Related Posts Widget for Blogs by LinkWithin

Sunday, May 16, 2010

Yeshimbra Injera: Chickpea Flour Injera

easy recipe chickpea injera yeshimbra dabbo

Yeshimbra Dabbo, a bread made with fermented chickpea flour, is the inspiration for this dish. Injeras are Ethiopian thin pancake-like fermented flat breads usually made from flours like t'ef, sorghum, barley, maybe even corn, wheat, or a combination. I like making injeras as it is a great alternative to my favorite Dosai that I grew up with.

The idea behind Dosai and injera seems similar to me - fermented flour, spread thin on a griddle or pan, cooked over medium heat till required done-ness, served with some wonderful sides, torn by hand and relished slowly.

I like to make injeras with buckwheat, rye, spelt flours sometimes. Chickpea flour is another great option for soft fluffy injeras and they are quite tasty.

It does need some planning ahead as the batter is not ready till well-fermented - and that could take up to 36 or 48 hours depending on the season, how warm the place is to allow good fermentation. Usually, if I start the batter tonight, it is fermented and ready for dinner the day after tomorrow.

Ingredients
2 cups chickpea flour
1 cup all-purpose flour
2 tsp rapid rise yeast
2 cups warm water (more if needed before cooking)

1 tsp baking soda and salt to taste, to be used just before cooking

Preparation
  1. Combine the flours, yeast, and water, stir well, cover loosely with a cheesecloth and allow to ferment in a warm place for 24 to 36 hours; stir once every 12 hours or so
  2. When it develops a slight pleasant sour smell and bubbles when stirred, it is ready to be made into injeras
  3. Heat a non-stick pan or griddle over medium heat, brush or spray with oil if preferred
  4. Stir in the salt and baking soda, add a little water if needed to make a thin batter like for crepes, which can be poured into the pan and spread around by simply picking up and tilting the pan
  5. Holes form on the surface as it cooks; I usually cook only on one side till the raw batter turns color as it cooks through; but, can flip and cook the other side if preferred

Roll up the injera one by one as they come off the pan and stack them for serving. Perhaps lay a few of them flat and overlapping on a large plate and scoop small mounds of sides on top. Serve warm with sides like mesir wat, y'abesha gomen, yekik alicha or bamya alicha, maybe even some Yeqey Sir Qiqqil, some Selatta...

Some of the sides can be prepared ahead of time, refrigerated, and warmed up before serving.


Labels: , , , , ,

Thursday, May 13, 2010

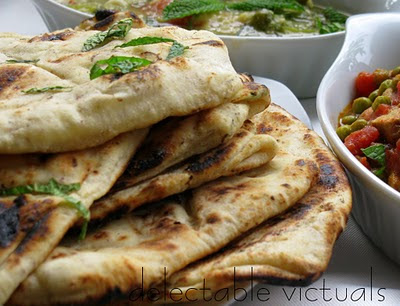
Simple Mint, Fennel and Garlic Naan

easy recipe Mint, Fennel and Garlic Naan indian

This Mint, Fennel and Garlic Naan recipe is similar to my stuffed naan recipe, but, rather than use the piroshky dough, this recipe has no eggs, and has a couple of ingredients that I have been incorporating into foods over the last few years - viz., flax meal and nutritional yeast.

Ground up flax seeds (flax meal) is better utilized by the body than whole flax seeds which might just pass through undigested at times. Nutritional yeast tastes good in many savory foods like mashed potatoes, macaroni and cheese, and even makes air-popped popcorn taste delicious. If buying these from bulk food stores, store in cool dry place and smell before using - flax meal can go rancid over time.

The fresh mint and fennel in the home garden was the inspiration for this dish - much like mint and fennel pesto.

home-garden herbs mint fennel

Any other herb or even grated vegetables can be added to the dough to make interesting naans. Some of my staples: sprinkle some white or black sesame seeds, or some kalonji (nigella sativa), maybe some chopped spring onions, or some methi (fenugreek) leaves if handy.

If making on a weekend, I start the dough around mid-morning and let it rise till ready to make at dinner time. The mild sour smell and beautifully fluffed up dough indicates it is ready to be cooked.

These naans freeze well - place sheets of wax paper between each one, store in a zipper sealed freezer bag. Thaw in fridge overnight and warm up in toaster oven or conventional oven, or even stove-top. (Microwaving the naans don't work well for me).

Serve with Radish Greens Dal (I used radish greens from the home-garden which had to harvested anyway) and Muttar Tofu Curry (pictured);

or with Paneer Kofta Curry and Kohlrabi Dal;

or with any South Indian Koottu or Korma

maybe even some cucumber,mint, tomato, onion raita.

My gas stove and roti-wirework , with cast iron skillet come in handy to simulate the earthy texture and flavor, but, even just a cast iron skillet approximates the clay-oven-like (tandoori) finish.

easy recipe Mint, Fennel and Garlic Naan indian

Ingredients
4 tsp rapid rise yeast
3½ cups unbleached all-purpose flour
¼ cup flax meal
4 Tbsp Nutritional yeast
½ cup 110°F water
1 Tbsp brown sugar
1¼ cup warm milk (more or less)
1-2 tsp salt (depending on how salty you prefer the naan)
4-6 cloves of garlic finely minced (more if you prefer)
½ cup freshly chopped mint and fennel leaves, combined

Preparation
  1. Making the dough: In a large bowl, add the rapid rise yeast, brown sugar and lukewarm water and allow to sit for 5 minutes till frothy
  2. Add the salt, flax meal, nutritional yeast, flour, chopped up herbs, garlic, plus a little milk at a time, and knead to a smooth elastic dough; place in an oiled bowl, cover, and allow to rise in a warm place until doubled in volume - I leave it by the heating vent or in a slightly warm oven (oven turned off, of course)
  3. When ready to cook, divide into 10 or 12 balls - bigger balls makes fewer but larger naans, as expected
  4. Roll each ball out, one at a time, to a quarter inch thick round; fold once to form semicircle, fold again to form a rough triangular shape; roll with rolling pin to about ¼-inch thick and keep covered till ready to cook
  5. Cooking the Naan: Heat a cast iron skillet to high heat; brush one side of the naan with water, place the damp side down on the hot skillet and leave it undisturbed for a minute or so till bubbles form on the top surface
  6. Remove from skillet, flip and transfer to the roti-wirework and place the uncooked side over open flame of gas stove till it is cooked through, but not charred;
  7. Alternately, flip and cook on the cast iron skillet till done

The complicated description above could be quite misleading - these naans are the easiest to make and quite wholesome :)

Labels: , , , , , ,

Tuesday, May 04, 2010

Spicy Cous-Cous Patties with Mint and Fennel Pesto

Spicy Cous-Cous Patties with Mint and Fennel Pesto


Cous-cous with Spicy Tagine is a favorite dinner for the adults in the house. Kids don't care for it much. There's usually some cous-cous leftover, nudging me to reconstitute them into something appetizing the next day.

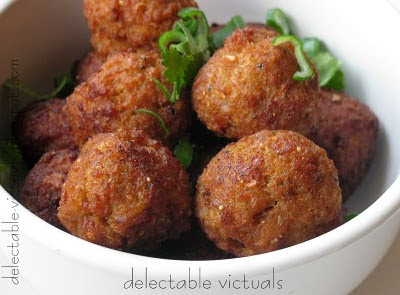
These cous-cous patties are a nice way to use up leftover cous-cous. Simply add finely diced onions, carrots, bell peppers, maybe some spices like paprika and cumin, perhaps even some chipotle chilles, bind with eggs or bread, form into patties and pan-fry.

Or, shape them into small balls, even flattened balls, and deep fry, like bonda or vada. The deep fried flattened cous-cous balls remind me of one of my favorite street foods in India, Masala Vada, which is usually made with a few different kinds of lentils.


Spicy Cous-Cous Patties with Mint and Fennel Pesto

If I were to indulge à la Owl in Tearwater Tea, I would say the heels, the end-slices, of sliced bread loaves, loathed and discarded cruelly all over, warrant a mention.

Anyway, rather than eggs for binding the cous-cous, I prefer slices of bread, especially the heels, adding a bit of stock or water as needed to be able to shape the patties or balls.

Now, chutneys and pestos flow freely in my kitchen. Chutneys were nothing to write about when I was growing up in India - there were several varieties - any combination of handy edible ingredients, ground together with thought to flavor and texture, becomes a fine condiment to accompany any meal.

In those days, my mom reserved her precious Moulinex Mixer exclusively for delicate handling. All the heavy-duty idlee/dosai batter and chutneys were made using the large mortar-pestle called Aattukkal - The Grinding Stone. Quickly smashed ginger, garlic, black pepper, cumin was done in Ammi kal - a lesser known but just as valued companion of Aattukkal. Ammi kal is very much like the Mano and Matate used in the Americas.

Pesto, to me, bears similarities with the Indian chutneys I grew up with. After all, Pesto is made by quickly grinding the ingredients together in a mortar and pestle. Some favorite nuts, olive oil, fresh herbs, dash of salt/pepper is all it takes to make fresh pesto that has enhanced many a simple dish in our house.

The mint and fennel pesto with sunflower seeds came about thanks to the lovely mint and fennel in the garden that have managed to survive my negligence.


Mint and Fennel Pesto with Toasted Sunflower Seeds
Ingredients
1 cup fresh mint leaves
¼ cup fresh fennel leaves
1 clove of garlic
¼ to 1/3rd cup toasted sunflower seeds
2-4 Tbsp olive oil
hint of water, if needed
salt and black pepper to taste

Simply blend the ingredients together to desired consistency, adjust salt to taste.

Labels: , , , , , , , , ,

Friday, April 30, 2010

Simple Blueberry Muffins

easy recipe blueberry muffins healthy low sugar low fat

Muffins are so commonplace these days that I don't think about them much. Some days, depending on my mood and ingredients, I whip up a quick batch for breakfast or for an afternoon snack. Each time, I vary the proportions and ingredients a bit, just to see how it turns out. Sometimes they turn out surprisingly yummy and at other times they get eaten anyway...

These simple blueberry muffins are a favorite with the kids. It is light, not too sugary, and quite tasty, especially when fresh from the oven. The quantity here makes about 12 standard size muffins.

Ingredients
2 cups all purpose flour
½ to 3/4 cup brown sugar
1 Tbsp baking powder
½ tsp each of cinnamon and vanilla (or more if preferred)
2 eggs
½ cup canola oil
½ cup thick plain non-fat yogurt (I like Nancy's™ for this)
½ cup fresh or frozen blueberries

Preparation
  1. Pre-heat oven to 400°F
  2. Combine the dry ingredients: sift the flour, baking powder, cinnamon and ½ cup brown sugar together in a bowl and make a well (reserve the rest of the brown sugar for topping)
  3. Stir in the wet ingredients: add in the eggs, oil, vanilla, and yogurt and stir with a wire whisk till just mixed, do not over-mix; fold in the blueberries
  4. Grease a muffin pan or use paper baking cases, drop the batter in - to about 2/3rds full - in each baking case/mold; sprinkle remaining brown sugar on top for a crispy sweet skin
  5. Bake in a 400°F oven for about 15-20 minutes, till a toothpick inserted in the center comes out clean
  6. Cool on a wire rack for a few minutes and enjoy warm

Labels: , , , ,

Wednesday, April 28, 2010

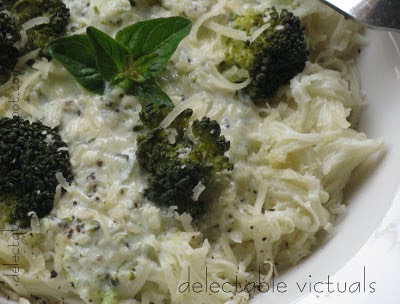
Home-made Pasta with vegetarian"meatball" sauce

homemade pasta vegetarian meatball sauce creamy broccoli sauce

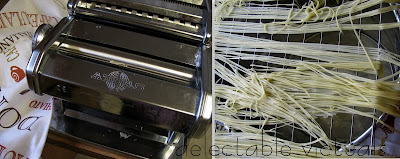
Dry packaged pasta of all shapes and varieties is fairly inexpensive and readily available and I use them a lot. However, ever since we received a simple pasta maker as a present last year, we have started making home-made pasta on and off. I admit, it is a labor of love, something I reserve for a lazy Sunday afternoon when we are winding down the weekend, preparing for another hectic week ahead.

Now that my daughter is a willing sous chef (at times), we've made this a sort of once a month weekend ritual - to make home-made pasta. I get the dough ready right after lunch and let it rest in the fridge. After tea/snack time, we make the fresh pasta, with my daughter turning the handle as I pass the sheet through the slot to get it thinner and thinner and then finally pass it through the fine angel-hair slot and allow the strands to dry for 10-15 minutes and cook it for a short 2-6 minutes (depending on the size/shape of the pasta) and enjoy it for dinner with a sauce or two.

homemade pasta vegetarian meatball sauce

Pasta dough is usually made with fine durum wheat, semolina flour. However spelt flour and a combination of all-purpose and semolina flours seem to work well. Pasta dough can be made with eggs or without. I prefer the dough without the eggs.

Home-made Pasta Dough, without eggs
½ cup fine durum semolina flour
3/4 cup all purpose flour
2 Tbsp Olive oil
1 tsp salt
3/4 to 1 cup water, as needed

Knead the dough well, adding a little water at a time to keep the dough dry but still comes together to roll into a ball. Knead some more till cut surface shows pores. Cover in a plastic wrap and leave in the fridge for an hour or so.

Then, follow the instructions for using the pasta-maker and shape the pasta as desired; allow to dry and cook briefly till al dente.


Broccoli Cream Sauce

vegetarian meatball sauce creamy broccoli sauce homemade pasta
Ingredients
2 cups broccoli florets, steamed
1 small boiled potato, if handy (optional)
½ cup cream or half-and-half
¼ cup grated Parmesan cheese
¼ cup grated Mozzarella cheese
¼ cup grated Colby Jack cheese
finely minced garlic
ground or dried oregano to taste
ground or dried sage to taste or any other favorite herbs
salt and ground black pepper to taste

Preparation
Heat the cream in a sauce pan with the garlic; mush part of the steamed broccoli and the potato if using, add it to the saucepan; when close to boil, stir in the cheeses, adjust spices to taste; off heat toss in the remaining steamed broccoli florets.


Vegetarian "Meatball" Sauce

vegetarian meatball sauce home-made pasta easy recipe
Ingredients
1½ to 2 cups TVP (Textured Vegetable Protein)
1 to 3 slices of favorite bread, as needed
1½ to 2 cups boiling water, as needed
¼ to ½ cup all purpose flour
1 Tbsp finely minced garlic
salt, paprika, chili powder to taste
oil for deep frying
1 can diced tomatoes, or favorite canned pasta sauce to be used as-is

Preparation
  1. Place the TVP in a heat-safe bowl, add hot water - first just enough to immerse it, and when it is all absorbed and TVP still feels dry and hard, add a bit more - just enough to soften the TVP without making it watery; cover and let it stand for a few minutes till TVP still holds shape but is no longer hard
  2. Heat the ready-made pasta sauce or the diced tomatoes in a sauce pan, on medium low, with the garlic and spices
  3. Squeeze out the water from TVP, knead in one bread slice and ¼ cup all purpose flour first; if the dough is still wet and hard to form into balls keep adding more bread slices and a little of the flour at a time till the dough is just right to shape into small balls for deep frying
  4. Deep fry in oil, drain and add to the boiling pasta sauce, allow to simmer together for a few minutes; turn off heat, garnish with fresh herbs if handy

Labels: , , ,

Friday, April 23, 2010

Rhubarb Strawberry Cobbler

easy recipe rhubarb strawberry cobbler

Arrival of the fresh leaves on the reddish stalks signals Spring for me. Being the first of the backyard perennial that I harvest for cooking, rhubarb has a special place in the backyard and in my heart. Not that I relish it raw... too tart for my sensitive teeth, but, it is nice to know that I can make the usual scones and cobblers and chutneys with them, or freeze them for making Rhubarb-Strawberry jam when the strawberries arrive in a couple of months.

Enjoy it warm as-is, or with a scoop of home-made frozen yogurt or ice cream.

easy recipe rhubarb strawberry cobbler


Ingredients
for the cobbler topping:
1 cup unbleached all purpose flour
¼ cup Smart Balance™ Omega Light Butter
¼ cup brown sugar
2- 4 Tbsp half-and-half or heavy cream, as needed
1 Tbsp baking powder

fruit mix:
2 cups chunky chopped rhubarb
2 cups quartered strawberries
¼ cup sugar or brown sugar or agave nectar
1 Tbsp flour

Preparation
  1. Pre-heat the oven to 350°F
  2. Fruit Bottom: Combine the fruit mix and keep handy
  3. Cobbler Topping: Sift the flour and baking powder together, add the brown sugar and mix well; rub the butter into the flour mixture till crumbly; add some cream, a little at a time and work it in till it comes together to form a soft dough
  4. Grease a bar cake or muffin mold pan; drop some fruit mix at the bottom; add a dollop of the cobbler topping dough; Alternately, use a round or rectangular cake pan instead, adjust cooking time according to the size of the pan
  5. Bake in the 350°F oven for about 20-25 minutes till the topping is done


Labels: , , ,

Monday, April 19, 2010

Easy Potatoes au Gratin

quick and easy potatoes au gratin

This classic French dish is certainly to be enjoyed in its traditional form, with delicious cheese sauce, baked for a good hour and a half. But, since I like to take short-cuts without sacrificing the taste (much), this has become a nice weeknight meal, especially on cold nights.

Basically, the short-cut I take is in making the sauce and the cooking time: I use canned creamy soup, grated cheese, and cook for about 35-45 minutes till done. As I make this with the kids in mind, I add some mixed vegetables and leave out the onions. So, while not quite authentic, this potatoes-and-cheese dish seems to be well-loved at home.

Ingredients
4-5 medium potatoes, peeled and sliced in rounds
1 can cream of celery or cream of potato soup
1 stick of celery diced finely (optional)
½ cup frozen mixed vegetables (optional)
1 clove of garlic, put through a garlic press, or grated finely
1 cup freshly grated Colby Jack cheese
½ cup water, as needed
salt and ground black pepper to taste
spring onion, chives for garnish (optional)

Preparation
  1. Pre-heat the oven to 400°F
  2. Grease a casserole/baking dish with vegetable spray and arrange the sliced potatoes in overlapping layers; toss in the frozen vegetables and celery, if using
  3. Sauce: Empty the can of soup into sauce pan, add about half a can of water to keep the soup fairly thick, and heat it, stirring well, till it boils; adjust flavors to taste
  4. Pour the hot thick soup over the potatoes in the baking dish, top with grated Colby Jack cheese, cover with aluminum foil and bake for about 30 minutes till bubbly and potatoes are done (if potatoes are not sliced thin enough, increase baking time accordingly)
  5. Uncover the foil and bake another 10 minutes or so till cheese is bubbly and slightly brown
  6. Garnish as desired and serve warm

Labels: , , , ,

Thursday, April 15, 2010

Vegetable Manchurian

indo-chine fusion cuisine vegetable manchurian vegetarian

Indian-Chinese food came into my life several years ago, in India, with the most popular Gobi Manchurian, which is Cauliflower fritters in a sweet-sour-hot-ish sauce.

While "Manchurian" seems misleading, the dish happens to combine the basic Chinese sweet-and-sour sauce with some Indian spices to present an incredibly delectable meal. The staple meats of Chinese cuisine like pork and beef are not as all-encompassing in India, so, vegetables seem like a great alternative, and the sauce works great with any kind of vegetable fritters.

And fusion cuisine being my signature, this dish is one of the quick-and-easy weeknight meals we relish. This not much different from the Gobi Manchurian or Chicken Manchurian recipe. I just happened to have a smallish bit of red/purple cabbage, a couple of potatoes and a zucchini that needed to be used up and wanted to do something creative with them in combination. That's how this dish came about. Any favorite combination of vegetables would work fine, I'm sure.

Grate the raw potatoes, finely shred the cabbage and zucchini, toss them with some flour and water to bind, deep fry and drain the fritters, then toss them in with the sauce. As always, I vary the sauce proportions to taste depending on my mood. Here, I used approximately the Gobi Manchurian sauce, but instead of condensed tomato soup/sauce and sweet chili sauce, I used organic tomato ketchup.

Ingredients
2 medium potatoes, finely grated
1 cup finely shredded red cabbage
1 medium zucchini, finely grated

Seasoned flour coating:

½ cup corn starch
½ cup rice flour
1 tsp salt
2 tsp cayenne pepper
1 tsp cumin powder
2 tsp coriander powder

canola oil or other preferred oil for frying

for the sauce:
1 Tbsp sesame oil or peanut oil
2 Tbsp ginger, finely grated
4-6 cloves of garlic, finely minced
4-6 green chilies, chopped finely
1 medium onion sliced thin
1 small red bell pepper, chopped
1 small green bell pepper, chopped
¼ cup light soy sauce
½ cup tomato ketchup
2-3 Tbsp plain white vinegar
2-3 Tbsp red chili powder (or cayenne pepper powder)
1 cup water

Garnish: spring onions, or chives, cilantro

Preparation
  1. Sauce: heat the oil in a saucepan, throw in the ginger and garlic, sauté a bit, then add the rest of the ingredients and allow to simmer on medium low heat; taste and adjust flavors; if preferred, add a handful of red cabbage to the sauce; use corn starch to thicken the sauce if needed
  2. Squeeze out extra water from the grated vegetables, add the seasoned flour coating plus water, a little at a time, to form a sort of powdery batter that can be formed into small balls about an inch or so in diameter, without falling apart
  3. Deep fry, drain on paper towel to remove excess oil
  4. Toss the fritters with the sauce, allow to simmer for about 5 minutes, and allow to sit and develop for 10 minutes or so before serving
  5. Garnish with fresh chives or spring onions, even cilantro, and serve warm with hot jasmine rice

Labels: , , , , ,

Saturday, April 03, 2010

Quick Vegetable Idlees

Quick Vegetable Idlees idli recipe south indian breakfast

Before the kids arrived, I used to dutifully soak and grind and have batter fermenting for either Idlee, Dosai, or Adai, pretty much back-to-back. Just a habit I picked up from my mom. The batter keeps well in the fridge and is handy for quick breakfast or snack.

But, over the last couple of years, I have started relying on quick alternatives that are still healthy, but may not have the traditional process and taste. And, one such short-cut is quick idlees made with urad dal flour, rice idlee rava with suitable rising agents.

Years ago, I didn't think twice about the endothermic reactions my mom taught me (being my Chemistry teacher) but now that I use it a lot to create the rise in idlees, I just smile quietly and thank my mom. The endothermic reaction of Baking Soda (Sodium Bicarbonate) with Citric acid* in water creates the required rise in the form of Carbon Dioxide that is released.

Grated carrots, beets, ginger, even corn kernels, cilantro, onions can be mixed in with the idlee batter to add a boost. Sometimes, I throw in a handful of quick cooking rolled oats to the batter (adjusting water to get the right consistency).

In winters, for the yeast rise (rather than citric acid+baking soda reaction), I allow the batter to ferment for an hour or so in warm place (usually by the heating vent).

The batter consistency determines the quality of idlees - too thick a batter results in hard, dense idlees while soupy batter results in mushy goop. The quantity of water given here has worked well for me, but, feel free to experiment.

If idlee steamer is not handy, can use muffin mold pan. Steaming apparatus can be a pressure cooker minus the weight, or a large pot of boiling water with lid.

Ingredients
¼ cup urad dal flour
¼ cup all purpose flour
½ cup rice idlee rava
½ tsp citric acid
½ tsp baking soda
1¼ cup water†
½ tsp salt (or less, if preferred)

Grated vegetables (optional)
† Add one cup first and then add the rest as needed after the 10-minute wait, to get the right consistency

Preparation
  1. Combine the ingredients, stir well and allow to sit for 10 minutes
  2. If preferred divide the batter it into two parts, or make two batches separately as above. Stir in grated carrots, beets, ginger into one batch and corn kernels, ginger, onions, cilantro for the other. Or use any favorite vegetables, or none at all
  3. Steam in the traditional idlee cooker for about 10 minutes or till done. The quantity given here makes about 8 standard size idlees(about2½ inch diameter)
  4. Serve with favorite chutneys. My favorites for idlees are spice tomato-chili chutney and milder coconut-cilantro chutney, besides the staple Idlee Molaga Podi ( a home-made spice powder), of course [recipe to come] :)

An alternate recipe, using yeast:
½ tsp rapid rise yeast
1¼ cup warm water
¼ tsp sugar
¼ cup urad dal flour
3/4 cup rice idlee rava
½ tsp salt

Bloom the yeast in sugar+water till frothy (about 5 minutes). Then mix in the rest of the ingredients and allow to sit in a warm place for 1 or 2 hours before steaming.

*Some people are sensitive to citric acid as-is, but not to the end product of the citric acid+baking soda+water reaction.

Labels: , , , ,

Friday, March 26, 2010

Beet & Carrot Salad with Agave Nectar & Ginger Vinaigrette

Beet and Carrot Salad with Spring Greens and Agave Nectar and Ginger Vinaigrette

Sometimes as a starter, sometimes as a snack, sometimes as a meal in itself. Sometimes layered and drizzled with freshly made vinaigrette, sometimes well-tossed with a rich creamy dressing... anywhichway we make it, we love salads.

This Beet and Carrot salad with Spring Greens is one of our favorites: the combination of freshly grated beets and carrots, plus the simple vinaigrette on the slightly sweet side enhancing the beet and carrot flavors seems to make this almost addictive.

Pictured here is this salad served with a small sandwich made of: home-made buckwheat buns (recipe to come) toasted with some Swiss cheese, black bean burger (made very much like the Mock Kibbeh recipe but with black beans instead of chickpeas), some pepperoncini, onions and sun-dried tomatoes.

Ingredients
Salad:
Organic Baby Spring Greens
Raw Carrots and Beets, finely grated or shredded
Onion or Alfalfa Sprouts
Toasted Sunflower Seeds

Agave Nectar, Ginger, Chili Vinaigrette:
50 ml raspberry or pomegranate red wine vinegar; or plain red wine vinegar
50 ml Agave nectar
25 ml Sambal Oelek or any favorite Chili paste
150 ml Hazelnut Oil or Olive oil
1 clove of garlic, finely grated or crushed
1 - 2 tsp of freshly grated ginger, to taste
¼ tsp each salt and black pepper to taste

Preparation
  1. Combine the dressing ingredients and whisk or beat well, adjust flavors to taste
  2. Layer the salad items, top with sunflower seeds, drizzle some dressing

Alternately, use Romaine hearts or any favorite greens, julienne the carrots and finely grate the beets, garnish with avacado if preferred, sprinkle slivered almonds instead of sunflower seeds... this is a flexible and versatile salad with the agave-nectar-ginger vinaigrette pulling the elements together :)

Beet and Carrot Salad with Spring Greens and Agave Nectar and Ginger Vinaigrette and Mock Kibbek sandwich

Labels: , , , , , ,

Tuesday, March 16, 2010

Orange Chicken

easy recipe orange chicken chinese


Just like my Kung Pao Chicken , this is a favorite with the rest of the family. And, very much like Kung Pao chicken recipe, this Orange Chicken starts out the same way, with only variation in the sauce ingredients to get the characteristic orange flavor.

Ingredients
2-3 boneless skinless chicken breasts, cut into chunks
4 Tbsp canola oil

coating: seasoned ¼ cup cornstarch + ¼ cup rice flour

marinade: soy sauce + red wine vinegar

Orange Chicken sauce:
2-3 medium shallots, finely diced
6-8 garlic cloves, finely diced
1 medium celery stalk, finely chopped
2 Tbsp freshly grated ginger (or 1 Tbsp dry ginger powder)
¼ cup light soy sauce
¼ cup kecap manis
¼ cup plain distilled vinegar
¼ cup sambal oelek (or, any favorite hot chili sauce)
1 tsp Orange essence
orange zest and juice of 1 large orange
a few drops of yellow food color
cornstarch as needed for thickening the sauce

garnish: Spring onions and cilantro

Preparation
  1. Marinate the chicken pieces in the marinade for about 15-20 minutes while assembling the other items
  2. Heat 1 Tbsp oil in a sauce pan and sauté the shallots, garlic, ginger, then add the rest of the sauce ingredients (except orange essence) to the saucepan and simmer gently over medium low heat; add the essence (and food coloring) at the end, adjusting to taste
  3. Heat 3 Tbsp oil in a pan, drain the chicken pieces, pat dry, and dredge with the seasoned coating, shake off excess, and add them to the hot oil in the pan; allow to form a seared coating at the bottom, then turn over and do the same; cook the chicken till done
  4. Add a bit of cornstarch dissolved in water to thicken the sauce if needed, or alternately, add a bit of water to make the sauce thinner to suit your tastes; Turn off the heat for the sauce
  5. Slowly add the sauce to the chicken, a little at a time, stirring gently to coat the chicken well, off heat
  6. Serve warm with hot jasmine rice


Labels: , ,

Carbon neutral blogging

As we drive around getting to places we need to be, doing the things that need to be done, and making the best of our time and energy, it does seem hard to look at the big picture at times... and, every once in a while, we do what we can so our children need not grow up in a world that gets progressively hostile, stifling their existence, making even the basic function tedious...

Towards that end, we make small positive changes in our lives today, hoping the Snowball effect or the Butterfly effect will take care of making it better for our children.

Well, rather than rambling about it, here is one step which seems easy to do, thanks to an initiative by kaufDA. In their own words:
Our goal is to contribute our part in reducing the carbon footprint by raising awareness of the severe environmental damage caused by carbon emissions. One of our activities is to raise awareness of the carbon emissions resulting from the use of the internet - specifically of blogs. A blog with 15,000 visits a month has a yearly carbon dioxide emissions of 8lb. To neutralise these emissions we have created "My blog is carbon neutral" buttons so bloggers can demonstrate that they care about the environment and the carbon footprint of their blogs. We present them a small but nontheless worthy solution to contribute to environmental issues. Our idea is to show possibilities to make a contribution to protect the environment.

To find out how you can participate please visit http://www.kaufda.de/umwelt/carbon-neutral/how-you-can-join

And how do we actually neutralize your blog's carbon footprint? We are planting trees in cooperation with the Arbor Day Foundation in Plumas National Forest in Northern California for our project to neutralize the carbon footprint of blogs. Thousands of wildfires burned down many national forests over the past ten years and 88.000 acres of Plumas' were destroyed by two fires in 2007. To help replanting we need the support of bloggers all over the world! For every participating blog we plant a tree. One blog - one tree.

Why do we do this? We are a German based company called kaufDA, which provides advertisement brochures of local stores online to help consumers search for specific products and find good deals in their neighborhood. This reduces the amount of brochures printed and so the project helps the environment by reducing unnecessary paper in mailboxes. An American on average receives 41 pounds of junk mail per year. This has the same carbon footprint as burning six gallons of gasoline.

We'd be glad to plant your tree! Help us and show that you care! Every tree counts!

Labels:

Friday, March 12, 2010

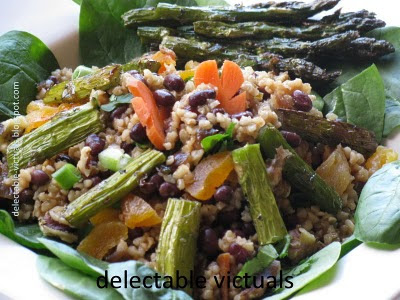
Adzuki Beans, Asparagus, and Bulgur Salad

Adzuki Beans, Asparagus, and Bulgur Salad easy recipe

High in iron, protein, soluble fiber, and folate, and low in fat, Adzuki beans is believed to benefit reproductive and kidney function, by speeding up removal of waste from the body and promoting regularity.

Ever since I "discovered" it in the local Asian market and read up on its health benefits, I have been incorporating it more in my cooking over the last year or so. I can't quite tell the difference between the basic Atzuki beans and the Hokkaido variety yet unless I read the label, but, considering that about half a cup per week is all that is prescribed for getting its benefits, it seems hard not to take advantage of its nutritional value.

There are many ways to present these beans, just like any other beans: As bean burgers, as bean soup, in salads and stews, in tacos, in rice, even as plain Adzuki bean soup. Or, just toss a handful into whatever meal I have planned for the night...

Since fusion cuisine is my personal slant, this Adzuki Beans, Asparagus, and Bulgur Salad, has a MediterrAsian feel with Bulgur from the Mediterranean and Adzuki beans and the dressing from Asian cuisine. Roasted asparagus is optional. I had some leftover from previous meal so it was nice to use it up. Serve at room temperature (or slightly chill, if preferred).

Leftover dressing can be saved for up to a week in a cool dark place and used for other salads and sauces, or even as a home-made spring roll dip.

Maybe one of these days I will get around to listing the frequently used spices and condiments in my cupboard, by cuisine. Just like I restock organic ketchup and stone ground mustard, I restock kecap manis and sambal oelek... and since basically "anything goes" in my kitchen, I seem to use them all up at almost the same rate.


Ingredients
2 cups loosely packed fresh baby spinach leaves
1 cup cooked Adzuki beans
1 lb of fresh asparagus, cut, and roasted
1½ cup cooked medium-ground bulgur
¼ cup chopped dry apricots
¼ cup coarsely broken toasted walnuts
spring onions and cilantro, chopped

Dressing/marinade:
¼ cup light soy sauce
2 Tbsp seasoned rice wine vinegar
1 Tbsp kecap manis
1 Tbsp sambal oelek
1 Tbsp sesame oil
1 Tbsp toasted sesame seeds
1 garlic clove, finely chopped

Preparation
  1. Combine the dressing ingredients, stir well, adjust to taste, keep handy
  2. Toss together bulgur and adzuki beans; add the dressing a little at a time to desired sogginess and set aside for 20-30 minutes to overnight (in fridge)
  3. When ready to serve, place a bed of spinach leaves, pile the salad, top with apricots and walnuts, and garnish with spring onions and cilantro


Labels: , , , , , , , , ,

Monday, March 08, 2010

Roasted Fingerling Potatoes

roasted fingerling potatoes ruby crescent

Fingerling potatoes are a heritage variety of potatoes that are usually small, oblong, about the size of a largish finger. And, when in season, they are aplenty and fairly inexpensive. Well, not inexpensive compared to sturdy old Idahos, but, reasonable enough , let's say :)

Fingerlings are not new potatoes which are just baby potatoes (like we dig up from our garden early winter), and are usually roundish. There are quite a few varieties of fingerling potatoes in the market and so far the ones I've tried have all been good - Ruby Crescent, French Fingerling, Russian Banana.

Some are best steamed, some are best roasted, usually cooked with the skin on. This is a simple recipe for roasted Ruby Crescent Fingerling potatoes (400°F oven, about 20 minutes), with herbs and light seasoning. Somehow, it seems like rosemary and potatoes are made for each other :)

Fresh rosemary from the garden, with a touch of olive oil and some salt makes this one of our favorite sides, and was especially good with Blood Orange, Beets and Black Plum salad.

Labels: , , , , ,

Saturday, March 06, 2010

Blood Orange, Beets and Black Plum Salad

Blood Orange, Beets and Black Plum Salad

Blood oranges, ruby grapefruits, tangelos, navel oranges, clementines, kumquats... it's been a citrus fiesta for the last couple of months in our house.

While the adults enjoy a fresh grapefruit as breakfast or as dessert, the kids don't seem to care for it, except in blended fruit smoothies.

The deep red flesh (thanks to anthocyanin) and the sweet mellow taste makes blood oranges a special treat. That, and the fact that other than this season it is unaffordable in my budget :) While grapefruit feels quite a bit harshly acidic, bothering my teeth, blood orange seems pretty mild in comparison. The Moro oranges grown in the U.S. are deep red, almost burgundy, and happens to be our favorite.

blood orange

As I was browsing for interesting ways to present blood orange, this Roasted Beet and Blood Orange Salad recipe caught my attention and inspired me to present my version of it for a weeknight dinner, along with some roasted fingerling potatoes.

Salads are very much a favorite first course or even a whole meal on some weeknights, especially in summer when we get fresh greens and tomatoes from our garden. Now, the dressing/vinaigrette is what makes the salad for me. I have been meaning to post a compilation of my favorite dressings here... maybe soon. Sometimes it is just a quick vinaigrette thrown together with no thought, at other times it is based on a special craving, a special flavor to bring out the salad's strength...

Anyway, the ginger-soy hot-and-sweet vinaigrette for this salad is one of our favorites. But, a light red wine vinaigrette or sherry vinaigrette would be good too.

Ingredients
1 blood orange
1 navel orange
1 small black plum
1 can whole beets
4-6 cups baby spinach

Hot-and-Sweet Ginger-Soy Vinaigrette:
2 Tbsp sambal oelek
2 Tbsp kecap manis
4 Tbsp cup blood orange juice, or plain orange juice
2 Tbsp sesame oil
1 Tbsp fresh grated ginger
1 Tbsp light soy sauce
¼ cup canola oil (more or less)
1 Tbsp toasted sesame seeds
Blend the ingredients together, adjusting flavors as desired.

Preparation
  1. Cut the canned whole beets into chunks and pan roast them with some canola oil and sambal oelek. Sambal oelek is optional, can use cayenne pepper instead; or leave it out. I like the way the heat of the sambal oelek complements the natural sweetness of the beets as they roast together
  2. Cut chunks of flesh from the oranges, toss together with baby spinach, plums, and pan-roasted beets, adding just enough vinaigrette to suit your taste


Labels: , , , , ,

Wednesday, March 03, 2010

Fresh Spring Rolls with Rutabaga, Turnip, Zucchini filling

easy recipe Fresh Spring Rolls with Rutabaga, Turnip, Zucchini filling

Thanks to a wide array of ready-made wrappers, making spring rolls seems like something my 4 year-old sous chef can handle easily these days. Wonderful as an afternoon snack washed down with green tea, or as an appetizer, spring rolls have become a staple at home, nothing to be excited about.

Some weekends, I just make a big batch in the morning, along with dipping sauces, and arrange it on the table like hors d'oeuvres to be munched on and off as we go about our business. On such days, typically, we end up not having any major meals as the spring rolls turn out very satisfying.

As I was sorting through my posts, I realized I haven't shared a recipe for fresh spring rolls, just a version of deep fried and pan-fried spring rolls.

As always, the filling changes each time depending on vegetables of the season, my mood, availability etc. This particular version is D's favorite, thanks to the rather unconventional filling.

Ingredients
For the filling:
1 rutabaga, grated
1 turnip, grated
2 medium carrots, grated
1 zucchini, grated
2 cups finely chopped cabbage
½ medium onion, sliced thin
3-4 cloves of garlic sliced thin
2 Tbsp grated ginger
2 Tbsp kecap manis
1 Tbsp sambal oelek
1 Tbsp coconut vinegar (or seasoned rice vinegar)
1 Tbsp sesame oil or canola oil
2 Tbsp toasted sesame seeds

Dry rice paper (Vietnamese), reconstituted/moistened with damp cloth, for wrappers

Preparation
  1. Filling: heat the oil in a pan, add the grated ginger and sliced garlic, sauté a bit and then add the onion, sauté some more; then add the rest of the veggies, seasonings, cover and cook till slightly soft but not mushy; finish off cooking without the lid; allow to cool
  2. Add the filling into each soft fresh spring roll wrapper, roll per package directions or like a burrito
  3. Serve with home-made peanut sauce and (canned) plum sauce


Labels: , , , , , , , ,

Monday, March 01, 2010

Welsh Cakes

easy recipe welsh cakes st.david's day

Dydd Gwyl Dewi hapus!

I didn't want St.David's Day, to go uncommemorated. So, I decided to make some Welsh cakes and some Leek-and-Potato soup to make D feel right at home. Sort of.

Not having visited Wales, I haven't really tasted the native specialty, but the Welsh Cakes recipe at BBC site is a fairly standard one as far as I gather.

However, having the chronic inability to follow a recipe to the letter, and an inherent resistance to using too much butter, I usually make a substitution or two so I can polish off a plateful fairly guilt-free:)

Now, on a medium-hot non-stick griddle it comes out nice and golden brown, but the hot cast iron griddle gives it that extra flavor plus the dark exterior. I like the cast iron griddle so, these cakes turn out moist and soft on the inside but a bit dark on the outside.

Without further ado, in honor of St.David's Day, here is a version of Welsh cakes. It tastes sort of like a cross between sweet fluffy pancake and buttery soft cookie.

Ingredients
1¼ cup flour (more or less)
1 tsp baking powder
½ cup Smart Balance Omega butter (light)
2/3 cup sugar (or less if using Castor sugar for dusting)
1 egg
¼ cup sultanas/raisins
round cookie-cutter or canning ring to cut shapes
optional: Castor sugar for dusting

Preparation
  1. Sift the flour and baking powder together; work it into the butter to form coarse breadcrumbs
  2. Add the sugar, eggs and raisins and knead to cookie-dough-like consistency
  3. Dust a work surface and roll it flat to about ¼ inch thick and cut out small rounds
  4. Cook in a hot cast iron griddle till golden brown on each side and cooked through
  5. Dust with Castor sugar if preferred

Labels: , , ,

Sunday, February 21, 2010

Twisty Twirly Pretzel Bagel Buns

easy recipe pretzel bagel sweet and salty

For want of an apt term, I let my 4 year-old sous chef suggest a name for these delicious baked goodies that started out as pretzels but took on its own identity :)

One Sunday morning, after the breakfast things were put away, we made the dough and let it rise, and then, after lunch, we set about preparing and baking these just in time for the afternoon snack. Of course, the shaping was the fun part for my 4 year-old, and me. The agave nectar and cinnamon sugar pretzels were almost as good as cinnamon buns. Almost :)

Ingredients
1½ tsp active dry yeast
1 tsp brown sugar
a pinch of salt
1½ cups 110°F water

4 cups unbleached all-purpose flour
1 Tbsp oil

1½ cup hot water
1 Tbsp baking soda

2 Tbsp Smart Balance Omega butter, melted

Optional Toppings: Agave nectar or honey or maple syrup, cinnamon sugar, coarse salt crystals, stone-ground brown mustard

Preparation
  1. Add the yeast and brown sugar to the 110°F water, allow to sit for about 5-8 minutes till frothy and active
  2. Add the pinch of salt, then, the flour a little at a time and knead to a smooth elastic dough
  3. Grease a bowl, coat the dough with oil, place in the bowl, cover and let it rise in a warm place until doubled in volume
  4. Punch down a bit, take little portions and roll them into ropes for shaping
  5. Heat some water in a pan, turn off heat and add the baking soda; keep handy
  6. Shape the ropes of dough as desired, dunk them one by one in the water+baking soda solution till it rises to the top, remove with slotted spoon and place on a baking tray
  7. Brush with agave nectar or salt crystals as desired and bake in a 500°F oven for about 8-12 minutes till brown on the outside and cooked through on the inside
  8. Remove from heat, brush with butter, serve warm with mustard, or sprinkled cinnamon sugar

Store in an airtight container in the fridge for up to a week, or freeze for later use.

easy recipe pretzel bagel sweet and salty

Labels: , , , , ,

Sunday, February 14, 2010

Lemon Banana Walnut Bar Cake

easy recipe lemon banana walnut cake

Appa's Birthday called for something special, but something simple and quick as well. These Lemon Banana Walnut Bar Cakes came about as we had all the ingredients handy and I had a 4 year old sous chef raring to go.

She has been exploring marbling, so, she wanted to add food colors and swirl them around to make colorful cakes. But, can leave out coloring in this recipe, if preferred.

Somehow her heart was set on making flower and heart molded chocolate decoration for the cakes. Since we don't make this often, I liked that she got me interested in taking the little extra effort... so, we melted some White Melts (not quite white chocolate, we buy it in bulk food store), added food color and poured into molds to set.

easy recipe lemon banana walnut cake


Ingredients
1/3 cup sugar
½ cup Smart Balance Omega™ Light butter
½ cup powdered walnuts
2 medium bananas, mushed
juice of 1 lemon - about 2 Tbsp
2 eggs
1 tsp baking soda
11/3 cup flour
Food color (optional)

Frosting: Neufchâtel cheese with some black currant jam, or strawberry jam beaten in till fluffy; or, leave out the jam for some plain topping.

Preparation
  1. Beat the sugar and butter till fluffy, then beat in the eggs, lemon juice, and mushed bananas;Stir in the powdered walnut
  2. Sift together baking soda and the flour and add it a little at a time to the wet mixture, stirring gently with a ladle till well incorporated
  3. Fill the batter into the bar cake mold; add a drop of food color in each and swirl it around gently with a fork or small whisk
  4. Bake in a 350°F oven for about 20-25 minutes, turning half way through if desired, until toothpick inserted comes out clean
  5. Frost as desired and top with the chocolate mold


easy recipe lemon banana walnut cake

Labels: , ,

Friday, February 05, 2010

Simple "Marbled" Cupcake

easy cupcake marbled

This simple cupcake came about to cheer up the little ones at home who were feeling under the weather... nothing fancy about it, except, my 4¾ year-old helped me make it - beating the eggs with a fork, measuring the flour and sugar, adding baking cases to the muffin pan, stirring and tasting the batter, and of course spreading the frosting.

We've been trying various kids art activities some of which involved simulating the marbling-effect or "colorful swirlies" as she calls it. And so when she added a few drops of purple food color, rather than blend it in uniformly, she decided to swirl it around a bit, just enough to leave streaks of purple in an otherwise plain cupcake batter. When scooped as-is and baked, it formed nice deep swirly patterns all around. Can use multiple colors and swirl them about to form interesting patterns in the batter before baking. (The quantity here made about 8 standard size muffins)

Ingredients
2 eggs
½ cup Smart Balance Omega 3™ butter
1/3 cup sugar
½ tsp baking powder
1 cup flour
food color

Frosting: Light Cream Cheese, (home-made) strawberry jam or plum jam - beaten together till fluffy
Sprinkles optional

Preparation
  1. Pre-heat oven to 350°F; Beat the eggs and keep handy
  2. Blend the sugar and butter together with an electric mixer till fluffy, about 2 minutes
  3. Add the beaten eggs and continue to beat another 30-40 seconds
  4. Sift the flour and baking powder together and slowly fold it into the wet ingredients mixture
  5. Add a few drops of food color and swirl it around with a ladle
  6. Scoop the batter into each of the baking cases in the muffin mold (or, simple spray the muffin mold with vegetable oil) to about 2/3rds full and bake in a 350°F oven for about 20-25 minutes, checking midway and turning the tray around if needed
  7. When cool enough, spread some frosting on top, add some sprinkles and enjoy! Or chill in the fridge for a summer time snack


Labels: , ,

Wednesday, January 27, 2010

Savory Baked Snack Bread


Dhokla is a favorite and so is Handvo. And this Savory Baked Snack Bread is inspired by these two delicious Indian snacks. Whereas Dhokla is smooth and fluffy, this dish has a coarse texture that I enjoy, and rather than steaming, this is baked in a loaf pan which gives it a crisp outer coating, much like Handvo.

Tempering is optional, but, I think it adds a good texture and flavor to the dish as well. Also, in addition to onion, other vegetables can be used - peas, carrots, red peppers, chopped finely.

Ingredients
¼ cup quick cooking grits
¼ cup quick cooking rolled oats
¼ cup chickpea flour (besan)
1 tsp sugar
1 tsp curry powder
1 tsp turmeric powder (optional)
½ tsp salt (more, if preferred)
½ tsp baking soda
½ tsp citric acid
¼ medium onion, chopped finely
tempering: 1 tsp oil, 1 tsp urad dal, 1 tsp chana dal, ½ tsp mustard seeds
2/3 to ¾ cup water (about 175 ml)
1 tsp oil for greasing the baking dish

Preparation
  1. Heat the oven to 350°F, grease a baking dish and keep handy
  2. Tempering: heat oil, add the chana dal, urad dal, allow to brown till golden, then add mustard seeds, allow them to pop, turn off heat, keep handy
  3. Combine the dry ingredients, plus onions and spices, mix well, then add the water a little at a time stirring gently without over-mixing
  4. Pour into the greased baking dish, bake in 350°F oven for about 15-20 minutes, checking to make sure it is cooked through in the center - toothpick inserted comes out clean
  5. Add tempering adn garnish, if using
  6. Cut into small squares or diamonds and serve warm with favorite chutneys

Labels: , , , ,

Tuesday, January 19, 2010

Rutabaga and Turnip Treat

easy recipe flavorful rutabaga turnip roasted winter vegetables

Winter Vegetables. The term didn't mean much to me when I was growing up as we barely had a proper winter season. But, Seasonal Vegetables, now, there was a term I was familiar with. Seasonal Vegetables & Fruits. One could tell the month by just looking at the produce in the local market in those days.

Nowadays, of course, we get every thing year round. It takes away the longing, the waiting, the savoring-till-next-year...

This Rutabaga & Turnip Treat is just a fancy term for a simple way of presenting a few of the wonderful vegetables like Turnips and Rutabagas, combined with some favorites like Carrots, Chinese Long Green Beans, cooked in a light broth and a few fresh herbs.

Hot off the oven, this makes a wholesome and delicious winter night meal. Leftovers? Just purée it and make a soup, adding other flavors/spices if desired.

For some reason, I only make this a couple of times each winter. Each time with slight variations in herbs and seasonings and maybe the combination of vegetables. Sometimes, I reduce the amount of broth and finish off under the broiler. The flavors in the combination of these vegetables is quite magical for me.

The rutabaga is a root vegetable that looks very much like a turnip with yellow-orange flesh and ridges at its neck. Although this beta carotene-rich vegetable has been grown and marketed in our country for nearly 200 years, it remains an uncommon food in American dining.

It's actually a great tasting vegetable with a delicate sweetness and flavor that hints of the light freshness of cabbage and turnip. With its easy preparation and versatility, great nutrition, and excellent flavor, the rutabaga can easily become an endearing family favorite.
--Vegetarians in Paradise
rutabaga turnip roasted winter vegetables
(Rutabaga is the larger one)


Ingredients
1 large rutabaga, cut into chunks
1 turnip, cut into chunks
15-20 Chinese Long Green Beans, cut into 2 or 3 inch sticks
3 or 4 carrots, cut into chunks
1 medium red onion, cut into chunks
2 or 3 sticks of celery, cut into chunks
1 14oz can of low sodium broth
optional herbs and spices: fresh rosemary, onion powder, garlic powder, red pepper flakes

Preparation
  1. Pre-heat the oven to 420°F
  2. In a shallow roasting pan, arrange the vegetables in a single layer
  3. Mix the herbs and spices with the broth and pour over the vegetable, and cover with aluminum foil
  4. Bake in the 420°F oven for about 30-35 minutes; remove the foil, stir a bit and bake uncovered for another 10-15 minutes till vegetables are cooked yet firm, not mushy


Labels: , , , , ,

Monday, January 18, 2010

Easy Spinach Casserole

easy spinach casserole recipe light


This is an easy, no-fuss mid-week dinner, hot and fresh from the oven, that can be enjoyed on its own, or served with some breads - maybe olive ciabatta or French bread, or even naan or roti.

Ingredients
1 pkg (about 14oz-16oz) frozen cut spinach, thawed and squeezed dry

1 can cream of celery soup, undiluted
1 Tbsp distilled white vinegar
1 Tbsp red pepper flakes
1 Tbsp garam masala paste

cooking oil spray
salt to taste

Optional: roasted red peppers, marinated onions and ginger

Preparation
  1. Preheat the oven to 375°F
  2. Combine the cream of celery, vinegar, red pepper flakes and garam masala paste, stir well, then add the spinach and mix well
  3. Spray an oven-proof casserole dish or a pan with some cooking spray, pour the mixture into it and bake in 375°F oven for about 25-30 minutes, till bubbly and spinach is cooked to your liking, checking to make sure the top doesn't get too dry


Labels: , , , , , , ,

Friday, January 15, 2010

Sautéed Mustard Greens


Juicy, flavorful, peppery and wholesome, these Sautéed Mustard Greens are a delicious side, or even a meal in itself.

If preferred, caramelize the onions first, set aside; cook the greens separately and top with the caramelized onions.

Ingredients
6 cups loosely packed mustard greens, chopped & cleaned
3-4 cloves of garlic, crushed
½ medium red onion, sliced into rings
1 Tbsp canola oil
flavoring:
¼ cup vegetable stock or water
1 Tbsp distilled white vinegar
1 Tbsp Seasoned Rice Vinegar
1 Tbsp crushed red pepper
salt to taste

Preparation
  1. Heat oil in a pan, add the garlic and layer the onions, sprinkle some salt
  2. Add the greens and the flavoring ingredients, cover and cook on medium low heat for about 15-20 minutes, checking to make sure there is enough liquid, until greens are cooked to your liking
  3. Serve warm with plain basmati rice, or roti or naan or even with a pan-cooked crispy chicken breast


Labels: , , , , ,

Wednesday, January 13, 2010

Amrit by Purnima Nandkishore

Amrit by Purnima Nandkishore

Eating healthy can be quite challenging in today's world where the ready-made food market is crowded with inexpensive junk. Which is one of the reasons I love to cook for my family. To make smart and healthy choices so that eating right becomes a way of life rather than a passing fad.

Amrit: Luscious & Heart-Healthy Indian Meals by Purnima Nandkishore is a well-researched, practical collection of recipes and information that empowers us to eat healthy.

When Purnima asked if I could review the book, I was quite excited, because her introduction immediately struck a chord in me:
"Amrit: Luscious & Heart-Healthy Indian Meals is a MediterrAsian cookbook. The book was published on November 15th, 2009. It is unique, because it is introducing people to fusion cooking with Indian flavors while helping them prevent or control chronic diseases like diabetes, cancer and as the name suggests, cardiovascular diseases. The recipes in this book have been analyzed by a registered dietitian who was on the team of two prominent studies (DASH and OmniHeart). The book's bibliography lists 240 references. Each reference (a book, a scientific paper, or a website) describes how the foods highlighted in the book are proven to improve heart health. The book has been welcomed by Cardiologists, Endocrinologists and Internists across the United States with great enthusiasm."

Fusion cuisine has been my specialization in the last two decades - actively experimenting with various cuisines, incorporating nutritionally valuable ingredients, knowing that flavor and appeal need not be sacrificed in the process of eating healthy. So, naturally, the recipes in Amrit appealed to me right away.

The book has over 50 recipes neatly categorized under Proteins, One-Dish Meals, Non-Indian Dishes, Vegetables, Starches, Condiments and Desserts.

The recipes use Indian flavors extensively and offer creative pairing of some authentic regional Indian staples from the South and North like Nimmakaya Annam (lemon rice) with Mughal Kofta as well as fusion cuisine like the Punjabi Polenta, Flaxseed Chutney, Cilantro Hummus.

Fusion cookbook Amrit by Purnima NandkishoreWhile the spiral-bound book itself is presented in charmingly simplistic ethnic Indian black-and-white design with no pictures of the foods, the companion website
Amrit For Heart: http://www.amritforheart.com/
provides all the pictures along with a feedback form allowing us to share our input on the recipes.

Each recipe lists the ingredients, steps for preparation, the method ( including a suggestion for presentation), and nutritional analysis, in clear detail. It helps to read the book, which is chock-full of information, cover-to-cover first, to get a feel for the recipes and the general methodology as well as to develop familiarity with the ingredients. Some of the recipes, as Purnima notes, are a labor of love and can take a couple of hours, but, good preparation and understanding of the method makes this an enjoyable experience.

I particularly liked the simple reminder about an ideal dinner plate: http://www.amritforheart.com/dinner_plate.html. We've read about this, we are aware of what's good for us, but, we sometimes fail to adapt our eating habits to conform with this recommended proportion of proteins, starch and fiber.

Amrit is a wonderful resource for people with specific dietary restrictions imposed by medical condition as it provides alternative ingredients and basic nutritional guidelines along with easy-to-prepare recipes. The Pantry section lists tools and equipment as well as essential ingredients used in the recipes. Where possible, brand names are used for products so it is easy to shop for. Many of the ingredients are already staples in my kitchen and are available at Trader Joe's or Whole Foods or New Seasons markets where I live. The Bibliography section is extensive and impressive. And each recipe has a Nutritional Analysis which makes it easy to plan out a balanced meal. I particularly liked the Glossary section with the Latin names and description.

I had to try a few recipes from Amrit right away! Kasha (buckwheat groats) with Kale and Chards & Oats Upmaav are perfect breakfast foods, or even a light yet wholesome dinner. The flavors are flexible and can be adjusted to taste (which I did). Instead of buckwheat groats, which I didn't have handy, I substituted Bulgur, adjusting cooking time as needed.

The very first recipe - Baked Salmon Badshahi Rawas - seemed like a wonderful dinner entrée and here is how it turned out in my kitchen, thanks to Amrit!

Amrit cookbook by Purnima Nandkishore

As Purnima notes, Amrit is put together especially to help people of South Asian origin prevent heart diseases and enjoy a delicious meal at the same time. She recommends using this book as a learning tool - a stepping stone into exploring and adapting a heart-healthy diet for life.


Labels: , , ,

Newer›  ‹Older