Related Posts Widget for Blogs by LinkWithin

Wednesday, October 25, 2017

Lahori Fish Fry


Lahori Fish Fry


In keeping with the fish theme here, this Lahori Fish Fry is a perfect snack food that can be made into a meal with some standard accompaniments.

Over summer our fresh-caught Alaskan Halibut was frozen for later use so as to savor the flavor and make the catch last longer.

Halibut and Salmon seem to be the only two fish that kids and the other adult seem to relish the most, cooked up in any which way that suits my mood.

Typically, Lahori fried fish is not served with any sauce, it is enjoyed as a fried snack food along with chutney. The seasoning and batter mix makes all the difference, bringing this dish alive, requiring no further enhancements.

However, I decided to make a simple sauce and serve with rice for dinner one evening.

Rather than make a batter, I decided to keep the seasoning and flour mixture dry and coat the fish with it and fry the pieces in batches, much like Indian pakoras.

Ingredients:
2 cups cubed halibut pieces
vegetable oil for frying

Lahori Fish Seasoning Mix:
1 cup chickepea flour
¼ cup rice flour
½ tsp crushed carom seeds (ajwain)
1 tsp crushed coriander seeds
1 tsp crushed caraway seeds
1 tsp onion powder
1 tsp garlic powder
1 tsp ginger powder
1 tsp black pepper powder
½ tsp turmeric powder
¼ tsp powdered clove
1 Tbsp brown sugar
1 tsp salt (adjust to taste)

For the sauce:
1 Tbsp tomato paste
2 tsp grated ginger
2 tsp minced garlic
1 tsp chaat masala
4 Tbsp distilled white vinegar
2 Tbsp sambal oelek
2 Tbsp Bragg liquid aminos
1 cup water
cornstarch as needed to thicken

Preparation

  1. Make the chaat masala and keep it handy; can prepare ahead and store it in an airtight container
  2. Combine the Lahori fish fry seasoning ingredients to form a smooth dry mixture
  3. Coat the halibut pieces with some cooking spray and add the Lahori fish fry mix a little at a time, stirring well, until all the fish pieces are coated well
  4. Fry in batches and drain in a paper towel
  5. Make the sauce and toss in some of the fried fish in the sauce, serve with rice; reserve the rest of the fried fish minus the sauce to enjoy as-is

Labels: , , , ,

Sunday, September 27, 2015

Purple Yam Ube Kachori and Mushroom Poblano Pepper Savory Kachori


Purple Yam Ube Kachori

Kachoris are stuffed fried breads from India, usually with savory filling, served with chutneys. Mung beans, chick peas, peas and carrots, potatoes are some of the popular stuffing. They are perfect tea time snacks and are good travel bread, much like parathas and rotis.

I had some ube purple yams and wanted to try Ube Kachori. But, rather than make it savory, went with the natural sweetness of the yams enhanced by flavorful coconut flour.

Purple Yam Ube Kachori


A sack of coconut flour has been lending itself well to some of the recipes and am liking the results so far.

For the savory kachori, a mash-up of mushrooms, Poblano and Anaheim peppers came in handy.

I prefer the dough to be seasoned a bit with salt and spices, or brown sugar for the sweet kachoris, but, that's optional.

Purple Yam Ube Kachori


The trick is to fry at medium-low heat, and usually I find that I am not the best person to deep fry anything. However, these turned out all right.


Ingredients:
2 cups all purpose flour
1/2 cup plain yogurt
2/3 cup warm water (plus or minus a few Tablespoons)
1 Tablespoon white sesame seeds
1 Tablespoon red chili powder (optional)
Salt to taste
oil for deep frying

Filling:
Sweetish:
1 teaspoon coconut oil 
1/8 cup coconut flour
1/4 cup steamed and mashed purple

Savory:
2 button mushrooms
1 Anaheim or Poblano pepper
1/4 shallot
1/2 inch piece ginger
1/8 cup coconut flour
1 teaspoon coconut oil

Preparation

  1. Dough: Combine the dry ingredients in a bowl, add the liquid a little at a time till a soft elastic dough forms; cover it and set it aside while getting the filling ready
  2. Sweet Filling: Steam the ube purple yams, mash them, add coconut flour and coconut oil to be able to shape them into smallish balls about 1.5 inches diameter
  3. Savory Filling: Finely mince the ingredients (except coconut flour and oil) and sautee it in coconut oil till rawness goes away; off heat stir in coconut flour and shape into 1.5 inch balls
  4. Heat the oil at medium low to about 350 ° F
  5. Divide the dough to make enough 2.5 inch diameter balls; flatten each ball in the palm while pressing the center to form a cup or a bowl shape; place a filling-ball and gather up the dough into a ball again with the filling enclosed; flatten this loaded dough ball with the side of the palm
  6. Deep fry in oil till golden brown all over, on both sides
  7. Serve warm with chutneys and dips


Labels: , , , , ,

Thursday, August 27, 2015

Okra Rellenos: Fried Cheese-stuffed Okra in Coconut Flour Batter

Okra Rellenos: Fried Cheese-stuffed Okra in Coconut Flour Batter


Chili Rellenos comes a close second to Mirchi Bajji (Milagai Bajji or Molaga Bajji, colloquially), when done right. Okra Rellenos is just one step away from this, especially since Stuffed Baked Okra comes close, without the frying.

I am not an expert at frying foods. I invariably mess with the batter and ruin it, or not have patience to check the oil temperature and therefore either burn the outsides or get them soggy with oil. I think it is a subconscious defense mechanism: If I don't do it right, then I won't be eating a lot of fried foods, and that must be just fine.

Anyway, I do like to try out different batters, just for the fun of it. I like the tried and tested ones, no doubt. Since I had a big sack of coconut flour and chickpea flour, I wanted to see if the batter made with these two would turn out all right.


Okra Rellenos: Fried Cheese-stuffed Okra in Coconut Flour Batter


Stuffing is easy this time - just some cheddar and mozzarella sticks plus finely minced pickled jalapeno.

Ingredients
for the batter:
¼ cup coconut flour
¼ chickpea flour
2 Tablespoon fine cornmeal (optional - I like the gritty crunch it adds)
2 Tablespoon all purpose flour
½ teaspoon baking soda
¼ cup buttermilk
1¼ cup water (plus or minus a few Tablespoons)
salt and chili powder or smoke paprika powder for seasoning the batter

okra and filling - cheese, jalapeno

Oil for deep frying

Preparation

  1. Combine the dry batter ingredients in a bowl, add the buttermilk, then slowly add the water; try not to overstir; coconut flour absorbs water quickly so alternate adding water and stirring to get the batter to a pancake batter like thick yet flowing consistency
  2. Slit and stuff the okra and keep it ready
  3. Heat the oil for frying to medium
  4. Dip the stuffed okra in batter and deep fry in batches
  5. Serve warm with chutneys and dips


Labels: , , , , ,

Wednesday, May 06, 2015

Fig and Dark Cocoa Chicken Taquitos or Flautas

Fig and Dark Cocoa Chicken Taquitos or Flautas


There was enough Chicken in Dark Cocoa and Fig Sauce leftover that I was going to put it in a wrap or serve it like fajitas when I noticed a stack of corn tortillas and some wheat rotis waiting to be used up. Since I don't fry foods every day, I decided to indulge by making these deep fried taquitos from corn tortillas.

Simply add the filling to the tortilla, roll it up and pin it with a toothpick, and with tongs, carefully immerse in hot oil to deep fry. Alternately bake in a 425 °F oven and then place under the broiler briefly to crisp it.

Serve with home made tomatillo salsa verde.

Labels: , , , ,

Sunday, December 23, 2012

Mini Pepper Poppers


Bajji, Pakoda, Ulunthu (Urad dal) Vadai, Masaal Vadai, Samosa... deep fried snacks were quite an indulgence around monsoon season when I was young. Of course, they were made for festivals and guests, and just because as well. Bajjis were my favorites - batter-dipped and fried eggplant, large green chilies, carrots, onions.

The weather being cold and soggy, and it being winter break for the kids, we felt like having some home-made deep-friend snacks.

Mini Peppers are so cute and colorful and have become my favorite indulgence of late, along with Baby Bella aka Cremini mushrooms.


Rather than the usual Baajjis, we had some Jalapeño and Mini Pepper Poppers, with some Habañero (seeded) thrown in the filling for the adults. Not an unusual recipe, but, quite satisfying nonetheless... Save any leftover filling in the fridge and use as sandwich spread

Ingredients
12 Jalapeño, Mini Colorful Peppers,
½  Habañero pepper, seeded and finely minced (optional)
8 oz Cream cheese or Neufchâtel cheese
grated cheddar and mozarella as much as needed for the filling
garlic, herbs, finely minced
1 Tbsp finely minced drained, squeezed pineapple bits (optional)

some milk, flour for coating
about 20 oz. breadcrumbs or as much as needed for coating

oil for deep frying

Preparation
  1. Filling: Mix the Neufchatel cheese, freshly grated cheddar and mozarella, some minced seeded habañero, finely chopped pineapple, minced garlic and set aside
  2. Cut the peppers in half lengthwise, seed them, and scoop some filling in and keep handy
  3. Have a bowl of milk, a plate of flour, a dish of breadcrumbs ready
  4. Heat the oil to about 375°F
  5. Dip the filled half peppers in milk, then in flour, allow to dry; then dip in milk and then in breadcrumbs and allow to dry; then once more in milk then in breadcrumbs and deep fry
  6. Drain in a paper towel and serve with favorite dipping sauce

Labels: , , , , ,

Thursday, July 26, 2012

Leeks and Red Cabbage Kofta in Red Pepper, Beets, Chipotle Sauce

indian vegetarian chipotle red bell pepper beets sauce


The title says it all. This is another kofta recipe, this time, in keeping with my signature fusion cuisine, the sauce is made with Chipotle in Adobo Sauce, Roasted Red Bell Peppers and Beets, along with a few staples for Indian curries. I love the rich, deep red color that these ingredients lend to the sauce, not to mention the unique taste and the antioxidants.

The koftas were made a bit differently this time, from my other kofta recipes. No special reason for making it this way, other than to experiment and bring together ingredients from other cuisines and how they work together. If deep-frying is not an option, then, the koftas can be baked in a 450°F oven (I use the smaller toaster oven for this) till done.

Of course, I don't always include every detail, but, when using leeks, it is preferable to wash it a few times and make sure all the grit in between the layers are gone. Also, I don't measure exactly - I keep adding a little of this and a little of that till it feels right, so, for the koftas below, the measurements are approximate at best.

indian vegetarian kofta curry


Ingredients
For the Kofta:
1 cup finely chopped red cabbage
¼ cup finely chopped leeks
2 Tbsp chickpea flour
2 Tbsp rice flour
2 Tbsp dry fine-grain cous-cous
1 Tbsp nutritional yeast (optional)
1 tsp salt
water as needed

oil for deep frying

For the Beets, Roasted Red Bell Pepper, Chipotle sauce:
2 Tbsp Chipotle in Adobo sauce
about 12 oz of roasted red bell peppers
¼ cup of diced or grated beets
1 cup tomato sauce
1 Tbsp grated ginger
1 Tbsp minced garlic
1 tsp cumin powder
1 tsp coriander powder
1 Tbsp Garam Masala powder
1 Tbsp brown sugar (more or less)
salt to taste
water as needed
1 cup plain non-fat yogurt, beaten to be smooth

Preparation

  1. Combine the dry ingredients for kofta, adding a little water at a time to form a thick dough that can be shaped into balls; set aside for 5 to 10 minutes while getting the sauce ingredients ready; meanwhile, heat some oil in a pan for deep frying
  2. Combine all the ingredients for the sauce, except yogurt and water, and blend into a smooth paste
  3. Heat a tablespoon of oil in a pan, add the sauce paste, saute a bit, then add about a cup of water, turn heat to medium low and allow to simmer for a while
  4. While sauce is simmering, fry the shaped kofta balls a few at a time over medium heat so as not to brown the outsides too fast with the insides still uncooked; I usually test the oil temperature by frying one kofta first as I don't really measure the oil temperature, and figure out how long it takes for it to be cooked through
  5. When the sauce has thickened and reduced a bit, taste and adjust flavors, turn off heat, allow to cool for about 5 minutes before adding the beaten yogurt
  6. Add the beaten yogurt, toss in the koftas and let them sit and absorb the flavors of the sauce for another 5 to 10 minutes; the longer the koftas soak the softer and tastier they get, but too long and they will fall apart easily
  7. Garnish with cilantro, spring onions, and a sprinkling of dry dill weed
  8. Serve warm with brown basmati rice or naan or rotis


Labels: , , , ,

Thursday, September 15, 2011

Home-garden Zucchini Three Ways

Zucchini Tempura Zucchini 65 Breaded Zucchini


After the round of Zucchini breads and soups and curries and grated fritters/hash and what-not, we had one last home-garden Zucchini left from this season's harvest.

Not quite the fan of fried foods (and not because I don't like the taste or anything), I was trying to resist the urge to make a snack feast much like the pakora/bajji my mom used to make on rainy days... it seemed like a perfect overcast day with a hint of Autumn in the air.

Rather than deep frying, I went with shallow frying. And that's how these hot delicacies came into being in my kitchen and disappeared in a short time. I used just one half the large foot-long 4½ inches diameter home-garden zucchini for this and it was plenty.

Zucchini Tempura Zucchini 65 Breaded Zucchini

Technically, they are not cooked up in three different ways, but, three different batters make for an interesting spread. Kids liked the Shredded Wheat one the best as it was the crunchiest for them.

Simply cut into preferred shape about 2 or 3 millimeters thick, dust with flour, keep handy. Prepare the batters and keep handy as well. Shallow fry in batches. Serve with favorite dip/sauce or chutneys. I went with a quick and easy favorite: Combine equal parts of ketchup and Sambal Oelek for a Hot+Sweet Chili Sauce. Kids preferred just the ketchup, of course.

The quick picture I took doesn't justify the taste and the satisfaction it gave us that day.

Zucchini 65: Very much like the Hong Kong Bitter Melon 65 recipe, the rich red light batter seemed like a good first way. So, I shallow fried a batch using much the same batter as before.

Zucchini Tempura: Much like my usual vegetable tempura batter, this is light and crispy and best enjoyed right away. Any standard recipe for tempura batter is fine - prepare the batter just before frying and use it up quickly.

Shredded Wheat Breaded Zucchini: Shredded wheat cereal has lent itself to a few other dishes as a breading ingredient, much like in breaded chicken recipe shared here. I use the unfrosted, plain old shredded wheat, of course. Combine it with some stale old cheese crackers to form a crunchy coating for any breaded-and-fried dish.

What should I do with the last half of the home-garden zucchini? I've been asking myself as I eye the half dozen on more butternut squashes that are ready to be picked in the garden which is getting ready to close down for this year.

Labels: , , , , , ,

Tuesday, August 09, 2011

Hong Kong Bitter Melon Gourd 65


Studies over the years record the anti-diabetic and other wonderful properties of bitter gourd/bitter melon (Momordica charantia) and yet it remains one of the not-so-easily-incorporated foods in daily diet. Possibly its strong bitter taste and lack of versatility are the reasons, along with not-easily-available.

So far I've primarily cooked with two varieties of bitter gourd/bitter melon - the dark skinned, pronouncedly ridged, smaller Indian variety, and the larger, lighter green, smoother-skinned Chinese Fu Gwa. They each have their distinct taste and lend themselves to many dishes that I have shared here.

This time, a third variety - Hong Kong Bitter Melon - was available at the nearby Asian market, inspiring me to cook it in a not-before-cooked way - at least not-before-cooked in my kitchen.


Hong Kong Bitter Melon has beautiful light green skin, smooth with gentle ridges, thick flesh and very mild bitter flavor. Which makes it more versatile in my book.

Inspired by the Cauliflower 65 recipe shared a while back, this Hong Kong Bitter Melon 65 recipe turned out to be a delicious new way to enjoy the benefits of this fruit.


The general theory is that 'Anything tastes good when battered and deep-fried'. And, while I am not much for deep-fried foods, the light non-greasy batter-coated fried Hong Kong Bitter Melon 65 turned out to be quite a snack treat one weekend afternoon. Especially when served with the sweet-and-sour Tamarind Sauce.

Ingredients
2 Hong Kong Bitter Melon
1 tsp red chili powder
a few drops of red food color (optional)
1 Tbsp ginger-garlic paste
2 cups rice flour
salt to taste

Canola or vegetable oil for deep frying

For the Tamarind Sauce:
1 tsp Tamicon™ tamarind paste
2 Tbsp brown sugar
salt to taste
optional: finely diced home-garden pearl onions and onion sprouts, home-garden green chilies
5 cups of water

Preparation
  1. Tamarind Sauce: Combine the sauce ingredients and bring to a boil, lower heat to medium high and continue to simmer till sauce reduces to about 1 cup; it takes quite a long time to get the most delicious flavor and texture for it so I prefer to start cooking the sauce first; taste and adjust flavors for the sweet-sour balance
  2. Hong Kong Bitter Melon: Remove the spongy insides of the bitter melon, slice into rings, salt it an allow to sweat; then drain, pat dry and dust lightly with some rice flour and set aside
  3. Heat the oil in a pan for deep frying
  4. Batter: Combine the ginger-garlic paste, rice four, salt, chilli powder, food color if using, and any other preferred spices, add a little water at a time to make a smooth batter
  5. Dunk the bitter melon rings in the batter and deep fry
  6. Serve hot off the frying pan with the richly flavored Tamarind Sauce

Labels: , , , , ,

Wednesday, July 20, 2011

Cauliflower 65


Chicken 65 is a popular spicy deep-fried chicken dish that originated in Andhra region of South India some decades ago. This Cauliflower 65 is a vegetarian take on the Chicken 65 recipe, usually served dry with lemon, and some sauce on the side.

The bright red color characteristic of this dish usually comes from red hot chilli powder. Here, keeping the kids (and me) in mind, a few drops of red food color give the dramatic effect without the heat. The sauce is a quick sweet-and-sour sauce with tamarind and brown sugar, flavored with finely diced onions and garlic, and garnished with cilantro.

I like to blanche the cauliflower so it is still crunchy but par-cooked. The batter is a simple mix of corn starch, rice flour and all-purpose flour much like my Vegetable Tempura batter.

Serve with rice or home-made naan.

Ingredients
1 large head of cauliflower, cut into florets
1 tsp ginger-garlic paste
½ cup all purpose flour
½ cup fine rice flour
¼ cup cornstarch (separately to dredge the cauliflower)
½ tsp salt
1 tsp paprika
1 tsp cayenne pepper powder
4 drops of red food color (adjust to desired redness)
1 Tbsp lemon juice
½ tsp baking soda
1 tsp soy sauce
½ cup water (more or less)

oil for deep frying
lime, green chillies, curry leaves and cilantro for garnish

Preparation
  1. Blanch the cauliflower florets, drain and set aside
  2. Combine the rest of the batter ingredients, adding a little water at a time as needed, and beat to a fine consistency that is not too runny, not too thick
  3. Meanwhile, heat oil in for deep frying
  4. Dip the blanched cauliflower florets in the batter and deep fry in batches, drain, keep warm


  1. Sauce: For optional sauce to serve on the side, sauté some finely diced shallots or onions, and add ½ tsp tamarind paste, 2 cups water, 1 Tbsp brown sugar and simmer till the sauce reduces and thickens to desired consistency; then add salt to taste. I prefer the sauce not to watery, but not so thick like a pudding either :)

Labels: , , , ,

Tuesday, December 07, 2010

Sweet Potato and Red Cabbage Croquettes

Sweet Potato and Red Cabbage Croquettes

Some dishes just come into existence out of the need to use up small bits of remaining vegetables. Half a sweet potato and a small wedge of red cabbage came together for these surprisingly interesting croquettes. Some were deep-fried unbreaded, and some were breaded and pan-fried.

The croquettes, along with pan-fried polenta cakes and lightly steamed broccoli, made quite a filling dinner.

Ingredients
½ large sweet potato
½ to ¾ cup finely chopped red cabbage
2 to 3 high fiber whole wheat bread slices
1 tsp Cajun seasoning salt (more to taste)
½ tsp cumin powder (optional)
½ tsp coriander powder (optional)

Canola or vegetable oil for frying

Preparation
  1. Microwave/Steam the sweet potato till soft, drain and pat dry; mash it along with the rest of the ingredients, adding enough bread to be able to shape the dough; shape into small logs
  2. Heat a tablespoon of oil in a grill-pan over medium-high heat, place the shaped logs, allow to brown, turn around and brown all sides; if breadcrumbs are handy, bread the logs before shallow pan-frying
  3. Alternately, deep fry

Labels: , , , , , ,

Sunday, June 20, 2010

Spinach & Napa Cabbage Eggless Croquettes

Spinach Napa Cabbage vegetable no-egg Croquettes

Vegetable croquettes with dipping sauce or chutney can be a wonderful appetizer or snack. Typically, potatoes and carrots are mashed with some spices and binding agent (usually eggs), possibly breadcrumbs for crisp crunchy skin, and deep fried.

This recipe uses home-garden veggies: spinach, spring onions, and radish; plus some Napa cabbage and carrots; no eggs, just heels of bread loaves, rice flour, and water for binding.

home garden vegetables radish spinach onions vegetable croqueetes

As I often mention, à la Owl in Tearwater Tea, the heels - the end-slices of sliced bread loaves - loathed and discarded cruelly by one and all, have a sad fate indeed. Which is precisely why I like to use them for binding, even for making breadcrumbs and croutons.

For a quick Father's Day snack, I served these vegetable croquettes with fresh home-garden mint chutney.

Ingredients
1 cup finely chopped Napa cabbage
½ cup finely grated carrots
1 cup chopped fresh spinach leaves
optional: finely grated radish and chopped radish greens
2 or 3 end slices of bread loaf
¼ cup rice flour (more or less)
1 Tbsp smoked ground paprika
1 Tbsp ground black pepper
1 Tbsp coriander powder (optional)
salt to taste
water as needed (a Tbsp at a time)

Canola oil for deep frying

Preparation
  1. Combine the ingredients and knead to a soft dough that can be shaped into small logs
  2. Deep fry in oil till golden brown and cooked through on the inside


Mint Chutney

2 cups fresh mint leaves
¼ cup pickled jalapeno rings (less if preferred), with a bit of the vinegar it is pickled in

Combine the ingredients and blend till smooth, adding a little water if needed. Serve fresh.

Labels: , , , , , , ,

Wednesday, June 02, 2010

Muthusaram, Karasev: Savory Indian Snacks

naazhi Muthusaram, karasev, Kaaraasev: Savory Indian Snacks

Among the many home-made snacks my mom had handy when we were little, the top favorites of mine were Muthusaram and Ribbon Pakkoda.

Usually, most of these were traditional snacks made during special festivals, but, during summer vacations, when families gathered and kids were home and hungry all the time, my mom had huge metal containers filled with a variety of sweets and savories... feels like a dream, like another lifetime, just thinking about it now.

Typically, rice flour, chickpea flour, urad flour, salt, chili powder, water is all that is used to make these deep-fried savory snacks. Each family has its own slight variations to the standard recipe handed down through generations. My recipe here is based on my mom's, although I tinker with the proportions sometimes.

Muthusaram, also known as Mullu Murukku (thorny murukku), when done just right, sort of melts in the mouth and is hard to stop eating. At least for me :) I make it with just plain rice flour and a bit of urad flour, with a bit of cumin seeds for flavor and health benefits.

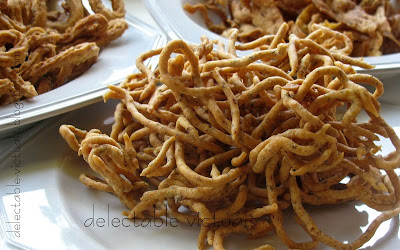
Kaaraasev is made with chickpea flour and a bit of rice flour. I like to add a bit of garlic and curry leaves for flavor and their health benefits.

Another mild sweet+savory kind of crunchy snack my mom used to make, called Maida Biscuit, is typically small diamond or square shaped biscuit, mildly sweet with a hint of salt, another year-round favorite. It is usually made with maida flour. I use my regular wholewheat flour, and this can be baked just fine, no need to deep fry.

These days, just about every snack, even crackers, seem to list HFCS as one of the first few ingredients and the so-called healthier ones in the market are not quite within my limited budget. So, when possible, I make a goodish batch of home-made snacks and store them for the kids, whose high point of the day seems to be snack time!

Of course, it is deep fried in oil, and baking it doesn't work out as well, but, as long as the oil temperature is right, it is not greasy; and compared to the hydrogenated oils used in store-bought crackers and snack items, zero trans fat Canola Oil seems a safer bet.

I don't really check the temperature with an oil thermometer when I cook - just learnt from my mom to drop a small pea-sized dough into the oil and see if it rises to the top in 5 seconds or so. If the oil is too hot, the outsides burn before insides are cooked, naturally; and if it is not hot enough, the end product is terribly greasy. Trial and error works best. Nothing like experience to figure it out, as my mom says :)

naazhi Muthusaram, Kaaraasev: Savory Indian Snacks

Of course, a Naazhi (dough press of sorts) would be essential to make these the right way as it has star-shaped holes that make the thorny texture of the Muthusaram. But, a ketchup or mustard dispenser would work just as well, only the Muthusaram will be more like Thenkuzhal with smooth outside.

As usual, my recipes are not always authentic or traditional, just something I've tried and liked. Here I add Flax Meal to the flours, plus some Nutritional Yeast (not the leavening active dry yeast). Incorporating flax meal wherever I can has become a habit, born out of necessity, thanks to kids' irregularity.

Since they are deep fried in oil, storing in air-tight containers in a cool dark place is good. After a week or 10 days, the oil could start giving off a rancid smell, and I've found that leaving the air-tight container in the fridge delays this rancidity.

Proportions of the flours are all that matter, so we can make a small batch starting with a quarter cup of urad flour and adding a cup and a half of rice flour to make the Muthusaram. So, am just listing 'measure' here.


Muthusaram
naazhi Muthusaram, Kaaraasev: Savory Indian Snacks

Ingredients for Muthusaram:
1 measure urad flour
1 measure flax meal
6 measures rice flour
1 Tbsp Nutritional yeast
½ to 1 measure chili powder (optional)
2 to 4 tsp cumin seeds
salt to taste

Canola oil for deep frying

Preparation
  1. Combine the dry ingredients in a bowl, add a little warm water at a time to make a loose yet thickish dough that can be pressed through the slots/holes of the dispenser easily, but not too watery/runny as it has to be dropped into hot oil
  2. Deep fry a small batch at a time at the right oil temperature, drain on paper towels or cheese cloth, allow to cool, store in an air tight container


Kaaraasev
naazhi Muthusaram, Kaaraasev: Savory Indian Snacks

Ingredients for Kaaraasev:
1 measure rice flour
1 measure flax meal
4 measures chickpea flour
1 Tbsp Nutritional yeast
salt to taste
2 cloves of garlic finely grated
a handful of chopped curry leaves (optional)
½ measure chili powder
water as needed

Canola Oil for deep frying

Preparation
  1. Combine the dry ingredients, add a little water at a time to knead into a smooth yet loose dough that can be squeezed through a dispenser or naazhi
  2. Deep fry in oil, drain on paper towels or cheese cloth, allow to cool, store in an air tight container


Labels: , , ,

Friday, July 04, 2008

Ribbon Pakkoda

home made ribbon pakkoda south indian snack


When Thenkuzhal is here, can Ribbon Pakkoda be far behind?

My mom whipped up a batch of these melt-in-the-mouth Ribbon Pakkodas sometime back and I am so glad I had the presence of mind to take a picture right away, 'coz they were all gone the next day!

thenkuzhal maker ribbon pakkoda maker apparatus


The apparatus used for Thenkuzhal works for Ribbon Pakkoda too, but, this time, my mom bought me another apparatus that we tested out - the shiny stainless steel one on the left in the picture. Instead of the ricer-like (garlic-press-like) action of the aluminum one, the new one simply involves turning the lever at the top round and round to squeeze out the batter into the hot oil. It still has the interchangeable plates at the bottom to squeeze out different shapes of batter, so, this new one would work to make Thenkuzhal, Muthsaram and such as well.

Ribbon Pakkoda is not quite the same as Pakodas, which is another fried snack - but the basic ingredients is the same: chickpea flour and rice flour.

Anyway, 4:1 is the proportion of Chickpea-flour:Rice-flour for this ribbon pakoda.

Ingredients
1 cup chickpea flour
¼ cup rice flour
1 pinch baking powder
salt and chilli powder to taste
water as needed to make a fairly thick toothpaste-like batter

canola oil for frying

Preparation
  1. Make the batter to squeezable thick consistency
  2. Heat oil to medium high
  3. Squeeze the batter through the apparatus into the hot oil in batches
  4. Fry till golden brown and cooked through
  5. Drain in a papertowel-lined plate

Labels: , , ,

Friday, June 27, 2008

Thenkuzhal


Thenkuzhal, along with Muthsaram, Ribbon Pakoda, and Murukku, is a fried snack my mom makes on and off, especially around festival season in Fall. If the oil temperature is just right, this turns out very light and non-greasy and is very addictive: you can't stop with just a nominal amount - like, I could eat the amount shown in the picture in one sitting, while sipping mugs of my favorite cardamom-ginger chai :)

While Ribbon Pakoda is my favorite, especially the melt-in-the-mouth texture that my mom makes, Thenkuzhal comes a close second, with the same buttery rich, crunchy yet not harsh texture.

This is my mom's recipe and the picture above shows the apparatus she uses to make these fried snacks. I have tried her recipe on and off and it is very easy and works well as long as the oil temperature is medium-high and just right to cook through without absorbing oil, but not too hot to scorch the outsides and leave the insides raw.

I test the temperature by simply dropping a pea-size bit of the batter: if it floats to the top within about 5-6 seconds and is golden brown on the outside and done on the inside it should be about right. And, as this is fried in batches, just need to wait for the oil to heat up to the right temperature for each batch.

thenkuzhal maker apparatus


Ricer-like contraption to push out the batter in little squiggles into the hot oil, as shown in picture, comes with several "plates" that define the shape of the batter as it gets pushed through. So, the same apparatus is used to make Muthsaram, Thenkuzhal and Ribbon Pakoda by just changing these plates with proper holes. The batter is of course, slightly different for each of these and I hope to post them soon.

Before my mom gave me this apparatus, I tried Thenkuzhal with cake icing plunger-thingy, and with a generic ketchup/mustard bottle with a larger hole cut at the tip, but those did not give enough control over the shape. The apparatus clearly is designed for this and makes it easy to get the job done.

Ingredients
2 cups plain rice flour
½ cup urad flour
2 Tbsp cumin seeds
1 Tbsp ghee or canola oil
a pinch of baking powder
salt to taste
water as needed

6-8 cups canola oil for frying
Ricer-like contraption to push out the batter in little squiggles into the hot oil.

Preparation
  1. Heat the oil to a medium-high temperature, not too hot
  2. Combine all the ingredients except water, add a little water at a time till the batter is about the consistency of thick toothpaste which can be squeezed through the contraption shown; taste and adjust salt
  3. Take a chunk of batter and stuff it into the ricer-like apparatus and squeeze gently while moving hands back and forth to trace the squiggly shape over the hot oil
  4. Allow to cook through and become golden brown on the outside, remove with slotted spoon and drain on a paper-towel lined plate
  5. If stored in an air-tight container in a dark place, it lasts for a few weeks before the oil starts getting rancid and starts feeling stale, but, I doubt it will last that long:)
  6. If the salt seems inadequate, sprinkle some as soon as it comes out of the oil

Labels: , , ,

Sunday, July 29, 2007

Gobi (Cauliflower) Manchurian


This is one of my favorite Indo-Chinese adaptations. The dish is usually prepared fairly dry, with just a coating of sauce tossed together right before serving to prevent sogginess.

The recipe here is sort of made-up, so, adjust to taste as you like. And, usually, I vary the proportions a bit each time to see if it can get any better, and also because I may not have all the ingredients handy, so I improvise. I happen to like all the variations I have made so far. But, this recipe is fairly standard when I make Gobi Manchurian and thought I'll share it here.


Ingredients
1 head of cauliflower, cut into florets
1 cup rice flour
salt to taste
1 cup oil for shallow frying

for the sauce:
2-3 green chilies, sliced thin
1 medium onion sliced thin
1 small red bell pepper, chopped
2-3 cloves of garlic, crushed or minced
2 Tbsp light soy sauce
1 Tbsp tomato paste
2-3 Tbsp plain white vinegar
2 Tbsp sambal oelek
¼ cup water
corn starch as needed for thickening

Preparation

par-cook the cauliflower florets in the microwave, pat dry, sprinkle some salt and keep handy

heat oil in a medium shallow pan for shallow frying the cauliflower florets

add some salt to the rice flour, dredge the cauliflower florets with the flour and shallow fry in batches till golden brown on the outside; remove with slotted spoon and place in a paper-towel lined plate

sauce: heat a few tablespoon of oil in a large sauce pan, sauté the onions and garlic, add the bell peppers, then all the sauce ingredients and let them simmer till flavors combine and sauce thickens

combine the shallow-fried cauliflower with the sauce, stir well, garnish with some slit chilies

Serve hot with hot rice.

Labels: , , , , , ,

Saturday, December 30, 2006

spring roll with two dipping sauces

easy recipe sping roll dipping sauces
Spring rolls are sort of easy to make and are a favorite appetizer in our family. I just don't make it often as it involves frying, so, every time I make it I try to come up with some nice dipping sauce that makes it interesting :-)

As the dipping sauces kind of take center-stage, I leave the spring rolls plain and simple.

Ginger Garlic Chili Soy Sesame sauce
2 Tbsp low sodium soy sauce
1 Tbsp mirin
1 Tbsp rice wine vinegar
1 tsp kecap manis
1 Tbsp fresh grated ginger
1 Tbsp minced garlic
1/2 tsp cayenne pepper
1 tsp red pepper flakes
1 tsp toasted sesame seeds

Preparation: just combine all the above ingredients and stir well. Adjust to taste, if necessary.

Tangy Lemongrass Peanut sauce
1 Tbsp finely minced lemon grass
1 Tbsp finely grated ginger
1 Tbsp minced garlic
1 Tbsp peanut butter (I prefer chunky)
1 tsp brown sugar
4 Tbsp lemon juice
1 Tbsp rice wine vinegar
1 tsp soy sauce

Preparation:
  1. heat lemon juice, ginger, garlic, brown sugar and lemongrass in a pan till it reduces a bit; off heat, combine the rest of the ingredients, stir well and serve
Spring rolls
Ingredients:
easy recipe sping roll dipping sauces
Spring Roll wrappers (I prefer the frozen kind)
Filling - veggies of your choice - julienned or sliced fine - onions, carrots, spring onions, cabbage; pickled ginger, bean sprouts
salt and cayenne pepper to taste
oil for frying
easy recipe sping roll dipping sauces
Preparation:
  1. combine the veggies, season with salt and pepper, set aside
  2. keep a small bowl of water handy for wetting the wrappers
  3. the package usually comes with instructions - just spoon some filling, roll up, wet with water to seal
  4. deep fry in oil, serve warm with the dipping sauces

Labels: , , ,

Tuesday, September 05, 2006

Pakoda: chickpea onion fritters

pakodas-1

Pakodas (aka pakoras) is one of my favorite tea time snacks, along with some home-made mint chutney, sweet-and-sour tomato chutney or tamarind-date chutney. Pakoras can be used in kadhi, a gujarathi dish.

There are quite a few variations of this recipe and am sure all of them turn out fine... this here is just one of the versions I default to. Adjust the proportions of rice flour to chickpea flour to suit your taste. Also, I've tried making these fritters with all-purpose flour and some cornstarch plus maybe some rice flour... it is quite flexible and depending on how crunchy or how soft I want it, I adjust the flour. So, this recipe is not quite set in stone - as with all my recipes ;)

Ingredients
1 cup chickpea flour (besan)
½ cup rice flour
1 medium onion finely diced
1-2 Tbsp red chili powder (more or less, adjust to taste)
salt to taste
water as needed
vegetable or canola oil for frying

Preparation
  1. heat oil in a pan for frying
  2. meanwhile, add the chickpea flour, rice flour, onions, chili powder and salt to a mixing bowl
  3. add water a little at a time and knead to form a slightly loose dough, but not watery or runny
  4. when oil is about 350-370° F, fry the dough in batches: without crowding the pan drop about 5-8 tablespoonful of dough in the oil, one tablespoonful at a time, and fry till they are nice and brown on the outside and cooked through on the inside.
  5. drain on a paper towel and keep warm till all the pakodas are done
  6. experiment with the chickpea-rice flour ratio till you find a satisfactory mix: i like the pakodas a bit crunchy on the outside and a little chewy on the inside - the crunchiness i believe comes from rice flour.

Labels: , , , , , ,

‹Older