Related Posts Widget for Blogs by LinkWithin

Wednesday, July 29, 2015

Purple Pleasures: Purple Carrots, Purple Beets, Purple Cabbage, Purple Onion Relish

Purple Pleasures: Purple carrots, Purple Beets, Purple Cabbage, Purple Onion Relish


Summer is the only time we visit the farm often, naturally. During each of these farm visits that are primarily focused on berry-picking, I exercise my right to loiter in the market attached to the farm, mentally salivating and resisting the urge to grab a bunch of each and every single produce there. That is, until the other adult gently but insistently escorts me to the checkout.

While the escort maneuvre was in progress last weekend, I held up a bunch of purple carrots grinning from ear to ear. But you have a pound of carrots at home already, he reasoned. Ah, but they are not purple, I clarified. You are going to be eating a lot of carrots this week, the wise septuagenarian co-shopper explained to him genially, all the while beaming at me. I could have hugged her right then.


Purple Pleasures: Purple carrots, Purple Beets, Purple Cabbage, Purple Onion Relish


The bright purples were irresistible at the farm market and so they came home with me, with no particular agenda except to use them as wisely as possible: purple carrots, purple cabbage, purple beets, purple onions. Well, sometimes the cabbage and beets fall under the "red foods" category, but, they seemed quite the purple to me this time so purple they shall be.


Ingredients
¼ cup finely chopped garlic
2 Tablespoon freshly grated ginger
1 medium purple/red onion grated
1 cup grated purple cabbage
2 cups grated purple beets
2 cups grated purple carrots

Flavoring:
1 cup white vinegar
½ cup cider vinegar
¼ cup balsamic
1 teaspoon dried caraway seeds or 1 teaspoon dried dill weed
1 Tablespoon red hot chili powder or ground black pepper (adjust to taste)
4 Tbsp brown sugar
salt to taste

¼ cup oil

Preparation
  1. Heat the oil in a pan, add garlic, ginger and onions, saute till aromatic
  2. Add the grated beets, carrots, cabbage, some salt, and stir in the rest of the flavoring ingredients
  3. Allow to simmer till liquid evaporates and the relish comes together to a coarse spreadable consistency
  4. Taste and adjust seasoning
  5. To preserve it, canning is done in a boiling water bath, just standard procedure


Purple Pleasures: Purple carrots, Purple Beets, Purple Cabbage, Purple Onion Relish


Ways to savor the Purple Carrot Beet Relish:
  1. Mix with goat cheese and cream cheese and use it as a sandwich spread
  2. Stir some in with thick Greek yogurt and use it as a Wrap sauce
  3. Add a dollop of it to crackers and enjoy with cheese
  4. Toss some cooked pasta with the beet relish, top with feta or other favorite cheese and enjoy a quick tasty meal minus the tomato sauce
  5. Spread it on a pita or naan, top with avocado, watercress, snow peas and spring onions, fold in half or roll it up

Labels: , , , , ,

Tuesday, September 04, 2012

Pear Apple Sauce


Not a fancy recipe, just a plain old staple with my signature fusion of organic home-garden fruits - viz., apples and two varieties of pears.

We had a lot of apples and pears and plums from our garden this year. Usually, the trees skip a year or two bearing bountiful fruits only once in 2 years or so. This was one of those good years.


As we don't use any pesticides or chemical synthetic fertilizers, the worms and bugs get to the fruits often unless we are vigilant. Plums seem immune from any infestation so far.

After canning about half a dozen pint jars of Apple Plum Butter, I still had enough apples leftover to make something else.

We had very few traditional pears - the kind that kids loved eating off the tree for a snack. But, there were plenty of Asian Pears. (Also susceptible to bugs.)

Pear AppleSauce


And that's how this Pear Apple Sauce came about: After cutting and discarding worm-eaten fruits, there was enough pears and apples to make about 2 half gallon jars and 2 pint jars of Pear Apple Sauce.

Simply chop the fruits coarsely (skin and all), cook in just enough water to soften them. Puree in batches. Return to boil. Keep simmering while canning as usual in a Boiling Water Bath.

I added a hint of cinnamon and some Agave nectar as I had splashed some lemon juice on the cut fruits to keep them from browning too much. If it is too tart, the kids don't prefer it, but I didn't want to use any sugar.

Just 4 simple ingredients (two is probably all the is traditionally used): fruits, water, cinnamon, agave nectar, simmer and save.


Labels: , , , , , , ,

Monday, August 20, 2012

Apple Plum Butter


We had a fairly sizable yield of Jonagold Apples and Italian plums from our garden this year. The apples, plums, pears in the garden usually skip a year or two for giving maximum fruits, so, the years when they are aplenty I like to can them.

As they are organic, the worms get to the apples before we do so it is a bit tenuous to share it with friends. As we joke at home, What's worse than biting into an apple and finding a worm? Biting into an apple and finding half a worm!

Chopping the apples up and getting the good parts is usually fun, even if a bit tedious.


Plums have been safe from bugs so far - birds and squirrels get to them first. There is a short window when they are perfectly ripe for picking, when they are juicy and sweet and ready to eat. But they are just fine when they are firm but tart and work well for jams and preserves.

I like to can some of them whole, pit and all, in mild syrup so it saves time. But taking that extra effort to pit the plums and make jams and preserves is very satisfying too.


The Apple Plum Butter/Jam is a pretty straightforward recipe: simply cook with favorite spices for long enough time till apples caramelize to a thick jam-like consistency.  I did not measure exactly for this batch.

Ingredients
Chopped apples, skin and all
Chopped Italian plums, pitted
Lemon juice
Prune Juice
Cinnamon, Nutmeg, Cloves
Brown sugar (or Splenda, just enough to reduce the tartness)
Apple Cider vinegar
Water as needed

I cooked the above ingredients on stove-top for about half an hour over medium heat, then transferred to a slow cooker/crock pot and left it overnight on low, and finally increased it to high to finish cooking for the last 2 hours. Indeed, it takes about 14 hours to make this but one taste and it convinces me that it is worth it.


I made some garlic relish as well, and some key lime pickle - my favorites - Indian-style. Unlike the usual Chunky style Lime Garlic Chili pickle, I diced the key lime finely and minced the garlic and chopped the chili to make a Thokku-like pickle.

Labels: , , , , ,

Tuesday, May 17, 2011

Preserved Lemons

preserved lemon pickle in brine

Preserved vegetables, either pickled in brine/vinegar, or in spices and oil the Indian way, make a unique accompaniment to meals.

Spicy lemon pickle with chili and garlic is one of my favorites, next only to tender baby mango pickles.

Brined baby mangoes, brined citrons (narthangai) and lemons and limes, sometimes preserved in spices and oil, sometimes dried and packed in earthenware are intimately tied to some wonderful memories of my childhood. Narthangai Oorugai with plain buttermilk rice was a summer time favorite.

Anyway, those memories surfaced when I had preserved some lemons and forgot about them a couple of months ago. Now they are ripe and ready to be enjoyed.

preserved lemonhttp://www.blogger.com/img/blank.gif

Thin skinned lemons work well, but, I had these glossy yellow thick-skinned lemons, (and I prefer the softened preserved thick skin to the tangy mushy flesh), so, these worked out great. Spices can be varied to taste. Once opened, keep refrigerated.

Chop up and mix with rice or risotto; dice the preserved skin finely and use it to make flavored ghee or butter; or jab a fork on a chunk and enjoy it fresh as-is. The tangy saltiness, the mild sweetness balanced by the heat of the peppers, and the unique flavors of coriander, cinnamon, star anise makes this feel like quite an exotic dish.

title=

Ingredients
6 medium to large lemons
3 or 4 Tbsp honey
2 cups salt
1 cup lemon juice
2 cups warm water (plus more for boiling water bath)
4 cinnamon sticks
1 Tbsp coriander seeds
1 Tbsp whole black peppers
6-8 dry red chilies (optional)
6-8 cloves of garlic (optional)
2 star anise (optional)

Preparation
  1. Cut the lemon into chunks, pack in a jar sprinkling with salt generously between layers; add crushed coriander seeds and peppers and cinnamon sticks in between layers as well
  2. Dissolve the honey in warm water, add it into the jar, along with lemon juice, cover tightly with a canning ring lid
  3. Set up a boiling water bath such that the jar is at least half submerged in water, bring water to a boil, leaveit in the boiling water bath for 10 minutes, remove from heat
  4. Set the jar aside in a cool dark place for about 4 to 6 weeks
  5. Enjoy!

Labels: , , , , , ,

Thursday, September 03, 2009

Plums, plums, plums


The art of Putting Food By has always been a secret indulgence of mine. Despite dirt-cheap jams and sauces flooding the supermarket, there is something extremely fulfilling about gathering the pesticide-free fresh produce from the backyard home-garden and putting it by for the colder months when the yield would be down to nil...

The only initial fear for me was inadvertent poisoning due to botulism if the canning is not done right. I stick to acidic foods which are hard to spoil and usually follow the directions and times for processing. There is nothing like hearing the "pop" as the jar cools after undergoing the boiling water bath canning, when the lid gets sucked in by the contracting air and the jar seals tight. All that's left is labeling with the date and storing it away in the pantry :)

We came back from a long and lovely vacation to find the little patch of Earth on our backyard yielding plentiful sustenance. The plum tree especially was overloaded with ripe purple prune plums. Sweet and juicy as-is, but, I was itching to make good plum jam and Chinese-style plum sauce and can them away...

Plum jam wasn't anything new - just followed the recipe that comes with the Fruit Pectin packet. Except I reduced the sugar, which is not a smart thing usually as the jam won't set well. But, I like the loose spreadable consistency anyway :)

Pit and coarsely chop the plums. Simmer in a little bit of water (about ¼ cup for 6 cups of chopped plums) for about 5 minutes. Crush it or process it in a blender, draining excess water. Return to pot, stir in a packet of fruit pectin allow to come to rolling boil. Skim foam if preferred. Stir in about 6-8 cups of sugar (makes it cloyingly sweet, but jam doesn't set well otherwise) and allow to come back to a boil. Stir well, and can in boiling water bath canner for 25-30 minutes.

plum-jam-09


I have always loved Chinese Plum Sauce mixed with Sambal Olelek - just the plum sauce by itself that I get at the stores is almost like honey, too sweet. So, I wanted to make some Plum Sauce that was close to my liking and ready to use on busy weekdays.

Ingredients
4 cups pitted chopped plums
½ medium onion, roughly chopped
2 Tbsp freshly grated ginger
4-6 cloves of garlic, maybe more
2 Tbsp Sambal Oelek
----
¼ cup cider vinegar
¼ cup rice wine vinegar
½ tsp Chinese Five Spice
¼ tsp cinnamon powder
1 tsp coriander powder (optional)
1 Tbsp Agave nectar or brown sugar

Combine the first five ingredients and allow to simmer for 10-15 minuted till onions and garlic are tender. Mash or process in a blender. Strain. Return to pot and add the rest of the ingredients to taste. Allow to simmer for another 20 minutes or so. Can in boiling water bath for about 30 minutes.

In addition to luscious sweet plum flavor, the sauce has all the spiciness I enjoy. This is almost like Hot-and-Sweet sauce and can be used as a dip for spring rolls and gyoza.

chinese-plum-sauce


Just for fun, to serve as simple winter dessert, I decided to can some plums whole. Rather than raw pack, I decided to process them hot in very light syrup (½ cup sugar for 8 cups of water). Despite pricking the skin with fork, some plums were too ripe and the skin split, but that's okay... I boiled them for about 35 minutes for canning.

canned-whole-plums


The plums are all put by for now. I am looking forward to dealing with all the pears this weekend... maybe make some pear sauce (like applesauce), maybe pack them in light syrup...

Labels: , , , , , , ,

Tuesday, January 22, 2008

Lime Chili Garlic chunky pickle

lime-pickle-2


I love the Indian style pickles - spicy and packed in oil - served as a side with any meal. Over the years, having been disappointed by the taste of packaged pickles, I started making my own... especially since I found the Joys of Home Canning :)

Over summer, when our garden is bountiful, it is always fun to can away the fresh produce for those dreary winter days. But, the pantry always has a dozen or more jars of assorted types of pickles... well... pickling away, till ready for consumption, pretty much year-round.

The only two kinds of pickles I absolutely relish and cannot make myself at home are: Spicy Mahali/Mahani pickle (a type of strong flavored root made into a pickle), and Tender Baby Mango Pickle (Kadugu Manga). My mom used to make these just the way I love them and the flavors still linger in my memory to-date... so, these are the two kinds I end up buying at the store to satisfy my cravings on and off...

canned-heaven-1


At any given time, there would be Chunky Mixed Vegetable Pickle, Lime Pickle, Chunky Lime+Chili+Garlic Pickle, Spicy Chunky Garlic Pickle, Mild (Spreadable) Garlic Relish, Tomato Thokku, Chilli Thokku (green or red chilies) , Ginger Thokku, canned and labeled with the dates, patiently aging away in the pantry waiting to be consumed when ripe and ready :)

The picture above is that of lime+chilli+garlic pickle at the beginning of the process - I just dished some out for the picture... but at the end of the process, before it is ready for canning, they lose their rawness and are well sautéed and wilted. And finally, after maturing for about 8-10 weeks, the lime is soft and fork-tender, the flavors mellow and well-blended, looking absolutely irresistible.

lime-chili-garlic-pickle-ready-to-eat


Usually, it takes about 4-6 weeks for them to sit undisturbed so they can mellow out a bit and the flavors can meld before they can be relished.

Since I don't have an exact recipe and each batch of pickle turns out slightly different from the others depending on my mood and ingredients handy, I thought I should record the general procedure here rather than specifics. Sometimes the vegetables are diced nicely, sometimes they are ground to a fine paste (like for the thokku), sometimes they are minced (like for my garlic relish) and sometimes I like to leave them as large chunks...

Ingredients:
Lime
green chilies
garlic
salt
oil
extra hot dry red chili powder
toast: small amounts of mustard seeds and fenugreek seeds, and grind them to a coarse powder
hint of brown sugar (optional)

Preparation:
  • heat adequate amount of oil (can add more as needed later)
  • add the lime, chilies and garlic, plus the spices, sauté and let it cook on medium low heat till well softened
  • add a little oil at a time so the pickle is not too dry, stirring often
  • when oil starts separating and is no longer "absorbed" into the dish, taste and adjust flavors
  • can them if making a large batch OR just store them in an air tight container in a cool dark place to age a little
  • if not canning, allow to cool a bit before storing in an airtight container

Labels: , , , , ,

Monday, November 19, 2007

Poached Pears

poached-garden-pears-1


Over late Summer we had a ton of pears in our backyard. We have an Asian pear tree which looks sort of like Shinseiki and a Northwest variety that looks a bit like Seckel. We inherited the trees when we bought the house some years ago when the pear trees were just little babies and weren't bearing much fruit... so, am not sure what the varieties are exactly.

Both the pear trees are short and skinny and bear a ton of fruit within a short span of 6-8 weeks, every other year. Many of the fruits are usually low-hanging that my toddler could reach and pick and enjoy fresh from the tree.

I made a few batches of pear sauce out of the juicy Asian pears and canned them. Pear sauce recipe I used is very much the generic Applesauce recipe, nothing special. About a couple of dozen pears were just sliced and canned in a light syrup. Many were enjoyed as-is, whole, fresh off the tree. Quite a few of them became an integral part of our summer salads.

poached pearspoached pears

However, some of the Seckel-style pears were destined to be served poached in a delicious sauce, in a bed of summer berry confetti :)

The rosy green skin was quite a hit with my toddler. They were mildly sweet, not cloying. And when picked just right, they had the crisp crunch that I love. I am not fond of ripe, soft and mushy pears.

garden-pears-1


Ingredients
for the sauce:
1 can (11½ fl oz) Kern's Papaya nectar
2/3 cup sugar
¼ cup sweet red wine
1 cup apple juice
a 2" piece of cinnamon bark whole (or 1 tsp cinnamon powder)
6-8 allspice berries
2 tsp cornstarch (as needed)
½ cup water

3-4 small to medium, firm pears, peeled.
fruit cofetti:
blue berries, raspberries or any of your favorite summer berries, maybe some diced apple all tossed together with about a tablespoon of sugar if preferred

or any other Kern's nectar that you like - I just had papaya nectar handy; or even any other preferred 100% fruit juice
I had some Syrah and Tawny Port handy, but any table wine with medium-to-heavy body and on the sweet side can be used

Preparation
  1. Bring a pot of water to a boil and allow the pears to cook in it till a fork pierces the flesh with some gentle pressure - don't cook till mushy unless you like it that way :)
  2. Sauce: combine all the sauce ingredients except the red wine and cornstarch, bring to a boil, then lower the heat, add the par-cooked pears so they are at least 2/3rds immersed in the syrup, add the red wine and simmer on low till thick and syrupy and the pears are fork-tender; dissolve cornstarch in a bit of water and stir it in gently to thicken the sauce to desired consistency as needed
  3. Serve warm or cold: place the fruit confetti in the bowl, place the poached pears and drizzle some extra sauce, or serve extra sauce on the side


poached-garden-pears-2

Labels: , , , ,

Sunday, September 30, 2007

Green Blog Project: Summer 2007


Summer gardens are always fun. We did most of the planting in late Spring for the Summer garden. We sectioned off a portion of our backyard for vegetable gardening.

Usually, unless it is something exotic and needs special care, we just get seedlings from local nurseries. As to tips for growing, it is not easy to jot down here - each year/season is different.

One thing that helped when we first started the backyard garden a few years ago is to have the soil tested. There was a free soil testing organized by the county, I think, and we took a sample and got it analyzed and followed the recommendation of the experts there - mainly pH was too low and we put some lime to add some alkalinity to help neutralize, and they recommended adding bone meal as needed as it contains some nitrogen and a lot of phosphorous as well as calcium.

Since then we didn't do much to the soil... except common things like rotate the plants each year, plant peas in Spring so it prepares the bed for summer garden by encouraging nitrogen-fixing, enrich soil with organic compost etc. Composting has been easy as we got this Earth Machine for home composting ($35) as soon as we moved into this house and have been throwing our organic waste in there pretty much daily.

This year, we went to local nurseries and got some seedlings where appropriate - like eggplant, some varieties of tomatoes, raspberries, strawberries, grape vines, greens, and chilies. A few varieties of tomatoes, okra were germinated at home. And, of course, corn and sunflowers - we just threw the seeds on the ground and they sprouted fine.

Basically, just talking to the experts at the nursery, sprinkling water as needed, adding compost from home-composting, and weeding is all we did. No pesticides, no fertilizers. We read up a bit on the web to see what common bugs affect the plants we have. If needed, we were prepared to get some praying mantis or other bugs to keep the plant invaders in check, but, we didn't need to this year, just like last year.

Most of the plants did well. The Okra didn't. We just got a handful from 4 plants. I think it never got warm enough for the okra to thrive.

Although I cook several of my favorite recipes over and over, it makes sense to post them only once unless I drastically changed something... So, some of the recipes listed here were already posted at an earlier date even though I cooked them over and over this summer so we could use the fresh garden goodies...

Instead of sending individual entries, or meshing all my garden photos and recipes haphazardly, I decided to list my recipes relevant to Green Blog Project Summer Event hosted by Deepz

Eggplant: Sautéed Eggplant, Ennai Kathrikkai, Thai Red Curry, Godhsu, Eggplant Rasavangi

Greens: Ethiopian Meal, Creamy Chards Soup, Chards Masiyal

Potatoes: Potatoes Lyonnaise, Swiss Rösti

Summer Squash: Summer Squash and Eggplant dish

Raspberries: Raspberry Chipotle Chicken

Tomatoes: I ended up canning most of the tomatoes as sauces, stewed whole, thokku and salsa; made some tomato rice, green tomato koottu, and stuffed tomatoes, plus of course, used tomatoes in many of my recipes as one of the ingredients...

Herbs: Some perennials like Rosemary, Lavender, Mint have been around from last year, and we planted some cilantro, oregano, basil, fennel and chives and they all did well, thankfully.

It is getting chilly already, so we dug out most of the plants. Tomatoes are still fruiting, so we have left it on for a few more weeks. Brussel Sprouts is just getting ready, so, in about a few weeks we might be able to harvest it as well.

We finally laid a major portion of the summer garden to rest. It was not easy to say good-bye, but, we are not planning on any winter gardening as we are not set up for any sort of greenhouse arrangement.

The few indoor plants we have are well out of the kitties' and baby's reach, so they are surviving fine. But, to grow any more indoor vegetables and herbs this winter would have to remain a dream. Even if we can teach our baby to stay off, the kitties stay home when we are gone for the day and end up messing with the plants, even if out of curiosity or by accident...

So, dear garden, Au Revoir!

Labels: , , , , , ,

Tuesday, July 31, 2007

chilli thokku

easy recipe chilli thokku JFI Jihva For Ingredients blog event

Chillies - green or red, fresh or dry - have always been an integral part of my mom's kitchen. And now, chillies have a special place in my kitchen as well.

When I was growing up, there was very rarely a period when we didn't have home-made pickles and chutneys handy. In addition to regular food, that is.

Thokku is a form of pickle where the main ingredients are ground into a paste and preserved in oil and spices. The most common ones at home are tomato thokku, ginger thokku and chilli thokku.

This chilli thokku recipe is a bit different from how my mom usually makes it. The primary ingredient is, of course, chillies - both green and red - plus, I decided to throw in some dry hibiscus flowers that I had handy as I like the color and the mild flavor it adds. Now, I love the deep rich color and the smoky flavor of dry ancho-pasilla chilies, so, I went with them here. But, if this is not readily available, substitute any favorite dry red chilies - adjust quantity based on heat.

easy recipe chilli thokku JFI Jihva For Ingredients blog event

I usually make fairly small batches and store it in the fridge. It lasts for about 2 weeks (if we don't eat it all up, that is). But, sometimes, I can them and put them away for later. It tastes even better when it has had time to age gracefully and develop deep flavors.

And this chilli thokku recipe is my post for JFI: Jihva For Ingredients, started by Indira of Mahanandi fame, hosted this month by a dear pal, the lovely and talented Nandita of SaffronTrail
.

Ingredients:
6-8 dry ancho-pasilla chilies
15-20 green chillies
a handful of dry hibiscus flowers
--------------
plain white vinegar
brown sugar
salt
oil

Preparation

Soak the dry red chilies and hibiscus in some warm water for about 15 minutes.

Remove the stem and some of the seeds, if preferred, and coarsely chop the soaked chillies; in a blender or food processor, grind the three ingredients together.

Heat 4 Tbsp oil in a pan, add some mustard seeds and when they splutter, add the ground chilli paste. Add about ¼ cup plain white vinegar, about 2-3 Tbsp brown sugar, and some salt to taste.

Stir well, and keep stirring till the rawness of the chillies go away, all the liquid is evaporated, the oil starts separating and the thokku comes together. Taste and adjust flavors.

The tang from the vinegar and the sweetness of the brown sugar counter-balance the heat from the chillies and make this a wonderful condiment to have handy at home. The heat is not overpowering, killing the taste buds, so-to-speak...

How to use this chilli thokku?

1. mix a small amount with cream cheese and use it as a sandwich spread
2. spread a thin layer of this wonderful thokku on rotis or parathas (or even tortillas), roll them up and munch as a quick snack
3. mix a small amount with fresh hot rice and ghee and enjoy!

Labels: , , , ,

Sunday, July 15, 2007

gooseberry pickle

gooseberries pickle indian achar gooseberry recipe

I remember two varieties of gooseberries from my childhood - one was about the size of regular playing marbles, bright green, smooth skin, soft flesh and incredibly sour, the other was bigger about the size of chestnut, not as sour, firm flesh, with stripes on the skin (like the picture here) and sort of dull sage green. I used to like the latter more.

The only form in which I have relished gooseberries is as a spicy Indian pickle. I've had some raw gooseberries straight off the tree spiced with some salt and chili powder when I was little. My mom used to brine and sun-dry the larger variety firm green mildly sour gooseberries that was abundant in summers.

For about two decades now I have not had gooseberries as it was not available in any of the stores near where I lived. Imagine my thrill when I spied boxes and boxes of crisp, bright green, tempting little gooseberries at New Seasons Market! I love shopping at the New Seasons, even if it is a bit pricey, as I love their philosophy and service (any store that says, "if you spill or drop or break something, oh well, accidents happens, we'll clean it up, you go on shopping", has my business).

gooseberries pickle indian achar gooseberry recipeThese were not quite the same variety I remember from India - the flesh was not as firm and sour - must be a nicer hybrid... so, right away I got down and pickled a batch.

Recipe for this pickle is very simple: heat some oil, pop some mustard seeds, add the gooseberries and spices*, some brown sugar and some salt, cook a bit, adjust to taste, and can immediately; or, allow to cool and store in an airtight container in the fridge.

*spices: I dry roasted and ground some fenugreek seeds, dry red chilies, coriander seeds, brown mustard seeds and khus-khus (white poppy seeds)

Labels: , , ,

Friday, April 27, 2007

Pan-fried Polenta Cakes with Tomato Sauce


Polenta loaf or log is a convenient prepare-ahead item and it keeps in the fridge for 3 to 5 days. To serve, simply cut some 2 cm slices from the loaf or log and pan fry in olive oil till both sides are crispy and the inside is warm. Garnish with sauteed onions and serve with favorite sauce.

To make polenta log or loaf: Cook the polenta in a rice cooker. 1 cup fine cornmeal with 1.5 to 2 cups water or stock. Some olive oil, Italian herbs, salt as needed. Combine it all in the rice cooker and cook in the regular cycle. When done in the rice cooker, allow to cool a bit. Stir in some more olive oil and pack it into a loaf pan or make a log using aluminum foil. Store in the fridge till it hardens and is ready to be cooked.

Sometimes I like to prepare this tomato sauce when tomatoes are in season and home-can them and store in the pantry so it is handy.

Ingredients
For the tomato sauce:
8-10 sun dried tomatoes (not packed in oil), soaked in hot water
1 6oz can tomato paste
1 12oz home-canned stewed tomatoes (store-bought is good too)
1 celery stalk, diced finely
8-10 cloves of garlic minced
½ sweet onion, diced
4 Tbsp cayenne pepper powder (adjust to taste)
1-2 Tbsp brown sugar (adjust to taste)
4 Tbsp dried oregano leaves
4 Tbsp dried marjoram leaves
½ cup loosely packed fresh basil leaves
½ cup red wine
salt to taste
water as needed
2 Tbsp olive oil

Preparation

heat 1 Tbsp olive oil in a pan, add the garlic, onion, celery, basil, parsley, dry herbs/spices and a pinch of salt; sauté till aromatic

transfer the above into a blender or food processor, add all the tomatoes - sun dried, stewed and the paste, blend into a thick sauce adding some water as needed

heat 1 Tbsp olive oil in a pan, add the blended sauce, brown sugar, adjust salt to taste, add water as needed, and simmer for about 10 minutes on medium-low heat; then add the wine and simmer some more till flavors meld and the sauce feels rich and thick

Serve warm with baked polenta, or pan-fried polenta cakes, spaghetti or any favorite pasta.

Labels: , , , , , , ,

Friday, March 30, 2007

Sun-dried or Fresh?

Tomatoes taste wonderful either way!

Tapas was on my mind when I thought of making something with fresh plump, juicy tomatoes for the Jihva for Tomatoes event hosted by RP at My Workshop.

But then, I couldn't turn my back on the versatile, aromatic, rich Sun Dried Tomatoes.

So I decided to make one dish with each: Tomate Rellenos with fresh bright tomatoes, and Thakkali Thokku with sun dried tomatoes.

Tomate Rellenos


Ingredients
2 eggs
¼ cup steamed corn kernels
¼ cup queso panela, crumbled (or queso fresco, or grated cheddar)
¼ medium onion diced finely
1 Tbsp coriander powder
1 tsp chili powder
¼ tsp salt (adjust to taste)
cilantro for garnish

4-6 small to medium plump and firm tomatoes

1 Tbsp lemon juice + 1 tsp Tabasco™ sauce (optional)

Preparation

cut the top off the tomatoes, scoop out the insides carefully, salt it a little, and leave it upside down on a colander or paper towel to drain for about 10 minutes while getting the stuffing ready

beat the eggs with the rest of the ingredients and keep handy

get the oven heated to 400°F, and keep a baking dish handy to arrange the tomatoes in

allow the liquid in the tomatoes to drain away as much as possible and pat dry tomatoes, and arrange them in the baking dish so they will stand up straight - slicing a very thin part of the bottom helps, taking care not to cut off too much:-)

pour the egg mixture into each tomato and bake in the 400°F oven for about 20-30 minutes, turning the baking dish around mid-way, if needed, till the eggs set well and are cooked through; off heat, allow to cool a little

add a splash of lemon juice mixed with Tabasco™ sauce and serve warm

Small to medium-small tomatoes that can be eaten in one generous bite are perfect for this.

Stuffing can be adjusted to taste - leave out the eggs, add some potatoes or wild rice as in stuffed acorn squash recipe.

Next up is my favorite spread made with sun dried tomatoes.

Thakkali Thokku: Sun dried Tomato Spread


Ingredients:
8-10 Sun dried tomatoes (preferably, not packed in oil)
3 Dried pasilla chilies
1 diced fresh tomato, a few dry thai dragon chilies for extra bite (optional), salt to taste
a few tablespoons oil


Preparation

soak the sun dried tomatoes and pasilla chilies in hot water for about 10 minutes to reconstitute them; drain and coarsely chop them

combine the reconstituted tomatoes and pasilla with the rest of the ingredients in a blender or food processor and blend to a smooth paste

heat the oil in a pan, add the blended paste and sauté till well blended; adjust salt to taste

Allow to cool completely and refrigerate in an air tight container. This keeps well for up to a month in the fridge.

What to do with this Thakkali Thokku ?
  • Mix equal portions of this Thakkali Thokku with cream cheese to make a yummy spread for sandwiches and pita pockets
  • Beat equal portions of Thakkali Thokku and Yogurt to make a delicious dip for chips
  • Stir some of this Thakkali Thokku into some hot basmati rice with some ghee, and enjoy!

Labels: , , , , ,

Wednesday, February 14, 2007

Home Canning: thokku and pickles

As a newlywed, I discovered the delights of canning.

When I was in my mum-in-law's kitchen for the first time, she opened a can of salsa she had made for one of our meals. D was pretty matter-of-fact about it, but, it made a deep impression on me.

My mom has always made pickles, vadams, snacks and such at home, stored them appropriately and served them year round.

I hadn't done any canning and was new to the Art of Putting Food By. So, I read books, scoured the web, and experimented with boiling water bath for canning.

First summer after we moved to Oregon, we went garage-sale-hopping and found a wonderful pressure canner for $2! Of course, the pressure gauge was broken, but D was confident of finding one online and getting it fixed. Which he did, of course, the gauge cost 20$! Still, at 22$, it is a steal for a 5 gallon pressure canner.

Now, even though I have a precious pressure canner for all my canning needs, boiling water bath remains my favorite as it meets the needs of most of the foods I can, like: indian pickles, salsa verde, salsa roja, veggies, tomatoes, pasta sauce, marinara sauce, berry jams and fruit syrups.


Indian pickles are not quite the same as pickling with vinegar.

Generally, they are packed in oil with spices and salt; some undergo a bit of cooking; some, like thokku, are sautéed, simmered, and undergo reduction till oil separates.

Many need to sit in a cool dark place for a few weeks to mature and develop.

Some are simply brined.

Some are simply allowed to soak in a blend of spices, salt, and oil, and served along with the savory liquid - my favorite of this kind being the tender/baby mango pickle called "maavadu", or "kadugu manga" when mustard seeds are used.


Tomato Thokku and Green Chili Thokku
Thokkus are almost like paste: smooth, not chunky. Generally, I blend the thokku ingredients into a paste when raw, then roast it in oil, stirring frequently till oil separates and is reduced to a thick, spreadable consistency. Can immediately. Store in a cool dark place for 2-4 weeks before serving.

Tomato thokku: tomatoes, paprika, red chili powder, salt, jaggery or brown sugar, oil
Green Chili thokku: green chillies, asafoetida (tiny bit), salt, oil, brown sugar, brown mustard seeds, tamarind

I am omitting exact measurements here. Adjust to taste. Make small or large batches as you desire... I usually make large batches and can them and let them mature in the cool dark basement:-)
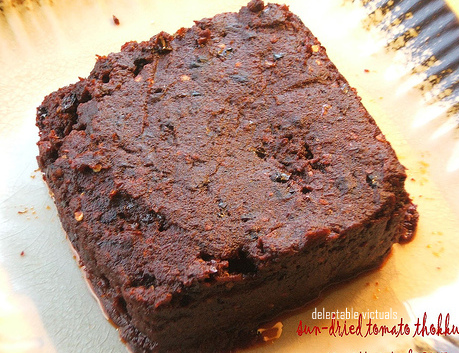
Tomato thokku mixed in with some cream cheese makes a great sandwich spread.


Chili Lime Pickle
Green chilies, slit; fairly thin-skinned lime, cut into pieces; garlic cloves, chopped (optional); salt; chili powder; asafoetida; fenugreek, crushed; black mustard seeds,crushed; oil
sauté chilies and lime in oil, add the spices and salt, adjust to taste, cook over medium high heat stirring constantly till oil separates; can immediately; allow to mature for 6-8 weeks before using.

As it matures, the chilies mellow out, and the tanginess of lime takes over in a pleasant way, balanced with the salt and brown sugar; the lime skin gets soft and fork-tender. It goes perfectly with south-indian style yogurt rice, aka "thayir shadam".

If not canning, store in an air tight container in a cool dark place (or in the fridge) for a few weeks before using.

Again, I am omitting exact measurements here. Adjust to taste. Make small or large batches to suit your needs...

Also, substitute chili and lime with mixed vegetables, or just garlic for variation.

Labels: , , , , , , ,

‹Older