Related Posts Widget for Blogs by LinkWithin

Friday, September 09, 2016

Yellow Eye Pan-seared with Wild Rice and Blanched Green Beans

Alaskan Wild Yelloweye rockfish Pan-seared with Wild Rice and Blanched Green Beans


The other adult came back from Alaska with a modest catch of pristine fish.

Humongous Halibut was among the catch. As was immaculate Chinook Salmon. Plus lovely Ling Cod. These are the only kinds of fish, caught fresh in unspoilt waters, that we like. Some Yelloweye came home as well and I sure won't turn up my nose on them either, especially when I know the source and the work that went into catching them and bringing them home for us.

The good part is, it was all cleaned and cut and vacuum sealed and frozen, ready for storing and using over the next few months.

And, yes, I had to ask if the fish suffered much, trying to make peace with the handful he brought home, talking to the frozen packets as if they were alive, thanking them for nourishing us.

Although we don't eat much of ocean's bounty, these few above are the best of the best so am glad to have them.


Alaskan Wild Yelloweye rockfish Pan-seared with Wild Rice and Blanched Green Beans


This is a no-fuss pan-seared yelloweye rockfish dish. Quite a mouthful there.

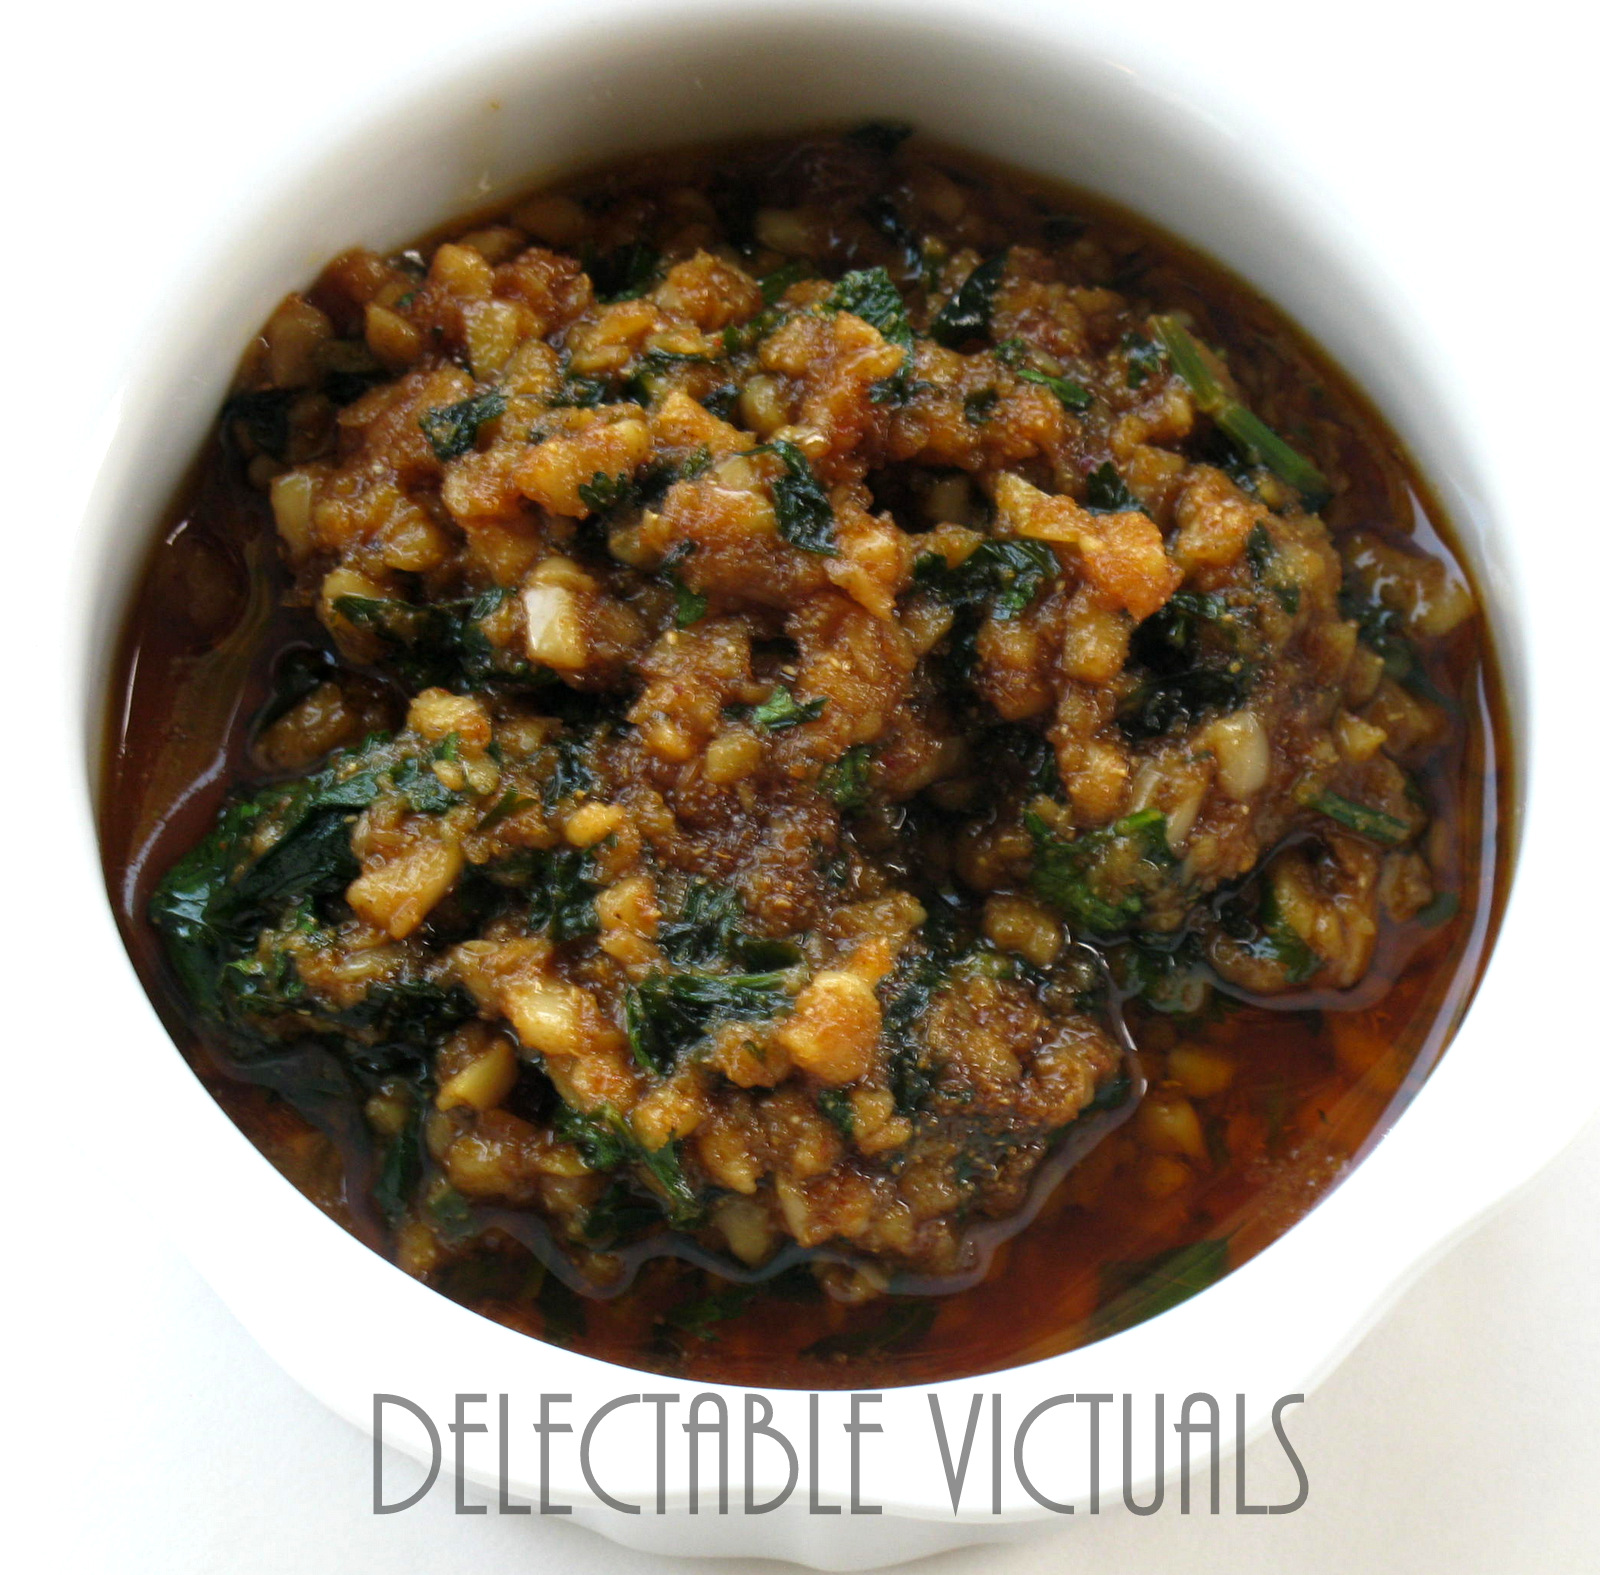
The fish was marinated in ginger-garlic paste. Then pressed on to seasoned coating and pan-seared in my trusty cast iron skillet to seal and brown the sides, then covered a cooked till the insides were done to flaky tenderness.

Wild rice was cooked in the rice cooker with some garden herbs and aromatic spices. Green beans were blanched to crisp-tender perfection.


Alaskan Wild Yelloweye rockfish Pan-seared with Wild Rice and Blanched Green Beans


Some blistered mild chilies are a fantastic accompaniment for the fish, with some lemon slices and sauteed onions.


Labels: , , , , ,

Wednesday, November 12, 2014

Roasted Butternut Squash, Sweet Potatoes, Kale, Bell Peppers, Red Onions


Roasted vegetables are the easiest and the most satisfying around this time of the year. A plateful of  these fresh-from-the-oven roasted vegetables is a meal in itself.

Toss the butternut squash, sweet potatoes, bell peppers and onions with some olive oil, herbs, grated Parmesan cheese, paprika and other spices and place in a single layer in a roasting pan and bake in a 425°F oven for about 25 to 30 minutes minutes.

Toss the chopped kale with some olive oil and spices and add it to the roasting pan and bake till kale is crispy and the other veggies are roasted, about another  8 to 10 minutes, making sure kale doesn't char.

Garnish with grated Parmesan and serve hot.

Labels: , , , , , ,

Tuesday, July 15, 2014

Roasted Golden Beets, Purple Radish, Scallop Squash

Roasted Golden Beets, Purple Radish, Pattypan Squash


A very simple dish, but, a huge favorite. The fresh golden beets and colorful radish from the farm were too good to pass up.

Red onions, Beet greens' stems, Radish green's stems came together with chunky cut vegetables in a hot cast iron skillet with a bit of oil to create this magic.

A dash of balsamic vinegar and white vinegar, plus some salt and black pepper is all the flavoring involved here.

Labels: , , , , , ,

Sunday, February 02, 2014

Crock-pot Chicken Stew

slow cooker crock pot chicken chunky hearty vegetable stew delectable victuals


I am a big fan of Electrical Slow Cooker and Crock Pots. It makes winter night meals a breeze if planned ahead and started early. Warm, hearty stews and soups, vegetables, casseroles, and even fall-apart chicken breasts come out just fine, given a little time, requiring minimal effort.

Marinated chicken breasts were started on the crock pot one Friday night, and allowed to slow cook for about 12 hours; then, in the morning, when the chicken breasts were fully cooked, I added some chopped onions, bell peppers, kale, carrots, tomato sauce, spices/seasoning and continued to cook through the day Saturday, possibly another 4 or 5 hours.

By dinner time Saturday night, aromatic chicken and vegetable stew with flaky, juicy, fall-apart chicken was ready. Served with some home-made biscuits, it was a wholesome winter night meal.

Of course, I don't care much for chicken, so this batch was consumed by the rest of the family. For myself, I like to omit the chicken and double the vegetables, adding cauliflower, chick peas, mushrooms, bell peppers, onions, winter squash, edamame and marinated tofu to make a There-Can't-Be-Too-Many-Veggies stew.


Labels: , , , , , , ,

Friday, March 09, 2012

Nesting Taklia Chicken

nesting taklia chicken in a bed of noodles

Couldn't resist throwing in the "nesting" part for the title, what with Spring in the air, birds tweeting everywhere, nests abound around this time of the year... plus the chicken :)

Taklia is one of the wet spice pastes I like to make on and off, thanks to Greg & Lucy Malouf's cookbook, Moorish, a birthday present way back in 2008. I do take epicurean licences and end up with something tailored to my taste in-the-spirit-of the original recipe, so, this Taklia I share here might not be authentic. But, since I am all about Fusion Cuisine, it works out all right.

taklia syrian lebanese moroccan spice paste

A plateful of delicious vegetables flavored with Taklia was a satisfactry meal for me, whereas D got the Nesting Taklia Chicken: cooked chicken pieces drenched and smothered with Taklia, resting on a bed of pan-fried noodles and sauteed onions forming the nest.

I was a bit liberal with olive oil and so the Taklia spice paste felt a little greasy when tossed with the lightly steamed vegetables, but, the aroma of coriander and garlic blooming in the oil is absolutely irresistible.

Typically, taklia is added at the end to give a burst of flavor and aroma to the dish, but, can be used as a flavor layer while building sauces and stews.

Ingredients
For Taklia:
4 Tbsp finely chopped garlic
2 Tbsp coriander powder
½ tsp salt
½ tsp brown sugar (optional)
4 Tbsp finely chopped fresh cilantro/coriander leaves

1 to 2 Tbsp olive oil (as needed)

Sautéed onions - as much as preferred (optional)

Chicken: breast or thigh pieces chopped into chunks, marinated for 10 mins in lemon juice and oil

Vegetables: Red and green cabbage, Italian green beans, Lima beans, carrots, cauliflower florets

Nest: Chuka Soba noodles, cooked, drained and pan-fried till lightly crunchy

Garnish: Scallions and Cilantro, plus extra Taklia if preferred


Preparation
  1. Taklia: Heat oil in a shallow pan, add the garlic and coriander powder and sauté till aromatic; stir in the chopped cilantro leaves and the rest of the ingredients if using; allow to cool if storing for later use; can refrigerate for up to 2 months; use as a condiment or the base flavoring for curries and tagines
  2. Cook the chicken till done, stir in as much Taklia as preferred
  3. Cook the vegetables with a pinch of salt if preferred, stir in Taklia for flavoring
  4. Nesting Taklia Chicken Assembly: Spread a layer of noodles at the bottom, add a layer of sauteed onions, chicken pieces on top, a dollop of Taklia for extra flavoring, garnish and serve warm or at room temperature
taklia vegetables moroccan syrian flavoring spice

Labels: , , ,

Friday, February 04, 2011

Sauerkraut or Choucroute

home made sauerkraut pickled cabbage

Vegetable fermentation is not a recent phenomenon. Age-old techniques have survived, with perhaps some help from modern equipment. And the benefits of (properly) fermented vegetables is well-documented.

Some of the store-bought sauerkraut I tried for the first time a decade ago did not appeal to me and I had written off sauerkraut from my diet. Until Sandor Ellix Katz's Wild Fermentation came into my hands. (Thanks Mom!)

After making crock after crock of sauerkraut at home over the last year or so, we've hit upon a recipe we like - especially my five-year-old daughter, who sometimes asks for this "pickled cabbage" for breakfast! We just add a sprinkling of dill weed for the low salt version.

I still remember the huge 'jaadi' (large ceramic crock/container/wide-mouthed jar) full of tiny tender baby mangoes swimming in brine and fermenting, developing the characteristic sourness before some were scooped out for making "Kadugu Maangaa Oorugai" by my mom.

About 4 weeks is all it takes to get a crock of sauerkraut ready, the longer the better. And as we eat just a couple of tablespoons at a time, it lasts a while.

We don't make it back-to-back and have it every day religiously, but, between regular dose of Kimchi and Sauerkraut, it feels like the body is getting something good for absolutely no effort - Nature does the real work.

The picture doesn't do justice to its many virtues. The green bits are dill.

home made sauerkraut pickled cabbage

Low salt version is what I like - the more the salt the slower the fermentation and sourer the result. But, too much salt doesn't allow the good microorganisms to grow.

A jar that fits into the crock, filled with water, helps weight the cabbage down so it doesn't float to the top and get moldy due to exposure to air.

No strict measurements needed - simply sprinkle salt on each layer of shredded cabbage as we chop and pack it into the crock. Press down hard and add some weight - a container or zipper lock bag filled with water. If not enough water comes out of the cabbage within a day or so, add some salt water to keep the chopped cabbage immersed. Keep the weight on and leave it to ferment. Check every couple of days.

By about 4 weeks it is ready to be enjoyed. The sauerkraut "juice" is incredibly delicious and is a wonderful digestive tonic.

In winters, I leave the crock out and let the cabbage continue to ferment after the 4 weeks while we take a bit each day. It can be refrigerated if preferred.

The crunch of the cabbage thanks to the salt, the sourness due to acidity, plus the dill and salt has made this a favorite in our home.

Labels: , , ,

Saturday, June 16, 2007

Grilled Vegetables

easy recipe vegetables grilled marinated

Roasted or grilled vegetables, especially if they have been marinated in some yummy marinade first, is quite a treat, don't you think? Fresh from the oven or grill, slightly charred or smoky depending on how the vegetables were treated, just a touch of fresh herbs and olive oil...

D offered to make a meal as I had a nasty migraine and my work week was horribly stressful. So, I naturally felt obligated to chop up the vegetables and marinate them :-)

I know, I agree, it is odd that rather than resting and awaiting the meal to be served, I *had* to get it "ready" first...

Now, ordinarily, D is fully capable of chopping, marinating and grilling the vegetables all by himself. But, when he throws a trap like, "Oh, your marinade is very good and you get them all neat and pretty", I fall for it completely and end up doing all the "prep" work. Despite the nasty headache...

Anyway, I guess it was worth it as the vegetables turned out just perfect and we had a nice meal... and my headache? well, it lingered overnight and reluctantly left me the next day.

Marinade is simple this time: some kecap manis (or soy sauce + brown sugar), Tabasco® sauce (or chili powder), coriander powder, canola oil - adjust to taste. (alternately, just throw together your favorite herbs and spices for the marinade).

Vegetables: this time we had asparagus handy, plus bell peppers, onions, tomatoes, potatoes, zucchini, summer squash, eggplant.

I prefer to par cook the vegetables before marinating, so they don't take too long to cook up on the grill.

Marinate for about 30 minutes while the grill is getting hot. Throw them in the grill basket, in batches if preferred, at high heat and let them char a bit... the brown sugar helps carmelize.

Labels: , ,

Sunday, February 11, 2007

chunky vegetable soup

My idea of a wonderful mid-week meal for a cold winter night: Soup served piping hot.

Weeknight dinners work out great especially if I prepare ahead during the weekend. Like, soak and cook some beans ahead of time, so that on a weekday morning, I can throw things together for a spicy bean soup in the slow cooker, leave it on low, run off to work, and have the wonderful aroma of a hot and ready meal welcome us home...

easy recipe chunky vegetable soupWell, I am not always well-prepared. So, I look for short-cuts in prep time, not the taste, during weeknights. Of course, some would argue that flavor takes time to develop, and anything I "throw together" can't be all that good...

Hm. Be that as it may... uniform satisfaction so far at my table seems to indicate otherwise:-)

Ingredients:
vegetables of your choice: cauliflower, potatoes, broccoli, carrots, cut into chunks
onions, garlic, green chilies and tomatoes, cut into chunks
salt to taste
1 Tbsp brown sugar
1 Tbsp cayenne pepper powder
1 Tbsp Madras curry powder
1 Tbsp cumin powder
2 Tbsp tomato paste
1 Tbsp canola oil
4 cups vegetable stock

Preparation:
  1. heat the oil in a pressure cooker; sauté the onions, garlic and tomatoes with a pinch of salt and the spices; allow the spices to bloom
  2. throw in the vegetables, brown sugar, tomato paste, vegetable stock and some water; put the lid on and pressure cook just enough to get the vegetables soft and cooked but not too mushy
  3. uncover the pressure cooker, stir well, adjust to taste and gently simmer for a few minutes till flavors come together
  4. serve hot off the stove

Labels: ,

Tuesday, January 23, 2007

zen meal two


A soup, a grain and vegetables. Served in individual bowls. A monk's meal. A Zen meal. The beauty is not in the complexity of the recipes. It is in the realization that food can enhance spiritual growth.

I recently came across The Zen Monastery Cookbook at the bookstore, and was browsing through it, wondering at the synchronicity in my world: certain things come together only at certain times, even if I had been exposed to it long before.

The other evening, I was too tired to make a fancy meal, so I tried to make a simple meal fancy: Veggies, with mild indian flavoring, along with dosai and chutney presented in a rather unusual way, seemed to do it for us that night.

Ingredients:
for dosai:
3 ladlefuls dosai or adai dosai batter, if handy (else, rava onion dosai batter is good)
1 tsp canola oil (optional)
for chutney:
2 medium tomatoes,diced fine
3 dry red chilies, crushed fine
1 clove of garlic, minced fine
salt to taste
flavoring for veggies:
1 Tbsp Madras curry powder
1 tsp cayenne pepper powder
1 tsp red pepper flakes (to sprinkle on top before serving)
salt to taste
Veggies of your choice- cauliflower and broccoli florets, lima beans, baby carrots, squash etc.


Preparation:
  1. heat a non-stick pan and throw in the veggies with a little water, add the flavoring spices and salt, cover and steam till veggies are done; stir well, adjust sat to taste, set aside
  2. heat a non-stick pan and spread the dosai batter; add oil, if needed, to make sure dosai comes off the pan without much struggle
  3. in a saucepan, throw the chutney ingredients together, some water, cover and let it cook till flavors meld and the chutney is fairly thick
A splash of lemon juice and a sprinkling of dry red pepper flakes adds a nice touch to the vegetables.

Served in an inspired yet simple way, it felt like a grand and sumptuous meal that night...

Labels: , ,

Saturday, January 20, 2007

teriyaki chicken and vegetables


Japanese Cooking traditions, techniques, ingredients, recipes by Emi Kazuko (with recipes by Yasuko Fukuoka) is my first and so far my favorite cookbook for Japanese foods.

I don't follow the recipes closely as I haven't developed the taste for some of the ingredients, but, the general techniques and introduction to ingredients in this book is pretty good. This chicken teriyaki recipe was inspired by salmon teriyaki recipe in Kazuko's book.

Ingredients
2 medium frozen skinless boneless chicken breasts, thawed
veggies of your choice: green beans, carrots, baby corn, broccoli florets etc.
1 Tbsp sesame oil, or canola oil

for the Teriyaki sauce and glaze:
¼ cup shoyu, or dark soy sauce
¼ cup mirin (or, sherry, if mirin is not handy)
¼ cup sake
1 Tbsp brown sugar (or, superfine caster sugar, if handy)

Preparation:
  1. heat the teriyaki sauce ingredients gradually till sugar dissolves; off heat, let it cool
  2. cut the chicken breast into bite size pieces and marinate in some of the cooled teriyaki sauce, for about 15-20 minutes
  3. blanch the veggies with some salted water, drain and keep warm
  4. heat the oil in the pan to high heat, drain the marinated chicken pieces, toss them into the hot pan and stir them around; alternately, pre-heat grill or broiler and grill or broil the chicken; i prefer to pan-fry
  5. toss around, turning all sides, over medium high heat, adding teriyaki sauce a little at a time to glaze the chicken pieces; cook till chicken is done, still juicy and tender; usually, i check the temperature of the thickest piece by taking it off-heat and sticking a meat thermometer in the center - if it is close to 170°F I am happy, it is done
  6. in a serving platter, arrange some of the veggies, some rice and some chicken pieces
The amount here roughly serves two adults and one toddler for one wonderful supper:-)

Save any remaining teriyaki sauce in the fridge. It usually lasts months.

Alternately, serve with cooked Japanese white rice (uruchimai), or brown rice (genmai): dish up some rice in a serving bowl, top with veggies and chicken, serve warm.

Labels: , , ,

‹Older