Related Posts Widget for Blogs by LinkWithin

Tuesday, October 30, 2007

Stuffed Naan

stuffed-naan-1


This stuffed naan recipe came out of leftover piroshky dough. It freezes well - I simply line some wax paper between the naans, cover with foil and store in a freezer bag. To use, I simply leave it in the fridge overnight to thaw, and warm it in the oven or toaster oven.

Ingredients:

Dough: same as in Piroshky recipe

Stuffing: sauté some carrots and peas with mild curry powder and salt, keeping it dry, and allow it to cool a bit before using with the dough. (or use any other favorite vegetables like grated daikon radish or cauliflower, or even mincemeat)

Procedure is simple: Pinch off a chunk of dough, stretch the dough a little, spoon a little of the stuffing, close and seal, shape into a ball, then carefully roll it out flat making sure the stuffing doesn't spill or leak out.

Cooking: there are probably a few different ways of cooking these naans. My preferred way is to
  1. heat a pan or griddle to high temperature on my gas stove,
  2. dampen a surface of the naan,
  3. place it wet side down on the hot griddle and leave it till large bubbles/bumps start to form on the top surface
  4. then, flip it on to a roti-contraption that my mom gave me - looks like a skeletal ping-pong bat made of wire-rack, the "bat" area being made of a wire to allow flame to come through - and cook till done

Alternately, it can be baked on a hot pizza stone in the oven, or even on a BBQ gas/charcoal grill.

Labels: , , , ,

Thursday, October 25, 2007

spinach & cheese mini tarts

tartlets-1


On a Sunday a few weeks ago, Ana was taking a nap, D was out at the hardware store or something and I was home dreaming about some deep fried yummy mini samosas. Since I had sort of foolishly, on a whim, told D that I wasn't going to make any fried foods that weekend, I didn't want to give him a chance to say A-ha! I told you...

I thought of baking the samosas instead of deep frying. It didn't feel right, somehow. Am not against baked samosas, and am generally (well, predominantly) a healthy cook and eater, but, I didn't want baked samosas just then.

So, I decided to bake savory mini tarts instead. And, that's how these cute little vegetarian tarts came about.

The filling is just spinach, peas & onions, sautéed with spices, combined with some cheese.

tartlets-2


Ingredients
dough:
1 cup flour, plus some for dusting
¼ tsp salt
5 Tbsp butter (or canola oil)
a few Tbsp water
filling:
¼ cup cream cheese
¼ cup ricotta cheese
¼ cup grated cheddar
1 cup frozen cut spinach, thawed (or equivalent fresh spinach)
handful of frozen peas
1 small yellow onion diced finely
1 tsp canola oil
1 tsp Madras curry powder
salt to taste


Preparation
  1. Dough: combine the flour and salt in a bowl; rub in the butter to form coarse crumbly mixture; stir in just a few tablespoons of water, a little at a time till the dough comes together; cover with a cling wrap and leave in the fridge for about 30 minutes
  2. Heat the oven to 350°F
  3. Filling: heat the oil in a pan, add the onions, sauté till translucent, add the peas and spinach, spices, salt and cook till done, making sure the mixture is dry not runny; combine the cheeses in a separate bowl and keep handy
  4. Assembly: take the dough from the fridge, roll out into 1/8th inch thick flat layer, cut out 3-inch rounds using a biscuit cutter; grease a muffin tin and line it with dough rounds; add the filling - both veggies and cheese
  5. Bake: in the 350°F oven for about 20-25 minutes till pastry crust is done and golden brown
  6. Optional: garnish with chopped chives, spring onions or any other fresh herbs

Labels: , , , ,

Wednesday, October 24, 2007

Navarathri Chundal

navy-beans-chundal-1


The the 10-days 9-nights festival of navarathri brings back sweet memories... Friday the 12th through Sunday the 21st of October was the Navarathri festival this year.

Chundal ('ch' as in chair) as we called it at home (or Sundal as many others refer to it) is a staple item during Navarathri.

I was not particularly fond of chundal when I was growing up. It was just different types of protein-packed beans mildly spiced and mixed with grated coconut+chilies paste, usually. Nothing exotic. Nothing terribly inviting.

But, now that I have a toddler to make nutritionally balanced food for, chundals have come in very handy. During Navarathri time, traditionally, no garlic or onion or strong masala spices is added to flavor the chundal. However, at other times, I make several variations of the basic chundal just to see which flavor appeals to the discriminating toddler palate ;)

Chundal can be served as a snack on its own, or as a side to complement a meal. Lentils, grams, beans of all kinds can be used. My favorites have been chick peas - both dark and light varieties, black-eyed peas, lima beans, butter beans, fava beans, yellow split peas, brown lentils, navy beans, pinto beans, kidney beans and black beans.

Traditional method: Simply soak the beans overnight (or allow to sprout, if preferred), cook till tender but firm, not mushy. Add some salt and ground coconut+chilies paste, garnish with tempering and curry leaves.

combine dry grated coconut with some green or red chilies in a blender and grind to a powdery paste with very little water - amount of chilies depends on how hot you like it; and usually, for 2 cups of cooked beans, I use roughly ½ cup dry grated coconut

Alternately, I like to add raw green diced mango, or grated carrot, maybe some freshly grated ginger - just about anything to make it a little more interesting.

chana-chundal-1

Labels: , , , ,

Sunday, October 21, 2007

Lemon Fruit Bread

amish-fruit-bread-3


My dear pal Sig sent me some starter for the Amish Friendship Bread so I decided to make this Lemon Fruit Bread with it. Not only was she nice enough to send the starter, she actually sent me a bread book! Thanks a bunch, Sig, you know how much I appreciate it.

Unlike the yeast-leavened traditional earthy breads (like the Ciabatta Olive bread with a Biga)which need to rise, and maybe rise again a few times, this bread is along the lines of banana bread and zucchini bread and such which are closer to cake recipes, using beaten eggs, baking powder and baking soda for the rise and fluffiness.

The starter came with the traditional Amish Friendship Bread recipe so I decided to try it out, with a few simple substitutions.

It turned out moist, fluffy and moderately sweet (just the way I like it - not too sweet). I've passed along the starter to some of my friends who don't have a food blog to pass along the goodwill...

amish-fruit-bread-1


Ingredients
wet:
1 cup starter
1 cup oil
1/2 cup milk
3 eggs
1 tsp vanilla
dry:
2 cups flour
1 cup sugar
1½ tsp baking powder
½ tsp baking soda
2 tsp cinnamon
1 - (5.1 oz) box instant lemon pudding mix
1/2 tsp salt
additional:
1 cup chopped prunes, figs, dates, apples
1 Tbsp lemon zest (optional)
2-3 Tbsp lemon juice (optional)


Preparation
  1. Beat the eggs till fluffy
  2. Heat the oven to 325°F ; Grease two bread pans and keep handy
  3. Combine the dry ingredients in a plastic or ceramic bowl, make a well in the center
  4. add the wet ingredients and mix gently with a spatula till well incorporated, do not over beat
  5. stir in the additional ingredients, if using
  6. Pour the batter into the two bread pans equally, spread a bit to fill the corners and bake in the 325°F oven for about one hour, or till done
  7. Remove from oven, allow to cool for 10-15 minutes, slice and enjoy!


Labels: , , ,

Saturday, October 20, 2007

Suhiyan

suhiyan-1


Suhiyan is the only name I know this dish by and it is a traditional festival dish my mom makes, particularly for Saraswathi Pooja celebrated towards the end of the Navarathri.

Navarathri was one of my favorite times when growing up. We used to set up this elaborate display called "Bommai Kolu" where dolls of varying sizes are displayed in a gallery-like steps set up especially for this purpose.

The dolls are usually of mythological figures, Gods and Goddesses, made with anything from clay to wood to paper maché. I wish I had scanned some of the old photos - a picture would be worth a thousand words to describe the beautiful decorations my mom used to enthusiastically set up in those days.

Friends, family, neighbors are all invited, and there is a lot of exchange of visits all through the festival period. Every day of the ten days (nine nights) there is a special dish, mainly chundal ('ch' as in chair) aka sundal, which are usually made with any kind of beans (sprouted, if preferred) like chick peas, butter beans, broad beans, split green peas, Lima beans, black-eyes peas, peanuts, kidney beans and so on. Plus, vadai, payasam, appam and suhiyan towards the end around Saraswathi Pooja and Vijaya Dasami.

While my mom makes the suhiyan in the traditional way soaking the urad dal, rice flour etc., grinding them and making sure the Suhiyan comes out approximately round shaped, I am not that experienced, so, I use some short cuts and the suhiyan turns out oddly shaped, but, quite incredibly tasty nonetheless, if I may say so myself :)

Suiyan is basically a sweet filling (poornam) coated with a batter and deep fried. The filling can have a few variations. I make a simple poornam, just like for Poorna Kozhakattai, with brown sugar and dry grated coconut. The batter is the short-cut one where I mix some urad flour, rice flour, all purpose flour and some water to about oothappam batter or pancake batter consistency. I am not too finicky about measuring, so, the ingredients list below is approximate, bear with me.

Ingredients:
for the poornam:
½ cup brown sugar
½ cup dry grated coconut
some water (just about ¼ cup or less)

for the batter:
¼ cup all purpose flour
¼ cup urad flour
¼ cup rice flour
some water

oil for deep frying

Preparation
  1. poornam: heat the water and brown sugar in a pan over medium low, when brown sugar dissolves and begins to bubble, add the grated coconut and stir till thick, but not rock solid; remove from heat when the mixture has come together and is not runny anymore; this step is mostly from experience and trial and error for me; roll into about 1-inch or 1½-inch round balls while still warm, allow to cool a little so it sets into shape
  2. batter: mix the flours, add a little water at a time till the batter is about the consistency of thick pancake batter, or oothappam batter, or even thick idlee batter
  3. suhiyan: heat oil for deep frying; dip each poornam ball in the batter, coat well (and uniformly if possible), deep fry till golden brown on the outside

This suhiyan recipe is my post for RCI: Regional Cuisine of India: Tamil Nadu Festival Foods hosted this month by Vcuisine

Labels: , , , ,

Wednesday, October 17, 2007

Piroshky

piroshky-1


About half a dozen years ago, when D and I were just spending a weekend in Seattle, we accidentally found ourselves near this teeny tiny little store called Piroshky, Piroshky at Pike Place Market. We wanted to just grab a couple of piroshkies for lunch and head out. But, boy did I have a hard time picking just one or two! We ended up buying about a dozen assorted ones and bringing it back home... The carrot, cabbage and potatoes Piroshky (Piroshki, Piroshky, or Pirozhki, aka Russian stuffed pastries) stuck in my mind.

Every time I looked up a piroshky recipe, the dough at a glance seemed to me like the calzone recipe (approximately, at least) and I wasn't sure if it would turn out as tasty as the ones I had from Piroshky, Piroshky, so, I just didn't really try it often. The first time was not a great success. I blame it on the oven :)

But, now that we have a newer oven, and I am getting the hang of using it correctly, this batch turned out quite good, if I may say so myself. I went with a simple potatoes, peas, carrots and cheese filling.

And, they make a wonderful snack hot or cold. One of these piroshkies for breakfast is incredibly filling and satisfying. They turned out soft and flaky, not dense and tough.

Piroshky can be fried or baked. I preferred to bake. And, it is definitely a weekend project for me - usually if it involves letting the dough rise, punch down, let it rise a second time, allow to rest, fill, shape and then bake, it has to be a weekend project for me... weeknights are just too short :)

The basic dough recipe is from Kaleenka Piroshky Recipe at Recipezaar. The quantity listed here made about 14 or 15 piroshkis of various shapes, before I ran out of filling, even though I was a bit conservative with the filling. So, I used the rest of the piroshky dough to make yummy stuffed naan.

Ingredients
dough:
4½ tsp dry rapid rise yeast
¼ cup warm water
4 cups flour (plus more for dusting, kneading)
2 Tbsp sugar
1 tsp salt
1 egg
3 Tbsp additional vegetable oil
1½ cups milk

for the filling:

2 medium potatoes, peeled, cooked
2 medium carrots, cooked
1 cup frozen peas, thawed
salt to taste
1 Tbsp canola oil
some paprika powder, cayenne pepper powder, hint of nutmeg - or any of your favorite spices/herbs
plus, 15 or so 1-inch cubes of cheddar or colby cheese

Preparation
  1. Dough: In a glass or ceramic bowl, activate the yeast by dissolving it in the warm water; let it sit for about 10 minutes; combine the rest of the dough ingredients, then add the yeast mixture, knead well till sooth and elastic
  2. Leave in a warm place to rise; usually, I heat the oven to 175°F (as that is the lowest it would go) before I prepare the dough, and turn it off; then, I cover and leave the ceramic bowl with the dough to rise in the warm (but off) oven; especially in winters, it might take several hours even if left by the heating vent to have the dough rise till double in volume; then punch down and keep the dough handy
  3. Filling: Heat oil in a pan; add the peas and sauté ; mash the potatoes and carrots and add them in, plus the salt and spices; stir till well incorporated; set aside to cool a bit
  4. keep a greased or lined pan or cookie sheet handy
  5. Heat the oven to 350°F
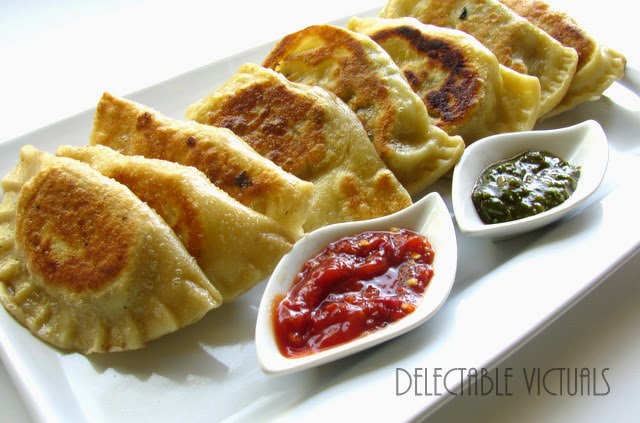
  6. Shaping: I took liberties with shaping the dough - basically, rather than gathering up the edges and pinching to seal, I rolled the dough to 1/8" thick rounds, folded them over to a semi-circle and then cut the edges a bit to shape as seen in the picture; and, just for fun I shaped a few others into a longish hoagie-like shape :)
  7. Anyway, roll out the dough, add the filling plus one cube of cheese, seal and shape as desired; set aside in a microwave safe dish without smushing them together or overcrowding
  8. Warm them in a microwave for about 10-15 seconds and transfer to the greased cookie sheet and allow to rise for 10-15 minutes while working in batches; then brush the tops with some water if preferred
  9. Bake in 350°F oven for about 15-20 minutes till golden brown on top and cooked through


Labels: , , , , ,

Monday, October 15, 2007

Pierogi

pierogi polish dumpling potato cabbage filling


Pierogi (piroghi, perogi, pirogi) is a boiled dumpling, filled with meat or vegetables, or anything you like. It is sort of like ravioli in concept, but the dough is a little different. However, it is quite tasty when served by sautéing in a bit of butter.

I don't make pierogi often - maybe three or four times a year. Potstickers show up in my kitchen more often though, because the wrapper is ready-made gyoza or spring roll wrappers. Dumplings, however, remind me of kozhakattai my mom makes (an Indian steamed dumpling made with rice flour, which can be stuffed with savory or sweet filling).

pierogi polish dumpling potato cabbage filling


Two simple fillings this time:
  1. Potatoes, peas and carrots filling like for samosas: Cook the vegetables together, mash them and pan sauté them with spices and salt - keeping it dry, not adding any water. It doesn't help if the filling is runny.
  2. Sauteed cabbage, kale and onions filling: just a touch of salt and dill for flavor

I do try for uniform shape, but, am not too finicky about it. And am too lazy, so I made them rather big. They are cuter when the diameter is about 2-3 inches, but mine are about 4-5 inches. One of these pierogies makes a nice snack, and two of these with a bowl of Borscht make a sumptuous meal.


pierogi polish dumpling potato cabbage filling


The dough recipe is from here: Pierogi recipe, which has a detailed description of the process and is quite entertaining to read. The quantity of flour here made about 15 large-ish dumplings.

Ingredients
Dough:
2½ cups all-purpose flour (plus some for dusting)
1 tsp salt
1 tsp sugar
1 egg
1 tbsp canola oil
½ cup hot water

Filling:
2 medium potatoes
1 cup frozen peas
2 medium carrots
salt to taste
2 tsp paprika
1 tsp cayenne pepper powder
1 Tbsp canola oil

water as needed
1 cup shredded cabbage
½ Tbsp butter (or oil)

Preparation
  1. Dough: start with 2 cups of flour, salt, egg, oil and add a little hot water at a time to make a soft elastic dough that is not too sticky; add a little more flour at a time, as needed, and knead gently till the dough comes together; cover and set aside for 30 minutes to rest while getting the filling ready
  2. Meanwhile, start a large pot of salted water boiling
  3. Filling: cook the vegetables (I microwaved them with a few tablespoons of water, in Baked Potato setting); mash them; heat oil in a pan, sauté the vegetables with salt and your favorite spices/herbs, allow to cool a little, while rolling out the dough
  4. Pierogi: roll out the dough into 1/8 inch thick rounds - the size of the rounds is flexible - smaller the better; fill with the veggies; brush the edge with a little water; fold over in half and seal shut, pressing down with the tines of a fork at the edges if preferred
  5. Boiling: gently slide a batch into the boiling water - the number in each batch, of course, would depend on the size of the pot and size of the pierogi - preferable don't overcrowd; wait till they float to the top and allow to boil for about 8-10 minutes depending on how large the pirogi is
  6. Freezing (optional): fish them out carefully, allow to drain on a paper towel; cool and freeze a portion at this point if preferred - use plastic wrap or parchment paper to separate the pieces so they don't stick together
  7. Finishing: heat oil/butter in a pan; sauté onions and cabbage if using, with a hint of salt; then add the boiled pierogies and sauté till desired brownness on both sides


Labels: , , , , ,

Saturday, October 13, 2007

Borscht (no meat)

borscht easy recipe

Borscht is one of those dishes I make when I have been thinking about it for a while, and somehow D echoes my thoughts, and we finally decide it is time to have some.

It is just a simple hearty vegetable beet soup, and I make variations of this soup on and off. But, this recipe here is my version of borscht that happens to satisfy both D's and my tastes, and has a bit of a kick to it with the spices.

While there are several regional and cultural variations of it, I stick to this basic version most of the time, leaving out the sour cream, and usually serving it hot. Cold beet soup has not appealed to me so far, but that can change ;)


Ingredients
1 medium potato, peeled and finely diced or julienned or grated
2 medium carrots, peeled and finely diced or julienned or grated
1 medium beetroot, peeled and grated finely
2 to 3 cups finely chopped red cabbage
1 medium onion, diced finely
1-2 garlic cloves, minced finely
3-4 cups vegetable stock
salt to taste
1 Tbsp canola oil
Or, chicken stock or vegetable stock; or just 3-4 bullion cubes dissolved in 3-4 cups of water

spices:
1 Tbsp paprika powder
2 Tbsp cayenne pepper powder
1 Tbsp dried dill

Preparation
  1. heat oil in a pot, add the onions and garlic, a pinch of salt and sauté till translucent
  2. add the rest of the vegetables and the stock, cover and simmer on medium low for about 15-20 minutes till vegetables are done
  3. stir in the spices and simmer 10 minutes longer, adjust salt to taste


Labels: , , , , ,

Friday, October 12, 2007

Yekik Alicha and Yeqey Sir Qiqqil

yekik alicha ethiopian stew lentil chana dal


This Yekik Alicha recipe is adapted from Exotic Ethiopian Cooking by Daniel Mesfin

Yekik Alicha is a mild and flavorful split pea stew. I used Chana Dal and some handy spices from my cupboard, so, this may not be traditional, but it came close to what I had at the restaurant some time back :)

I had started some buckwheat injera batter over the weekend and it was ready by mid-week. So, I decided to make a simple Ethiopian meal again, which my little toddler seems to enjoy as much as we do. This time, I served it with Bamya Alicha, Yekik Alicha and a simple boiled beetroot dish called Yeqey Sir Qiqqil.

Yeqey Sir Qiqqil: boil 1-2 medium beets (or get canned beets), dice or slice, toss with some olive oil, lemon juice and salt; allow to rest for 10 minutes or so till flavors meld.

ethiopian beet salad yeqey sir qiqqil


Ingredients
1 cup yellow or green split peas
1 medium red onion diced
3-4 cloves of garlic crushed
2 Tbsp fresh grated ginger
3-4 green chilies chopped or sliced
salt to taste
1 tbsp canola oil

spices:
1 tsp nutmeg powder (less if you don't like the strong flavor)
1 tsp cinnamon powder
1 tsp allspice powder
1 tsp black pepper powder
½ tsp cardamom powder (optional)

Preparation
  1. wash and cook split peas till well- done - still firm not mushy
  2. heat oil in a pan, add the onion, ginger and garlic and sauté till onions turn translucent
  3. add the split peas, spices, chilies, salt, some water, cover and simmer for 10-15 minutes on medium low heat

Serve warm with Injera.

Labels: , ,

Thursday, October 11, 2007

Bamya Alicha

bamya alicha ethiopian okra stew


Exotic Ethiopian Cooking
by Daniel Mesfin is one of the books D gave me early in our marriage. I like the book. Simple recipes, easy to follow. The only thing I would have liked more is to have pictures of each of the dish along with the recipe on that page. The book does have assorted pictures of dishes spread around the book, though, with the caption and all.

Anyway, I use it as a guide more than following recipes to the letter. So, this recipe of Bamya Alicha, which is a spicy okra stew/side, usually served with Injera, is not strictly traditional and is not per the recipe in the book, thanks to my chronic inability to follow any recipe to the letter :)

Ingredients
½ package frozen cut okra
2 medium tomatoes, diced
1-2 red chilies
2 Tbsp grated ginger
3 cloves of garlic crushed or minced
salt to taste

spice powders:
2 tsp paprika powder
2 tsp allspice powder
1-2 Tbsp cayenne pepper powder (adjust to taste)
1 tsp nutmeg powder (optional)
2 tbsp canola oil
½ cup water

Preparation
  1. heat the oil in a pan, add the tomatoes and sauté till soft
  2. add the ginger and garlic, sauté till fragrant
  3. add the cut frozen okra (no need to thaw - usually it is par-cooked and doesn't take long to cook through), some water, and some salt
  4. cover and simmer till okra is tender
  5. stir in the spice powders, simmer some more; adjust to taste


Labels: , ,

Monday, October 08, 2007

Stuffed purple peppers

purple pepper stuffed vegetarian


Only a few more weeks of Farmer's Saturday Market before they close down for winter... and it was Purple Mania all over again: I had to buy everything purple at the market.

The purple cauliflower went into a yummy salad with pears and raspberry vinaigrette. However, the purple bell peppers were asking to be stuffed and baked. Once cooked, the purple peppers don't retain their bright color, but, taste just as delicious.

purple peppers farmers market


Stuffing can be anything you like - say, wild rice stuffing as in my stuffed acorn squash recipe, or eggs with queso panela, corn and beans as in my Tomate Rellenos recipe, or even simple spiced potatoes and peas as for a vegetable samosa recipe.

However, I ended up stuffing these with leftovers. I wasn't in the mood to make special stuffing from scratch, and thankfully, there was enough spicy rice and cholay that needed to be used up anyway, so, this was rather a quick meal to prepare.


Ingredients
2-3 medium purple bell peppers (or red, or yellow, or orange)
Pam™ cooking spray
salt to taste

stuffing:
1 cup cooked rice - leftover rice with your favorite spices and vegetables
½ cup leftover cholay
¼ cup grated cheddar cheese (or any favorite cheese that melts well)
1 medium soy dog, diced
½ cup frozen peas
spring onions chopped (as much as you like)
cilantro, or other herbs for garnish

Preparation
  1. Slice the top off the bell peppers, scoop out the seeds and ribs carefully without puncturing the flesh, slice a thin layer off the bottom to make sure the pepper will stand stably and not topple over
  2. Heat the oven to 375°F
  3. Either in a pan, or in the microwave, par cook the bell peppers: immerse them in salted water completely and boil for a few minutes - the thickness of the flesh and the variety of the pepper will determine how long to do this - basically, in this recipe the peppers are not going to be in the oven for too long (as the stuffing is all pre-cooked), and so, it is nice to make sure the bell pepper is not raw when ready to come out of the oven
  4. Remove the bell peppers from water, pat dry, and stuff: a layer of rice at the bottom, a layer of cholay in the middle, and another layer of rice at the top
  5. Spray or brush the outside of the pepper with some oil
  6. Bake in a 375°F oven for about 15-20 minutes till the skin starts to wrinkle a bit, and gets softer and fork-tender (I usually pinch the top edge a bit to see if it is pliable)
  7. Top with some cheese and place it under the broiler briefly till cheese melts
  8. Remove from oven, allow to rest a bit
  9. Meanwhile, sauté the soy dogs, peas and spring onions with your favorite spices, or just salt, and keep handy to serve on the side and possibly garnish the peppers before serving

Whereas D just picks up the pepper and bites big chunks enjoying all the goodness in each bite, I tend to dissect the thing with my knife and fork and try to take manageable forkfuls in as ladylike a manner as I can :)

Labels: , , , , , ,

Saturday, October 06, 2007

Simple Egg Curry

egg-curry-1


For a while now, we have been getting our hen eggs from a colleague who has a smallish farm, where the chicken roam free and are as well cared for as I can imagine. As I had noted in my other blog, I find that these farm fresh eggs taste a whole lot better than commercial eggs, so we have given up buying commercial eggs... for now.

You've probably not met Helga if you have not stopped by my general rant space, but, she happens to have a special place on my crochet shelf. Anyway, the farm fresh eggs were perfect for a warm weekend meal of egg curry with coconut rice.

farm-fresh-helga-eggs-2


This egg curry is not as elaborate as my usual egg curry recipe, or as spicy as Gulai Telur, and has fewer ingredients than Telur Balado. But, it came about quickly one evening with ingredients handy at home and tasted quite good that I wanted to save it here.

Ingredients
6-8 hard boiled eggs, shelled
1 medium onion diced finely
2 Tbsp canola oil
1 Tbsp brown sugar
salt to taste
water

garnish: chives, cilantro or any other favorite fresh herbs

masala paste:
1 medium onion, diced
2 medium tomatoes, diced
6 sundried tomatoes† (not packed in oil)
3 Tbsp grated ginger
3 Tbsp sambal oelek (or 2-3 Tbsp cayenne pepper powder)
2 Tbsp coriander powder
1 Tbsp cumin powder

Pour some hot water over the sun dried tomatoes in a shallow bowl till just immersed, and reconstitute them before blending into paste

Preparation
  1. masala paste: combine the masala paste ingredients and blend to a smooth paste
  2. heat oil in a pan, add the onions and sauté till translucent
  3. then add the masala paste and sauté it till rawness is gone, about 5-8 minutes over medium heat
  4. add the shelled hard-boiled eggs with some slits on the surface, or halved if preferred, add some salt, and a little water to make sure the eggs are submerged in the gravy, cover and simmer till flavors meld
  5. taste and adjust salt, garnish with chopped chives and cilantro

Serve it with plain hot rice, or even simple rotis. I was in the mood for coconut rice, a simple version, so, here it is...

Coconut Rice:
4 cups cooked rice
½ cup dry unsweetened dessicated coconut
salt to taste
tempering: 1 Tbsp canola oil, 1 tsp urad dal, 1 tsp chana dal, 1 tsp mustard seeds

  1. start the tempering: heat the oil in a pan, add the chana dal, when it turns golden brown add the urad dal and when it turns brown add the mustard seeds, and when they pop add the coconut and toast a little
  2. add the rice and some salt, stir well


p.s: thanks to bee's thoughtful comment, I would like to send this out to CLICK: the photo event

Labels: , , , ,

Thursday, October 04, 2007

rustic cabbage and potato stew

rustic-meal-1


Irish Cuisine invokes images of hearty potatoes, cabbage, beer, stews, soda breads and more beer. Now, I have not truly tasted authentic Irish foods yet, and am hoping to do so when we plan a vacation next year.

But, meanwhile, I had bought this fragrant, fresh and earthy rosemary artisan bread hoping to have it with some hearty soup or stew for a weeknight dinner, and started looking around for some Irish stew recipes. Then decided to just go my own way and make something healthy, yet quick and easy to dip the rosemary bread in.

Since, we have a bunch of small/new/baby potatoes we had dug out of our garden recently and since I discovered a chunk of shy cabbage from a few weeks ago hiding in the lower back corner of the fridge, this cabbage and potato stew came about sort of unthinkingly. But, as it turned out quite hearty and tasty, I might as well jot down here for days when I can't think of anything exotic to serve for dinner :)

Anything as simple, yet tasty and wholesome as this, I pass off as "rustic" - just a little marketing ploy - not that a square meal at home needs marketing...

Ingredients:
16-20 baby potatoes
1-2 generous wedges of large green cabbage
1 cup granulated TVP:Textured Vegetable Protein (Optional)

for the broth:
6-8 cups vegetable stock (or water)
4 Tbsp coriander powder
2-3 Tbsp chopped fresh rosemary (or dried rosemary)
2 Tbsp cayenne pepper powder
2 Tbsp brown sugar
2 Tbsp garlic powder
salt to taste
(any other favorite flavoring can be used for the broth)

Preparation
  1. Start the broth simmering in a large pot
  2. Thoroughly clean the potatoes if leaving the skin on
  3. Drop the potatoes in the simmering broth, cover and simmer till potatoes are partially done, then throw in the cabbage
  4. Simmer till fork tender, adjust taste
  5. To thicken the broth, I simply mushed a few of the potatoes that were cooking in there till desired thickness
  6. If preferred, add some TVP:Textured Vegetable Protein for some body and, of course protein (i left it this time)

Chunks of unpretentious rosemary bread dipped in this simple yet wholesome stew was a perfect meal for the cold, wet, windy evening we had a few days ago.

For a nutritious and filling meat substitute, sometimes I make Wheat Meat, and run it in a blender to granulate it. This makes a non-soy protein substitute when needed, like in mock ground beef burrito.

Labels: , , , ,

Monday, October 01, 2007

Mambazha Mor-kozhambu

mambazha-more-kozhambu-2


Mambazham=Mango fruit. The mor-kozhambu recipe is very much the same as opo squash mor-kozhambu. The primary difference is the use of ripe mango fruit instead of vegetables (opo squash, carrots, plantain etc.).

This doesn't look like much in the photo - just a yellow liquid - but, it was a tiny piece of heaven for me. I don't make this often. I wait till I crave for it and make it in the mango season when the fruits are affordable here, which is usually around summer.

Mambazha mor-kozhambu can be a bit of an acquired taste like Mahani/Mahali oorugai (pickle). I simply love Mahali oorugai, but, my mom, and even D cannot stand the smell of it! Me, I am happy with yogurt rice accompanied by a generous helping of Mahali pickle:)

Anyway, for this mambazha mor-kozhambu:
  1. I used one large ripe mango fruit, skinned, and pulp extracted by hand.
  2. Then simmered it in some water and salt. When cool enough to handle, ran it in the blender till uniformly smooth and no lumpy mango pieces remained.
  3. Then added the ground mor-kozhambu paste as in opo squash mor-kozhambu recipe and simmered some more
  4. Finally added buttermilk till it warmed through but not boiled, else buttermilk separates. Optionally add the tempering and garnish with cilantro or curry leaves.

This mambazha mor-kozhambu has a slight sweet tinge to it from mango fruit, which is balanced by some extra hot chilies in the ground coconut+chili paste.

I love paruppusili to accompany this mor-kozhambu, but, I was too lazy to make paruppusili, so, I served it with spicy beetroot+potato roast - just potatoes and beetroot pan-roasted with red hot chili powder and some salt.

mambazha-more-kozhambu-3

Labels: , , ,

Newer›  ‹Older