Related Posts Widget for Blogs by LinkWithin

Thursday, June 24, 2010

Cous-cous Loaf, Sliced and Pan-fried

Cous-cous Loaf, Sliced and Pan-fried vegetarian Mediterranean fusion

Reconstituting leftovers was one of my mom's specialties. In those days, she believed in cooking a huge meal often because we'd usually have family and friends drop in, and depending on the meal time my mom always insisted on feeding everyone, forcibly if needed. Hospitality culture that I grew up in is simply wonderful. And, as a guest, it is an affront to refuse refreshments/meals offered by the host.

Anyway, so, there were days when a pot full of upma, or a dozen idlees sat around, uneaten. Spoilt brats that we were, we refused to eat leftovers in the same form. So, my mom used to get creative about rehashing the leftovers and making something "new" for us. I am glad I picked up a few pointers from her even if inadvertently.

Cous-cous, plain white rice, noodles, upma - they all lend themselves well to reconstitute for the next day. Rice, of course, is rather easy - they can become coconut rice or lemon rice or mango rice or vangi baath or mint and spinach rice or peas-and-cumin rice... endless possibilities.

Noodle pancake is a great way to use up the extra noodles, not to mention the various noodle salads, casseroles, and noodle soups that they can become.

While not the traditional way, sometimes I make leftover upma into upma kozhakattai.
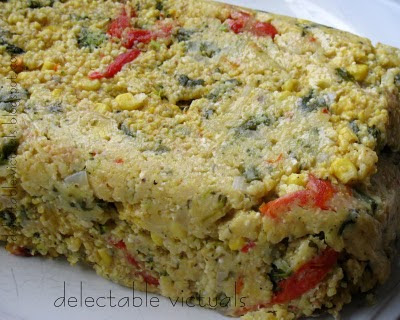

Cous-cous Loaf, Sliced and Pan-fried vegetarian Mediterranean fusion

While Cous-cous patties and vada are a popular choice at home, these pan-fried slices of cous-cous loaf are enjoyed as well.

Not very different in concept from cous-cous patties, the cous-cous loaf is rather easy to make. Simply sauté any veggies we'd like to add to the plain cooked leftover cous-cous, toss them all together, allow to cool a bit; then, line a bread loaf pan with cling wrap, pack the cous-cous down in there tight, cover with the cling wrap, and leave in the fridge to set for an hour or two up to overnight. Then, slice up the loaf and pan fry them till crisp on the outside. Serve with favorite tomato sauce.

Ingredients
4 to 6 cups of leftover cooked cous cous
vegetables: onions, ginger, garlic, peas, carrots, bell peppers
spices: cumin powder, coriander powder, paprika
canola oil
cling wrap, small loaf pan or any container that could make a roughly rectangular shaped loaf

Preparation
  1. Sauté the vegetables in a tablespoon of canola oil, add the cous-cous and a ¼ cup of water if needed, cover, and allow to cook on low heat for a few minutes till they come together in harmony
  2. Allow to cool a bit and pack it down in a cling wrap lined loaf pan, and let it set in the fridge for a few hours
  3. Unwrap carefully, cut into about 1-inch slices and pan-fry till the outsides are crisp and brown
  4. Serve warm with tomato sauce, with a side of carrot salad

Carrot Salad
grated carrots
finely chopped spring onions
dried cranberries, raisins, walnuts or almond slivers

Combine the salad ingredients and toss with Blue Agave Nectar & Aka Miso Dressing.

Cous-cous Loaf, Sliced and Pan-fried vegetarian Mediterranean fusion

Labels: , , , ,

Sunday, June 20, 2010

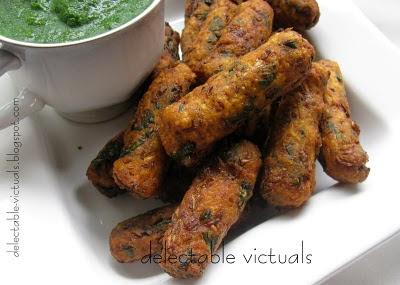
Spinach & Napa Cabbage Eggless Croquettes

Spinach Napa Cabbage vegetable no-egg Croquettes

Vegetable croquettes with dipping sauce or chutney can be a wonderful appetizer or snack. Typically, potatoes and carrots are mashed with some spices and binding agent (usually eggs), possibly breadcrumbs for crisp crunchy skin, and deep fried.

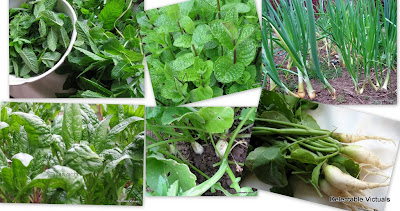
This recipe uses home-garden veggies: spinach, spring onions, and radish; plus some Napa cabbage and carrots; no eggs, just heels of bread loaves, rice flour, and water for binding.

home garden vegetables radish spinach onions vegetable croqueetes

As I often mention, à la Owl in Tearwater Tea, the heels - the end-slices of sliced bread loaves - loathed and discarded cruelly by one and all, have a sad fate indeed. Which is precisely why I like to use them for binding, even for making breadcrumbs and croutons.

For a quick Father's Day snack, I served these vegetable croquettes with fresh home-garden mint chutney.

Ingredients
1 cup finely chopped Napa cabbage
½ cup finely grated carrots
1 cup chopped fresh spinach leaves
optional: finely grated radish and chopped radish greens
2 or 3 end slices of bread loaf
¼ cup rice flour (more or less)
1 Tbsp smoked ground paprika
1 Tbsp ground black pepper
1 Tbsp coriander powder (optional)
salt to taste
water as needed (a Tbsp at a time)

Canola oil for deep frying

Preparation
  1. Combine the ingredients and knead to a soft dough that can be shaped into small logs
  2. Deep fry in oil till golden brown and cooked through on the inside


Mint Chutney

2 cups fresh mint leaves
¼ cup pickled jalapeno rings (less if preferred), with a bit of the vinegar it is pickled in

Combine the ingredients and blend till smooth, adding a little water if needed. Serve fresh.

Labels: , , , , , , ,

Sunday, June 13, 2010

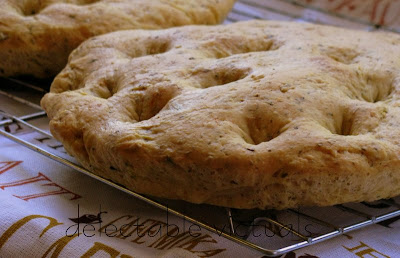
Simple Herb Focaccia

Simple Herb Focaccia

I've tried many different recipes for pizza and focaccia, sometimes taking epicurean license, sometimes to the letter. Baking is an art. I am still working on it, enjoying the explorations and learning a lot.

Most of the time, I simply throw together the dough for pizza - just keeping in mind the rough proportions.

Typically, for pizza, a ratio 3:1 of flour:water, with 1 pkt active dry yeast, works well. Since we buy active dry yeast in bulk rather than individual packets, I just keep in mind that 2½ tsp = 1 pkt active dry yeast, which is easy to remember after baking for a while :) The 3 parts flour can be a combination of whole wheat, soy, spelt, rye, all purpose, gluten, with flax meal and nutritional yeast added in - must adjust for the varying gluten content of the flours - just experimenting has given me good results.

And, Focaccia is very similar, except it is more yeasty, so, reduce the flour. The ratio of flour:water is typically 2:1 by volume, with 1 pkt (2½ tsp) active dry yeast. Can use a combination of flours, but, the simplest one here uses unbleached all purpose flour. Unlike for pizza which only needs one rising, Focaccia is better after 2 risings and a final short one before baking.

Most good bakers would advice that flours and other dry ingredients for baking should be measured by weight, not volume. And they are so right. I try to follow that as best as I can, especially when I make artisan breads.

Anything from sautéed onions to various fresh herbs can be added, or Focaccia can be baked plain, with nothing on except some salt to taste.

Ingredients
2 cups all purpose flour
1 cup warm water (105°F to 110°F)
2½ tsp active dry yeast
2 Tbsp olive oil
1 tsp salt
a few Tbsp fresh chopped rosemary, chives, parsley, oregano or other favorite herbs
1 Tbsp coarse salt (optional) for topping

Preparation
  1. Add the yeast to warm water and allow to sit for 10 minutes
  2. Add rest of the ingredients to this mixture, knead well, coat with olive oil and allow to rise in a warm place till doubled in volume, about 2 hours
  3. Divide the dough into 2 equal parts, stretch it into round cake pans, cover, and allow to rise another hour or so. If the dough doesn't stretch easily and wants to spring back, allow to sit for a little longer and try again
  4. Pre-heat oven to 475°F; Dimple the dough in several places with fingertips, cover the pan and allow to rise for another 30 minutes
  5. Bake in a 475°F oven for about 15 minutes (or till cooked through), remove immediately, brush with olive oil and sprinkle with coarse salt and serve warm
They make excellent quick sandwiches: slice the focaccia and load it with favorite fillings - feta, kalamata olives, sundried tomatoes, pepperoncini, spring onions or other favorites. Serve with warm soup for a filling meal. easy recipe Simple Herb Focaccia bread italian

Labels: , , ,

Wednesday, June 09, 2010

Broccoli Salad with Blue Agave Nectar & Aka Miso Vinaigrette

easy recipe fusion cuisine Broccoli Salad with Blue Agave Nectar  Aka Miso Vinaigrette

Salads are so unassuming and ubiquitous that it is hard to bring them front-and-center, right under the spotlight. To me, what makes a salad is not just the mix of greens and veggies, but the dressing or vinaigrette that brings out the flavors and sets the mood for the meal.

Of course, oftentimes, the salad is our meal at home - tossed or layered - with harmonious ingredients thrown in, and some odd ones just because they are handy and need to be used up...

Typical Broccoli Salad usually has some bacon, sliced almonds and raisins, with a sweetish mayonnaise-based dressing.

My recipe is not very different in concept - I omit the bacon here since none of us at home eat it. Also, rather than traditional mayonnaise, I went with a quick and light dressing.

Fusion cuisine being my signature, the dressing is where I usually like to get creative for salads. The combination of mildly sweet Blue Agave Nectar; bean-ish, tangy, robust, salty Aka Miso; hot Sambal Oelek; biting fresh grated ginger and garlic, all seem to come together in a red wine vinaigrette with bland Canola oil, not the rich Olive oil for this wonderful Broccoli Salad.

Miso is basically fermented soybeans with some grains and salt. It has a complex flavor that is hard to describe. Among the White, Red, and Yellow Misos available readily in the market, White Miso (Shiromiso) is fermented for the shortest time with sweet and mild flavor. The Red Miso (Akamiso) is full-bodied and saltier than white. The Yellow Miso falls in-between Red and White.

Usually, one part vinegar to 3 parts oil makes a good vinaigrette. Depending on the type of vinegar and oil, and personal preferences, can increase the oil or decrease the vinegar for a good balance.

With all the bold flavors, for the sweetness to show through, I add a bit of home-made plum jam in this recipe, but any other favorite low-sugar jam stirred in would add an interesting touch to the dressing.

Since I love to experiment, and vinaigrettes are easy to play with, I enjoy creating unique ones. Maybe someday it would be fun to bottle and market these exclusive creations... Of course, it probably won't help the business if I just share them here:) No matter.

Ingredients
Broccoli florets, bite-sized
Cauliflower florets, bite-sized (optional)
Red grapes, sliced in half (or quartered if they are too big)
Chopped Spring onions

Sliced Almonds or Toasted Sunflower Seeds (or both)
Dried Cranberries (preferably unsweetened)
Unsweetened shredded dried coconut (optional)
Fresh Grated Parmesan cheese (optional)

Blue Agave Nectar & Aka Miso Dressing
1 to 2 Tbsp Organic Blue Agave Syrup
1 Tbsp Aka Miso (red miso)
1 Tbsp Sambal Oelek
1 Tbsp home-made low-sugar Plum Jam (optional)
1 Tbsp fresh grated ginger
2 cloves of garlic, finely grated
¼ cup red wine vinegar
½ cup canola oil, plus more if desired

Preparation

Stir the Vinaigrette ingredients vigorously till well-combined.

Toss the salad ingredients together, drizzle some vinaigrette - generously if preferred. Top with grated Parmesan or Unsweetened shredded coconut, sliced almonds and dried cranberries.


Labels: , , , , , , ,

Wednesday, June 02, 2010

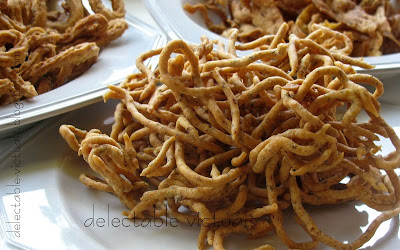
Muthusaram, Karasev: Savory Indian Snacks

naazhi Muthusaram, karasev, Kaaraasev: Savory Indian Snacks

Among the many home-made snacks my mom had handy when we were little, the top favorites of mine were Muthusaram and Ribbon Pakkoda.

Usually, most of these were traditional snacks made during special festivals, but, during summer vacations, when families gathered and kids were home and hungry all the time, my mom had huge metal containers filled with a variety of sweets and savories... feels like a dream, like another lifetime, just thinking about it now.

Typically, rice flour, chickpea flour, urad flour, salt, chili powder, water is all that is used to make these deep-fried savory snacks. Each family has its own slight variations to the standard recipe handed down through generations. My recipe here is based on my mom's, although I tinker with the proportions sometimes.

Muthusaram, also known as Mullu Murukku (thorny murukku), when done just right, sort of melts in the mouth and is hard to stop eating. At least for me :) I make it with just plain rice flour and a bit of urad flour, with a bit of cumin seeds for flavor and health benefits.

Kaaraasev is made with chickpea flour and a bit of rice flour. I like to add a bit of garlic and curry leaves for flavor and their health benefits.

Another mild sweet+savory kind of crunchy snack my mom used to make, called Maida Biscuit, is typically small diamond or square shaped biscuit, mildly sweet with a hint of salt, another year-round favorite. It is usually made with maida flour. I use my regular wholewheat flour, and this can be baked just fine, no need to deep fry.

These days, just about every snack, even crackers, seem to list HFCS as one of the first few ingredients and the so-called healthier ones in the market are not quite within my limited budget. So, when possible, I make a goodish batch of home-made snacks and store them for the kids, whose high point of the day seems to be snack time!

Of course, it is deep fried in oil, and baking it doesn't work out as well, but, as long as the oil temperature is right, it is not greasy; and compared to the hydrogenated oils used in store-bought crackers and snack items, zero trans fat Canola Oil seems a safer bet.

I don't really check the temperature with an oil thermometer when I cook - just learnt from my mom to drop a small pea-sized dough into the oil and see if it rises to the top in 5 seconds or so. If the oil is too hot, the outsides burn before insides are cooked, naturally; and if it is not hot enough, the end product is terribly greasy. Trial and error works best. Nothing like experience to figure it out, as my mom says :)

naazhi Muthusaram, Kaaraasev: Savory Indian Snacks

Of course, a Naazhi (dough press of sorts) would be essential to make these the right way as it has star-shaped holes that make the thorny texture of the Muthusaram. But, a ketchup or mustard dispenser would work just as well, only the Muthusaram will be more like Thenkuzhal with smooth outside.

As usual, my recipes are not always authentic or traditional, just something I've tried and liked. Here I add Flax Meal to the flours, plus some Nutritional Yeast (not the leavening active dry yeast). Incorporating flax meal wherever I can has become a habit, born out of necessity, thanks to kids' irregularity.

Since they are deep fried in oil, storing in air-tight containers in a cool dark place is good. After a week or 10 days, the oil could start giving off a rancid smell, and I've found that leaving the air-tight container in the fridge delays this rancidity.

Proportions of the flours are all that matter, so we can make a small batch starting with a quarter cup of urad flour and adding a cup and a half of rice flour to make the Muthusaram. So, am just listing 'measure' here.


Muthusaram
naazhi Muthusaram, Kaaraasev: Savory Indian Snacks

Ingredients for Muthusaram:
1 measure urad flour
1 measure flax meal
6 measures rice flour
1 Tbsp Nutritional yeast
½ to 1 measure chili powder (optional)
2 to 4 tsp cumin seeds
salt to taste

Canola oil for deep frying

Preparation
  1. Combine the dry ingredients in a bowl, add a little warm water at a time to make a loose yet thickish dough that can be pressed through the slots/holes of the dispenser easily, but not too watery/runny as it has to be dropped into hot oil
  2. Deep fry a small batch at a time at the right oil temperature, drain on paper towels or cheese cloth, allow to cool, store in an air tight container


Kaaraasev
naazhi Muthusaram, Kaaraasev: Savory Indian Snacks

Ingredients for Kaaraasev:
1 measure rice flour
1 measure flax meal
4 measures chickpea flour
1 Tbsp Nutritional yeast
salt to taste
2 cloves of garlic finely grated
a handful of chopped curry leaves (optional)
½ measure chili powder
water as needed

Canola Oil for deep frying

Preparation
  1. Combine the dry ingredients, add a little water at a time to knead into a smooth yet loose dough that can be squeezed through a dispenser or naazhi
  2. Deep fry in oil, drain on paper towels or cheese cloth, allow to cool, store in an air tight container


Labels: , , ,

Newer›  ‹Older