Related Posts Widget for Blogs by LinkWithin

Thursday, April 20, 2017

Melomakarona-Inspired Honey Orange Walnut Cupcakes


Melomakarona-Inspired Honey Orange Walnut Cupcakes


Cakes not being my favorite, I rarely make them unless the kids ask for it as a treat on birthdays and other special holidays. So far, they've preferred the simple hearty flax-bran-loaded muffins or fruit tartlets or mini pies that I offer as desserts anytime they feel like having a sweet treat.

When I do make a few different kinds of sweets on and off, of course, fruit pies turn out to be one of the top favorites, especially during the berry season when we pick berries from local farms, and later in fall when apples and peaches and cherries rain from the sky.

Cupcakes being my daughter's favorite pastime, along with cake pops -- dreaming up the varieties and drooling over pictures of them in books and web -- I end up making a few with her, based on her current choice.

Speaking of cake pops, and birthdays, she made these Shaun and Shirley cake pops along with some oddly crazy chicks for her brother's birthday. As cloying as I find the candy melts for cake pops, it seems like an easy, quick, satisfying treat that kids can make and decorate on their own. Less work for me, and I don't have to eat it anyway. Microwave Mug Cakes are the easiest to make, which can then be used to make the cake pops.


cake pops sheep shaun ahirley


Back to the Honey Orange Walnut cupcakes, this time, it was the Greek delicacy Melamakarona that inspired them. Honey and Citrus. Fresh and sweet for a springtime indulgence.

Drizzling some freshly squeezed orange juice mixed with honey onto the cupcakes before serving make them moist, almost juicy. The cinnamon, cloves, and nutmeg add that warmth and sweetness that enhances the sense of indulgence.

Typically, I don't have self-rising flour handy, so, I mix a small batch every time a recipe calls for it: simply mix 1 cup flour, with 1½ tsp baking powder, plus ¼ tsp salt.

Ingredients
Dry:
3/4 cup self-rising flour
¼ tsp cinnamon
1/8th tsp ground cloves
1/8th tsp ground nutmeg
Wet:
5 Tbsp softened unsalted butter
2 Tbsp heavy whipping cream
⅓ cup superfine sugar
2 eggs
2 Tbsp honey
1 Tbsp orange zest
Topping:
¼ cup minced/chopped walnut pieces
¼ tsp cinnamon
2 Tbsp honey
2 Tbsp freshly squeezed orange juice


Melomakarona-Inspired Honey Orange Walnut Cupcakes


Preparation

  1. Sift the Dry ingredients into a small bowl
  2. Beat the Wet ingredients until light and fluffy
  3. Fold in the dry ingredients into the whipped wet ingredients and mix gently till well incorporated
  4. Spoon into muffin cups
  5. Bake in a 375°F oven for about 20 minutes
  6. Remove from oven, allow to cool a bit, then prick the cupcakes with a toothpick so it can hold the drizzled toppings
  7. Topping: Stir the honey, cinnamon, and orange juice till well blended, and drizzle spoonfuls on each cupcake; sprinkle minced walnuts and serve warm or chilled

Labels: , , , ,

Thursday, January 19, 2017

Apricot Cheesecake

Apricot Cheesecake


This Apricot Cheesecake was a holiday dessert, requested by the kids. The recipe is nothing original, just a remake of this popular one, with minor adjustments to suit our tastes.


Apricot Cheesecake


It's a simple Graham cracker crust, with sour cream topping, infused with apricot jam/pulp. However, the repetition of the apricot motif makes it burst with flavor: the cream cheese gets a generous swirl of pulpy apricot cooked in wine, and an apricot rose sits on top invitingly.


Apricot Cheesecake


Minor differences: I used Splenda™ instead of sugar; cooked the dried apricots in white wine and pureed to get the pulp for swirling into the cream cheese as well as the sour cream topping.

This cheesecake froze well. I insisted on putting away half of it in the freezer to be enjoyed at another time. Simply thaw in the fridge overnight.

Labels: , , ,

Wednesday, September 21, 2016

Home-garden Apple Pie Crumble with Oats and Chex

Home-garden Apple Pie Crumble with Oats and Chex


Yet another Apple Pie Crumble, with Oats and Cinnamon Chex™ for the crunchy topping. Standard single crust pie crust recipe that I always use for the home-made pies. Why Cinnamon Chex? The crunch from it is the latest family obsession for home-made crumbles.


The solitary capricious little apple tree managed to bear enough fruits for Codling moth and us.


Home-garden Apple Pie Crumble with Oats and Chex


Jars of apple sauce got made and canned. 


Home-garden Apple Pie Crumble with Oats and Chex


(Hard) Apple Cider came about thanks to the home-made wooden apple press.


Home-garden Apple Pie Crumble with Oats and Chex


Mini Caramel apples got made as well, when the older child felt like it. Which was pretty much every other day. As it is easy to make especially with ready-to-melt caramels chips and ready-made toffee crunch, it seemed all right to indulge.


Home-garden Apple Pie Crumble with Oats and Chex


Finally, our neighbors came and got some of the apples (with permission, of course) from our tree, what was left after the pests got some.


Labels: , , , ,

Wednesday, October 28, 2015

Poached Pears in Moscato and Port

Poached Pears in Moscato and Port


Poached pears with a dollop of ice cream is the older child's recent favorite dessert. Being a dessert-o-phile, she enjoys a variety of fruit pies and cobblers rather than cakes and cheesecakes and other decadent sweets. And, not being a dessert fan, I rarely make desserts unless there is an occasion to celebrate or the older child talks me into it.

Poached Pears in Moscato and Port


Nothing out-of-the-ordinary about these poached pears. I made one batch with super sweet Moscato wine and another batch with Port for the rich red color. And, when I thickened the Port sauce, I also mashed in some frozen strawberries that we had picked and saved earlier in summer.

Combine the wine, some water, sugar, vanilla in a sauce pan, place the peeled pears in it cover and simmer till pears are a bit tender yet firm. Remove the pears and continue to thicken the liquid in the saucepan to a syrup.

Drizzle warm syrup on the poached pears and serve with some vanilla ice cream.

Labels: , , , ,

Saturday, February 07, 2015

Chocolate Bowl Filled with Marzipan Vegetables and Fruits

Chocolate Bowl Filled with Marzipan Vegetables and Fruits


Since Papa doesn't like cake much, and since we indulge in desserts only for special occasions, we were wondering what to make for his birthday.

When the nine year old got interested in it, there was no turning back - we made mini chocolate bowls and filled it with mini marzipan veggies (and fruits).

We used the balloon method for making the mini bowls, about 2.5 inches at its widest, and about 1.5 inches tall. The nine year old went for the marbling effect, and the asymmetric tulip-like petal effects. Since this was her first attempt, it was just fine despite the imperfections.


Chocolate Bowl Filled with Marzipan Vegetables and Fruits

Chocolate Bowl Filled with Marzipan Vegetables and Fruits


We also made chocolate cups using silicone cupcake mold.


Chocolate Bowl Filled with Marzipan Vegetables and Fruits


The marzipan veggies and fruits: carrots, green beans, artichoke, eggplant, strawberries, pear, watermelon, oranges. This was the favorite part as the little girl still loves to play with play dough and make shaped things that look like other real things. And working with marzipan was just like playing with play dough.


Chocolate Bowl Filled with Marzipan Vegetables and Fruits


And some marzipan-filled confections.

Chocolate Bowl Filled with Marzipan Vegetables and Fruits

Labels: , , , ,

Wednesday, December 24, 2014

Oatmeal Chocolate Rounds and Lemon Bars


I am not much of a desserts fan, as is probably obvious from the small number of desserts/sweets posts shared here. Cookies don't interest me at all, neither does cakes or pies.

Anyway, kids wanted to make something special for Santa so we can set it out the night before Christmas when Santa was scheduled to stop by.


Oatmeal chocolate rounds is really easy and there are many variations and names for it among the bakers of the world. This recipe here is tailored to make it easy for the resident 9 year old to make. I use a mini muffin pan to place the rounds to freeze - easier to handle this way. But, can place in a cookie sheet and freeze if preferred.


Ingredients
½ cup semi-sweet chocolate chips
¼ cup small marshmallows
2 Tbsp butter
2 Tbsp brown sugar
1 Tbsp molasses
¼ tsp cinnamon powder
⅛ tsp nutmeg powder
¼ tsp ginger powder

1 cup whole grain quick-cooking oats
¼ cup dry grated coconut

Preparation

  1. In a double boiler, melt the chocolate, butter, and marshmallows
  2. Add the flavoring ingredients, stir well, then add the oats and coconut and stir well till it comes together
  3. Remove from heat; use a tablespoon and scoop out a heaping spoonful to make a round; and place each round in the depressions in the mini muffin pan
  4. Leave the filled mini muffin pans in the freezer for 10 to 15 minutes; remove and serve; or save in an airtight container and store in a cool dry place


Lemon bars are fairly standard as well. I couldn't bring myself to add too much butter, so, added some oil instead. And, I made it extra lemony, slightly sour-sweet, which is the preferred flavor for the kids at home. It turned out fine for our tastes at least.


Ingredients
For the crust:
1 c flour
¼ cup demerara sugar
¼ cup butter
3 Tbsp neutral-flavored oil

For the filling:
½ cup lemon juice
½ cup brown sugar
2 eggs
2 Tbsp flour
¼ tsp baking powder

a few tablespoons of powdered sugar for dusting (optional)

Preparation

  1. Pre-heat the oven to 350°F
  2. Combine the crust ingredients to a uniformly crumby mixture and press down in an 8x8 baking dish and bake for about 12 to 15 minutes in the 350°F oven til lightly brown
  3. Meanwhile, make the filling: beat the lemon juice sugar and eggs till a bit thick, for about 10 minutes; then, stir together the flour and baking powder, and add it to the beaten lemon-sugar-egg mixture
  4. Pour the filling over the baked crust and bake in the 350°F oven for another 20 to 25 minutes
  5. Remove from heat and allow to cool; the bars will firm up as they cool; dust with powdered sugar if preferred
  6. Cut into small squares for serving

Labels: , ,

Tuesday, October 01, 2013

Zhima Qiu: Glutinous Rice Balls with Surprise Fillings


A popular Chinese snack, Zhima Qiu, Ma Tuan, is something we indulge in about twice a year or so. And each time, we savor it, trying to come up with different fillings.

Hot, crunchy, chewy, mildly sweet, these glutinous rice balls seem to be a staple at Dim Sum restaurants as I gather. But, neither the kids nor I are fond of the red bean paste filling.

So, we tried a couple of different fillings: sweet lemon curd, small peanut butter chocolate ball candy, peanut butter+jelly, bananas, dry cranberries.

And, since there was no outer indication of what the filling might be, it was fun to bite into one and find the surprise inside.

The recipe for the shell is a standard one available on the web. Glutinous rice powder is available in most Asian stores.

For the outer shell:
3 cups glutinous rice powder
½ cup sugar
1 cup water

Oil for deep frying.

1 cup white sesame seeds for coating

Filling as needed.

Preparation
  1. Mix sugar and water until dissolved. 
  2. Add the glutinous rice flour and knead to a smooth dough.
  3. Roll the dough into a long roll/log and cut into 20 pieces.
  4. Flatten one piece at a time, make a concave depression holding the dough in the palm of one hand.
  5. Add a small amount of filling in the center of the concave well.
  6. Gather the edges and pinch to close, roll into a smooth ball, making sure filling is sealed in.
  7. Dip the ball in water and coat with sesame seeds.
  8. Deep fry in medium heat till golden brown.
  9. Drain and serve warm.


Labels: , , , ,

Monday, March 01, 2010

Welsh Cakes

easy recipe welsh cakes st.david's day

Dydd Gwyl Dewi hapus!

I didn't want St.David's Day, to go uncommemorated. So, I decided to make some Welsh cakes and some Leek-and-Potato soup to make D feel right at home. Sort of.

Not having visited Wales, I haven't really tasted the native specialty, but the Welsh Cakes recipe at BBC site is a fairly standard one as far as I gather.

However, having the chronic inability to follow a recipe to the letter, and an inherent resistance to using too much butter, I usually make a substitution or two so I can polish off a plateful fairly guilt-free:)

Now, on a medium-hot non-stick griddle it comes out nice and golden brown, but the hot cast iron griddle gives it that extra flavor plus the dark exterior. I like the cast iron griddle so, these cakes turn out moist and soft on the inside but a bit dark on the outside.

Without further ado, in honor of St.David's Day, here is a version of Welsh cakes. It tastes sort of like a cross between sweet fluffy pancake and buttery soft cookie.

Ingredients
1¼ cup flour (more or less)
1 tsp baking powder
½ cup Smart Balance Omega butter (light)
2/3 cup sugar (or less if using Castor sugar for dusting)
1 egg
¼ cup sultanas/raisins
round cookie-cutter or canning ring to cut shapes
optional: Castor sugar for dusting

Preparation
  1. Sift the flour and baking powder together; work it into the butter to form coarse breadcrumbs
  2. Add the sugar, eggs and raisins and knead to cookie-dough-like consistency
  3. Dust a work surface and roll it flat to about ¼ inch thick and cut out small rounds
  4. Cook in a hot cast iron griddle till golden brown on each side and cooked through
  5. Dust with Castor sugar if preferred

Labels: , , ,

Sunday, February 21, 2010

Twisty Twirly Pretzel Bagel Buns

easy recipe pretzel bagel sweet and salty

For want of an apt term, I let my 4 year-old sous chef suggest a name for these delicious baked goodies that started out as pretzels but took on its own identity :)

One Sunday morning, after the breakfast things were put away, we made the dough and let it rise, and then, after lunch, we set about preparing and baking these just in time for the afternoon snack. Of course, the shaping was the fun part for my 4 year-old, and me. The agave nectar and cinnamon sugar pretzels were almost as good as cinnamon buns. Almost :)

Ingredients
1½ tsp active dry yeast
1 tsp brown sugar
a pinch of salt
1½ cups 110°F water

4 cups unbleached all-purpose flour
1 Tbsp oil

1½ cup hot water
1 Tbsp baking soda

2 Tbsp Smart Balance Omega butter, melted

Optional Toppings: Agave nectar or honey or maple syrup, cinnamon sugar, coarse salt crystals, stone-ground brown mustard

Preparation
  1. Add the yeast and brown sugar to the 110°F water, allow to sit for about 5-8 minutes till frothy and active
  2. Add the pinch of salt, then, the flour a little at a time and knead to a smooth elastic dough
  3. Grease a bowl, coat the dough with oil, place in the bowl, cover and let it rise in a warm place until doubled in volume
  4. Punch down a bit, take little portions and roll them into ropes for shaping
  5. Heat some water in a pan, turn off heat and add the baking soda; keep handy
  6. Shape the ropes of dough as desired, dunk them one by one in the water+baking soda solution till it rises to the top, remove with slotted spoon and place on a baking tray
  7. Brush with agave nectar or salt crystals as desired and bake in a 500°F oven for about 8-12 minutes till brown on the outside and cooked through on the inside
  8. Remove from heat, brush with butter, serve warm with mustard, or sprinkled cinnamon sugar

Store in an airtight container in the fridge for up to a week, or freeze for later use.

easy recipe pretzel bagel sweet and salty

Labels: , , , , ,

Friday, February 05, 2010

Simple "Marbled" Cupcake

easy cupcake marbled

This simple cupcake came about to cheer up the little ones at home who were feeling under the weather... nothing fancy about it, except, my 4¾ year-old helped me make it - beating the eggs with a fork, measuring the flour and sugar, adding baking cases to the muffin pan, stirring and tasting the batter, and of course spreading the frosting.

We've been trying various kids art activities some of which involved simulating the marbling-effect or "colorful swirlies" as she calls it. And so when she added a few drops of purple food color, rather than blend it in uniformly, she decided to swirl it around a bit, just enough to leave streaks of purple in an otherwise plain cupcake batter. When scooped as-is and baked, it formed nice deep swirly patterns all around. Can use multiple colors and swirl them about to form interesting patterns in the batter before baking. (The quantity here made about 8 standard size muffins)

Ingredients
2 eggs
½ cup Smart Balance Omega 3™ butter
1/3 cup sugar
½ tsp baking powder
1 cup flour
food color

Frosting: Light Cream Cheese, (home-made) strawberry jam or plum jam - beaten together till fluffy
Sprinkles optional

Preparation
  1. Pre-heat oven to 350°F; Beat the eggs and keep handy
  2. Blend the sugar and butter together with an electric mixer till fluffy, about 2 minutes
  3. Add the beaten eggs and continue to beat another 30-40 seconds
  4. Sift the flour and baking powder together and slowly fold it into the wet ingredients mixture
  5. Add a few drops of food color and swirl it around with a ladle
  6. Scoop the batter into each of the baking cases in the muffin mold (or, simple spray the muffin mold with vegetable oil) to about 2/3rds full and bake in a 350°F oven for about 20-25 minutes, checking midway and turning the tray around if needed
  7. When cool enough, spread some frosting on top, add some sprinkles and enjoy! Or chill in the fridge for a summer time snack


Labels: , ,

Friday, August 28, 2009

Elai Adai


Elai Adai is a simple Kerala delicacy my mom used to make in jackfruit season. And since my recent visit to India included the jackfruit season, and since we wanted to find a way to consume all the chakka varatti we made, this dish almost begged itself into existence :)

Basically, this can be roughly imagined as a sweet version of savory tamales, in principle. While tamales involve corn dough stuffed with minced savory meat, wrapped in corn husks and steamed, Elai Adai involves rice dough stuffed with jackfruit+jaggery+coconut mixture wrapped in banana leaves and steamed.

If Chakka Varatti is handy, this is rather easy to make for a lazy afternoon snack. Which is what my Athai (aunt, Dad's sister) did.


chakka varatti elai adai jackfruit jam dessert

Adjust the quantity of batter depending on how much filling is available. Extra batter can be allowed to ferment a day or so and made into Aapam. Extra filling, of course, can be eaten as-is, no wastage :)

Any questions/doubts, I'll gladly pass it along to my mom or Athai and try to post their response. The recipe here is rather vague about quantities as my Athai and mom don't believe in exact measurements in their cooking (neither do I, for that matter), but, that I guess is the strength of experience...


And I managed to take pictures of her finished product before these irresistible little packets disappeared forever into our tummies. Well, contents of the packets, I mean.

Ingredients
For the dough/batter:
Equal quantities (say ¼ cup each) of par-boiled rice and plain white rice
pinch of salt

For the filling:
For each cup of Chakka Varatti, use approximately ½ cup of grated coconut, or more to taste
Jaggery, optional, add to taste (I don't like the filling cloyingly sweet)

Steaming apparatus, Plantain/banana leaves cut into about 5"-6" squares approximately
Some oil

Preparation
  1. Batter/Dough: Soak the rice in water for a few hours, grind to a fine paste, add a pinch of salt and keep handy, no need to ferment it like dosai batter. Note: the consistency of the dough is slightly thinner than pancake or dosai batter
  2. Filling: Combine the Chakka Varatti and grated fresh coconut in a pan and stir till well incorporated
  3. Gently heat the banana leaf over open flame to make them pliable, they will turn a darkish green, take care not to burn
  4. Grease the piece of banana leaf with some oil, spread a bit of the rice dough/batter
  5. Keep a piece of banana leaf handy for arranging the filling: scoop and drop a dollop of filing, carefully pat it down over the banana leaf, invert this over the other banana leaf with the batter spread on it and transfer the filling onto the dough carefully
  6. Carefully fold the assembled Elai Adai into a packet
  7. Prepare as many packets as possible with available ingredients and arrange them in a steamer; steam for about 10 minutes; the rice dough/batter will look almost translucent when done, with the rich brown filling showing through
  8. Unwrap the banana leaf and pop these steamed delicacies into the mouth for an amazing experience

Labels: , , , , , ,

Sunday, August 16, 2009

Karupatti: Value-added Jaggery

karupatti vellam jaggery palm sugar unrefined

I remember the days when my mom rarely used refined white sugar. When I was about Ana's age, she used to add naattu chakkarai (jaggery) to coffee and tea, and anything else she can get away with.

Of course, all that has changed now, but, still her preferred sweetener is some form of jaggery. Every time she visits me, she'd insist on having a big hard ball of jaggery from the Indian store which she would chip away with hammer as needed for use.

One of the drinks I remember from childhood is Panakam, a watery concoction made with jaggery and pepper, served on special occasions. Panakam with Neer More were offerings on Rama Navami, if I remember right. Now, Neer More is another favorite drink - basically watered down churned buttermilk, salted, with grated ginger, curry leaves and some tempering. On a blazing hot day, this makes an ideal thirst quencher. But, I am digressing...

As far as I know jaggery can come from sugar cane or palm tree, and they each have distinct tastes. Because of the olden way of preparing where sand and dirt are not strained away, commercial jaggery tends to be gritty with particles that foul up the mouth-feel, and thus has not been top on my list of favorites. However, since my mom has the patience, melting and straining once or twice as needed, I have begun to enjoy it more nowadays.

My dad is especially fond of this Karupatti shown in the picture, which is jaggery with a few added ingredients like black pepper and ginger, believed to be a good home-remedy for coughs, colds and throat ailments. I like the sharp hot taste coming through the rich flavor of jaggery.

As my visit to India is coming to a close, I know I haven't even scratched the surface of local delicacies and indigenous treasures, but, c'est la vie... There's always the next time...

Aug-13-20091

Labels: , , , ,

Sunday, July 26, 2009

Chakka Varatti: Jackfruit Jam


Chakka, aka Jackfruit, is one of my favorites. This Chakka Varatti is my mom's specialty. My dad simply calls it Jackfruit Jam and that is basically what it tastes like.

Jackfruit is probably not easily appealing to all on account of its strong odor, size-and-shape, and its spiky exterior.

I love whole Jackfruit - everything about it appeals to me - the impressively huge tree, the way the fruits hang in the tree, the spiky green exterior skin, the sticky fibers which are quite useful as glue, and of course the sweet yellow flesh.

My aunts in Hyderabad and Vizag both have Jackfruit trees in their backyard. I feel they are so spoilt sometimes they don't even harvest the fruits... they are quite generous to let the neighbors take the whole ripe jackfruits away during peak season as it is hard to keep up with the bounty.


Anyway, I couldn't let the opportunity pass when I spotted a roadside vendor sitting with a pile of whole jackfruits somewhere in interior south when we were on a road trip recently. The vendor sold the whole fruit, which was about a foot-long and ¾ foot-wide and weighed maybe five kilos, for about 75Rs, am not sure if that is a reasonable local price, but, it seemed worth it.

I like to eat it as-is, but, I wasn't sure if my stomach was up to handling the raw fruit at the rate at which I was consuming them. So, my mom decided to make this Chakka Varatti which can be stored in the fridge or freezer for months at a stretch, and used to make Elai Adai , Chakka Pradaman (recipe to come soon) and other delicacies.

When we were little, we would bring home a whole fruit, once or twice during peak season (March through June), which we would cut, clean and pick out the fleshy sweet chunks, remove the seeds inside and even cook the seeds. But, most vendors do the cleaning and sprucing, and simply sell the flesh ready-to-eat.


Since this is my mom's recipe, and since she doesn't believe in measuring anything accurately, the quantities are approximate.

Preparation:

Basically, pressure cook the jackfruit flesh and smush it to a smooth pulp in a blender or food processor. Simmer this pulp with jaggery or brown sugar in a large pan, the amount is roughly:
1 cup brown sugar per cup of smushed jackfruit pulp. Stir continuously over medium-low heat till it thickens to a spreadable jam consistency and comes together without sticking to the pan.

Allow to cool and store in the fridge in an air-tight container.

Labels: , , , ,

Sunday, April 05, 2009

Raised Jelly-filled Doughnuts

jelly-donut-1


When we first got the bread machine as newlyweds, we used to love the delay-start feature where we can dump all the ingredients, set the time when we want it ready and forget about it. Usually, we program it on Friday nights to wake up to the delicious aroma of fresh-baked bread to start off the weekend.

Over the years, the bread machine has become sort of a second-class citizen in my kitchen. We still try to use it on and off and some of the breads turn out wonderful as always.

However, D and I have glanced at this recipe for raised doughnuts in the bread machine recipes book on and off but never felt motivated to try it until recently. It uses only ¼ cup sugar for about a dozen doughnuts, plus dusting with powdered sugar when hot makes it juicy and almost glazed, and it is very easy to make.

This here is a bread machine recipe, but, if preferred, can hand-knead it and allow to rise in a warm place before the second rising. We got about a dozen 4-inch doughnuts with this recipe.

Ingredients
2/3 cup milk
¼ cup water
¼ cup softened butter
1 egg
3 cups all purpose flour
¼ cup sugar
1 teaspoon salt
2½ teaspoon rapid rise yeast
Vegetable oil for frying
Confectioner's sugar for dusting (optional)
strawberry preserves for filling (optional)

Preparation
  1. Place all the ingredients in the bread machine, allow it to do its thing in the Dough cycle
  2. Roll the dough to about 3/8 inch thick on a lightly floured surface; cut out with a doughnut cutter or into rounds if filling with jelly
  3. Cover and let it rise for about 45 mins in a reasonably warm place till slightly raised
  4. Heat 2-3 inches of oil in a pan to 375°F
  5. Fry 2 or 3 doughnuts at a time, depending on how big you decided to make them, allowing them to rise to the top and turning them to ensure golden brown on both sides (I was distracted by the wee one and let a few of them get from delicate russet to pure bistre)
  6. Drain on a wire rack and dust some powdered sugar while warm if desired
  7. Also, with an injector or pastry pipe filled with your favorite fruit preserve, gently poke a hole and fill just a bit

Labels: , , , ,

Monday, November 12, 2007

Semiya (Vermicelli) Payasam

semiya-payasam-2


Payasams are desserts/sweets usually made for special occasions like birthdays, anniversaries and festivals. They can be made with milk, sugar, rice, vermicelli, or, with dals and brown sugar and coconut... there are many varieties and I would like to collect them all here someday...

Anyway, I am not particularly fond of payasam, so, I only make it for festivals, to keep up the tradition, and, since D and Ana like it a lot, it is incentive enough to make a small batch...

For this semiya payasam, I like to use packaged extra-fine roasted vermicelli. This is thinner than the regular vermicelli, and usually comes packaged as golden brown extra fine, extra long strands that crumble to the touch. In contrast, "regular" packaged vermicelli I use for Upma is usually broken into 1-cm bits, and is antique-white in color like angel hair pasta...

This vermicelli payasam recipe is very simple. Just combine the ingredients and boil on medium-low till vermicelli is cooked through. Garnish with roasted cashews and raisins. Saffron is optional. Also, I prefer the body and flavor of evaporated milk for this dish and it cooks up faster, but, if preferred, can use regular whole milk and cook for longer till thickened.

Ingredients
1 cup loosely packed, lightly crumbled roasted extra-fine vermicelli
1 12-oz can evaporated milk
¼ cup sugar
3-4 small strands of Kashmiri saffron (optional)

garnish: raisins, unsalted broken cashew nuts, 1 Tbsp ghee

semiya-payasam-1


Preparation
  1. Combine the roasted vermicelli, evaporated milk and sugar and cook over medium low heat till vermicelli is cooked, stirring occasionally
  2. heat ghee in a pan, add the cashews, toast till golden brown, then add the raisins till they plump up, off heat
  3. garnish the payasam with the cashews and raisins, and saffron if using
  4. Stir well before serving
  5. serve warm or cold
\

Labels: , ,

Saturday, October 20, 2007

Suhiyan

suhiyan-1


Suhiyan is the only name I know this dish by and it is a traditional festival dish my mom makes, particularly for Saraswathi Pooja celebrated towards the end of the Navarathri.

Navarathri was one of my favorite times when growing up. We used to set up this elaborate display called "Bommai Kolu" where dolls of varying sizes are displayed in a gallery-like steps set up especially for this purpose.

The dolls are usually of mythological figures, Gods and Goddesses, made with anything from clay to wood to paper maché. I wish I had scanned some of the old photos - a picture would be worth a thousand words to describe the beautiful decorations my mom used to enthusiastically set up in those days.

Friends, family, neighbors are all invited, and there is a lot of exchange of visits all through the festival period. Every day of the ten days (nine nights) there is a special dish, mainly chundal ('ch' as in chair) aka sundal, which are usually made with any kind of beans (sprouted, if preferred) like chick peas, butter beans, broad beans, split green peas, Lima beans, black-eyes peas, peanuts, kidney beans and so on. Plus, vadai, payasam, appam and suhiyan towards the end around Saraswathi Pooja and Vijaya Dasami.

While my mom makes the suhiyan in the traditional way soaking the urad dal, rice flour etc., grinding them and making sure the Suhiyan comes out approximately round shaped, I am not that experienced, so, I use some short cuts and the suhiyan turns out oddly shaped, but, quite incredibly tasty nonetheless, if I may say so myself :)

Suiyan is basically a sweet filling (poornam) coated with a batter and deep fried. The filling can have a few variations. I make a simple poornam, just like for Poorna Kozhakattai, with brown sugar and dry grated coconut. The batter is the short-cut one where I mix some urad flour, rice flour, all purpose flour and some water to about oothappam batter or pancake batter consistency. I am not too finicky about measuring, so, the ingredients list below is approximate, bear with me.

Ingredients:
for the poornam:
½ cup brown sugar
½ cup dry grated coconut
some water (just about ¼ cup or less)

for the batter:
¼ cup all purpose flour
¼ cup urad flour
¼ cup rice flour
some water

oil for deep frying

Preparation
  1. poornam: heat the water and brown sugar in a pan over medium low, when brown sugar dissolves and begins to bubble, add the grated coconut and stir till thick, but not rock solid; remove from heat when the mixture has come together and is not runny anymore; this step is mostly from experience and trial and error for me; roll into about 1-inch or 1½-inch round balls while still warm, allow to cool a little so it sets into shape
  2. batter: mix the flours, add a little water at a time till the batter is about the consistency of thick pancake batter, or oothappam batter, or even thick idlee batter
  3. suhiyan: heat oil for deep frying; dip each poornam ball in the batter, coat well (and uniformly if possible), deep fry till golden brown on the outside

This suhiyan recipe is my post for RCI: Regional Cuisine of India: Tamil Nadu Festival Foods hosted this month by Vcuisine

Labels: , , , ,

Saturday, September 15, 2007

Poorna Kozhakattai

modakam-2


Among the few festivals I manage to celebrate to my satisfaction, Vinayaka Chathurthy is among the top, a few others being Gokula Ashtami, Navarathri, Deepavali, Arudra/Thiruvadirai, Karthigai, Karadayan Nonbu and, of course, Vishu - the New Year.

Apart from the symbolism and the rituals, each festival has its own special menu. The primary attraction I have is that most of the festivals we celebrate at our home are marked by mellow and subdued observances, solemn, meaningful and simple rituals, quite modest and unceremonious, yet, sincere and heart-warming.

The special menu item, offered as prasadam, that my mom usually makes for Vinayaka Chathurthi is this Poorna Kozhakattai aka Modakam pictured here. Today being Vinayaka Chathurthi, I was happy to make this poorna kozhakattai.

poorna-kozhakattai-1


And, as with most of my recipes, this is probably not entirely traditional as I have adapted it to the ingredients handily available in my kitchen.

Kozhakattai, in general, is a steamed dumpling-like dish, which can be sweet or savory, with the stuffing inside making up the attractive part of the dish. Poornam is the term we used in my family to refer to a concoction of coconut+jaggery+water, (sometimes black sesame seeds+jaggery, instead of coconut) in proper proportion so it sets to a soft candy consistency. This poornam is usually encased in the dumpling shell made of rice flour+water, and then steamed to make this dish poorna kozhakattai.

The amount of dumpling dough and poornam can be varied, so, adjust the quantities as needed, while keeping the proportion of ingredients fairly the same. I usually make a small batch...

Ingredients

for the poornam:
¼ cup water (optional)
1/3 cup fresh or dry grated coconut or 1/3 cup toasted black sesame seeds
1/3 cup brown sugar* (plus a few Tbsp more, if preferred)
*jaggery if it is clean, else need to strain to remove mud and residue

for the kozhakattai dough:
½ cup water
2/3 cup fine rice flour
pinch of salt
1 tsp canola oil

Preparation

Kozhakattai: heat the water in a pan just to boiling, add the salt and oil, then gradually add the rice flour while stirring constantly till the dough just comes together; off heat, cover with a damp cloth till poornam is ready

Poornam: heat the water in a pan, add the brown sugar (jaggery if it is clean, else need to strain well to remove mud and residue), when it comes to a boil, add the coconut and keep stirring till it just thickens but not too long or it gets hard as a rock; off heat allow to cool for a few minutes, grease your palms and roll into 1" diameter balls while still hot. (Or any size you prefer, I like little ones...)

Shape a small portion (say 2" diameter ball) of the dough into a cup, add one poornam ball, and close it by gathering all sides and forming a cone-of-sorts at the top, all the while turning/rotating the dough cup so it seals tightly, and is shaped as in the picture.

Note: the dumpling can be oval or round, but traditionally, poorna kozhakattai is round as seen in picture.

Steaming: Place the prepared dumplings in a steamer or idlee cooker and steam them briefly - the dough turns a little translucent when done.

p.s: came across Yum Blog's Ganesha Chathurthi event on Ashaji's blog, and thought I must send this along...

Labels: , , , , ,

Tuesday, March 27, 2007

Karadayan Nonbu Adai

easy recipe karadayan nonbu adai
Before I morphed into a blasé teenager with what's the point of it? i don't care to celebrate festivals attitude, I used to enthusiastically participate in many small-scale festivals my mom celebrated commemorating some symbolic event, like Arudra Dharshnam, Karadayan Nonbu and such, in addition to the large-scale ones like Diwali...

Each little festival had its own prescribed menu and associated ritual, some of which differ from family to family. Yummy Thiruvadarai Kali and Koorkan Kari for Arudra Dharshanam, Nonbu Adai for Karadayan Nonbu and so on...

Many of these events happen only once a year, and so, the special menu is made just once a year to celebrate that event. But then, with about a festival a week or every fortnight, there was always something good cooking:-)

Since I like a lot of the festival foods, and since I left my blasé teenager self way behind, I have come a full circle and have started celebrating the ones I can, just to introduce them to my wee one. Plus, I love to doll her up in the wonderful Indian clothes my mom makes for her.

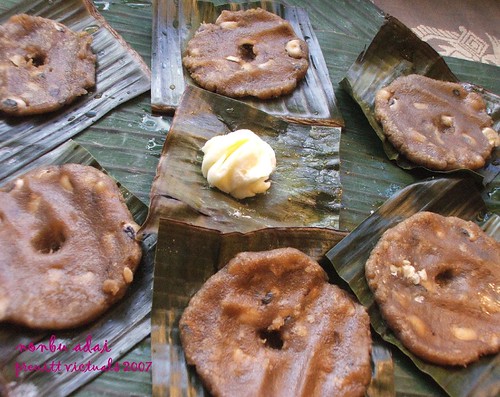
About a fortnight ago was one such festive event: Karadayan Nonbu. The menu for this event is very simple - just a mildly sweetened and steamed rice flour patty. I like the simplicity of this dish. It is usually served with a dab of freshly churned butter. Without further ado, here's my version of the karadayan nonbu adai recipe I learnt from my mom.

easy recipe karadayan nonbu adai

Ingredients:
1 cup fine rice flour
1½ cup brown sugar
1¼ cup water
¼ cup cooked black-eyed peas
optional: banana leaves for steaming
steaming apparatus

Preparation

combine the water, brown sugar and cooked black-eyed peas in a pan, and bring to a gentle boil

meanwhile, dry toast the rice flour in a pan till it turns light brown

add the toasted rice flour to the boiling brown sugar liquid, keep stirring and cooking till all the water is absorbed a smooth dough forms; off heat, allow the dough to cool a little

when cool enough to handle, shape the dough into small balls, about the size of a golf ball

if using banana leaves, cut small squares, one per ball of dough; place the dough ball on the leaf and flatten it into about ¼" patty, making a hole in the center of the patty (like for donut);

steam the patties in a steamer, in batches if needed; a large vessel with some boiling water and lid will work for steaming, or an idli cooker

Serve warm with butter on the side.

easy recipe karadayan nonbu adai

Labels: , , , ,

Monday, March 12, 2007

Maida Halwa

easy recipe maida halva halwa sweet dessert indian
I was talking to my mom last weekend, just usual call... She doesn't get to see her little granddaughter (my wee one) much, living in another continent and all, so, she makes rather sweet requests on and off asking me to cook something special for the wee tot:
"I really want to make maida halwa for my little baby but since i can't send it all the way over, make her some today and feed her, will you?"
"Sure, amma, of course."
That's how this dish materialized yesterday:-)

My mom makes this maida halwa for Diwali usually, among a dozen other sweets and snacks. It has not been my favorite as I don't quite have the sweet tooth... but, it is very tasty nonetheless. And easy to make!

It is amazing to me that many of the indian sweets my mom makes have just a few ingredients - sugar, flour, ghee - and the various proportions/combinations/methodology bring about quite a spectrum of sweets. Wikipedia says Maida is super refined wheat flour typically, but, this recipe uses all-purpose flour.

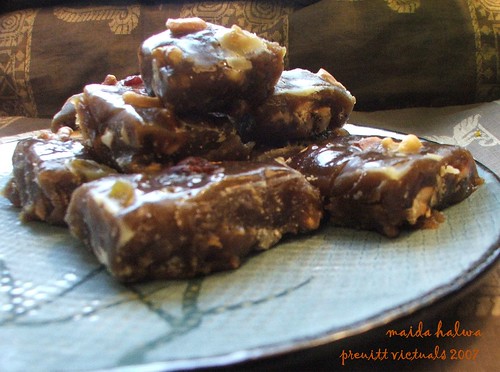
Halwas are usually ooey-gooey and don't usually set into a solid form. I stuck this maida halwa in the freezer for a while till it set well so I can cut into squares for easier handling:-) It remains gooey at room temperature, to be enjoyed by the spoonful...

The rich chocolate brown color of this halwa just comes from toasting the flour to a golden brown before mixing it with the sugar syrup.

easy recipe maida halva halwa sweet dessert indian

Ingredients
1 cup all purpose flour
1 cup sugar (maybe a little more, if you like)
1 cup water
1 cup chopped cashews, walnuts, raisins, dried cranberries
2 Tbsp ghee or butter (as needed)

Preparation

grease a plate with 1 Tbsp of ghee, or more as needed, keep handy

heat 1 Tbsp ghee in a pan, fry the chopped nuts and dry fruits, drain them out of the pan and set on a plate handy

add the flour to the same pan, with residual ghee in it, and toast the flour, stirring constantly, till it turns a beautiful light brown and loses the raw smell of flour

combine water & sugar, in a separate pan, bring to a gentle simmer and allow to boil over medium-high, stirring constantly to form a thickish sugar syrup, almost a "one-string-consistency", as my mom would put it:
hold a drop of syrup between index finger and thumb, separate the fingers slowly - if the syrup forms a single string between the fingers, it is ready
the catch of course is that it is incredibly hot, so, takes a brave heart to try it:-) i simply scoop a spoonful and try to pour it back into the pan and eyeball its viscosity, just trial and error...

when sugar syrup seems "ready", add the toasted flour as well as the fried nuts & dry fruits, stir well till thickened, off heat

pour into the greased plate, allow to cool; serve warm or at room temperature

Labels: , , , ,

Monday, March 05, 2007

coconut burfi

easy recipe coconut burfi dessert indian sweet
My dad has a sweet tooth that I did not inherit. Right after every meal, to this day, after getting up from the table and putting leftovers away and such, he likes a bite of something sweet. Just a bite or two, that's it. He has always had this habit. And, my mom always had sweets at home, mostly home-made, and sometimes store-bought.

Just about every month my mom celebrates at least 3 festivals. She makes wonderful traditional Indian sweets to celebrate each festival - like Poorna Kozhakattai for Ganesha Chathurthi, Suhiyan and Poli for Saraswathi Pooja/Vijaya Dasami and so on.

This is my 101st post, and in all the 100 so far, I realize I have not posted a dessert or sweet recipe:)

I don't make sweets and desserts often. But, my wee one seems to be fixated on chocolates, cookies and such these days. Rather than giving her store-bought corn-syrup concoctions, I decided to start making sweets at home.

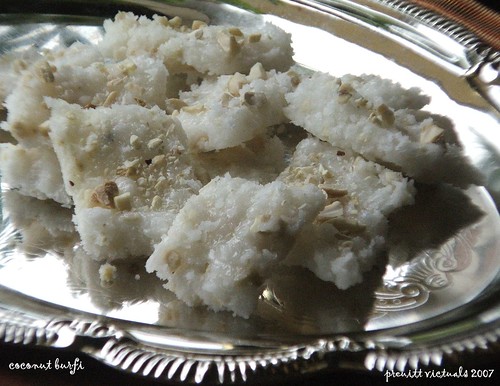
Among the many Indian sweets I watched and learnt to make from my mom, the easiest to me seemed like this coconut burfi. Easy to remember because the proportions are 1:1:1 of sugar:water:grated-coconut, and the sugar syrup for this is a fairly standard and simple one. Without further ado, here is an easy and quick recipe for coconut burfi.

easy recipe coconut burfi dessert indian sweet
Ingredients:
1 cup fresh or dry grated coconut
1 cup sugar
1 cup water
1-2 green cardamom pods (optional, for flavor)
¼ cup chopped cashew nuts and golden raisins combined (optional)
2 Tbsp butter or ghee (as needed, for greasing)

Preparation

grease a plate well with the butter or ghee and keep handy

add the sugar & water in a saucepan and heat it gradually over medium low; when water starts to boil stir in crushed cardamom, and watch closely to form a sugar syrup that is fairly thick, viscous like oil

it is mesmerizing to watch the sugar syrup, just when water starts to boil, the bubbles rise up in a column, from bottom of the pan to the surface, and this starts getting vigorous, and finally, the top surface is full of seething bubbles... it is beautiful to watch:)

off heat, add the grated coconut (and cashews/raisins, if using) into the thick sugar syrup, stir well

pour on to the greased plate and allow to set a little for a few minutes

cut into diamond or square shaped pieces, as small or large as you prefer, and leave it to cool completely

coconut burfi usually lasts for a month or more if stored in air tight container

Labels: , , , ,

‹Older