Related Posts Widget for Blogs by LinkWithin

Friday, August 31, 2007

Poori Masaal


"Poori Potato" is how my dad always refers to this classic breakfast/tiffin dish my mom used to make on and off when I was little. Pooris/Puris are whole wheat bread that are fried, and usually puff up in the process. Typical side dish it is served with where I grew up is a mildly spicy potato dish.

Pooris are usually made with whole wheat flour and are about 3-4 inches in diameter. Sometimes, I serve pooris with a hearty vegetable korma or curry.

Bathuras are made with all-purpose flour and about 6-8 inches in diameter. The mini bathuras, which are usually larger in size and served with Cholay/Chana, work just as well as pooris for a sumptuous weekend brunch.

easy recipe indian vegetarian poori masal poori potato tiffin breakfast


Ingredients
1½ cups self-rising flour*
OR
1½ cups all-purpose flour + 1½ tsp baking powder
1 cup buttermilk
½ tsp nigella seeds
½ tsp black cumin seeds
salt to taste
canola oil for frying
*(use whole wheat flour, if preferred)

For the potato masaal:
4 medium potatoes, cooked
1 medium onion, finely diced
2-3 green chilies, finely diced
1 Tbsp fresh grated ginger
1 tsp turmeric powder
salt to taste
cilantro for garnish
Tempering: 1 tsp canola oil, 1 tsp mustard seeds, 1 tsp cumin seeds

Preparation:

Poori: combine the flour (baking powder, if using), nigella seeds, cumin seeds, and some salt, add a little buttermilk at a time and knead into a soft yet slightly stiff elastic dough.

Meanwhile, heat the oil in a pan for deep frying.

Potato Masal: Start with the tempering - heat oil in a largish pan, when shimmering, add the mustard seeds, when they pop, add the cumin seeds, then the grated ginger, chilies and onion, plus turmeric powder and sauté till onions turn translucent; add the cooked potatoes, adjust salt to taste, add a little water as needed to adjust the dish to the consistency you like. I don't like it runny...

Divide the dough into one inch diameter balls, and roll them out flat with a rolling pin to about 2 millimeter thick. Deep fry each of these and drain in a paper-towel lined plate.

Serve pooris/mini-bhaturas warm with potato masal garnished with cilantro.

Labels: , , , , , ,

Wednesday, August 29, 2007

falafel pita pockets

easy recipe vegetarian falafel mediterranean meal pita pockets

Every once in a while, I soak a huge pot of chana/chick peas/garbanzo beans and cook them and freeze any unused portion. A few weeks ago, I had the last of the frozen batch I needed to use up and that's how this falafel pita pocket meal came about. Plus, there were fresh, sweet, juicy cherry and grape tomatoes from our garden that needed to be eaten up as well :-)

grape-tomatoes


Falafel can be made with fava beans or chickpeas. I've always used chickpea batter of sorts, with some za'atar/dried herbs thrown in for home-made falafels. Also, used chickpeas to make a simple hummus.

Ingredients

For hummous:
2-3 cups firm cooked chick peas
3-4 garlic cloves
3-4 Tbsp olive oil
1 Tbsp sesame tahini
1 Tbsp lime juice
1 Tbsp finely minced sun-dried tomatoes (optional)
salt to taste

For falafel:
2 cups firm cooked chick peas
1 Tbsp za'atar spices (optional)
OR
1 Tbsp dried spices like parsley, dill, coriander
salt to taste
oil for frying

Other:
fresh romaine hearts or any lettuce of your choice
fresh tomatoes
kalamata olives
feta cheese
pocket pita bread, cut in half, warmed up and opened into a pocket for stuffing

Preparation

Combine the falafel ingredients in a blender of food processor and grind to a thick paste

Heat oil in a pan for frying the falafel balls

Meanwhile, combine the hummous ingredients in the blender and grind to a smooth dip consistency

drop a dollop/ball of the chickpea paste into the hot oil and deep fry to make the falafel balls; drain on a paper towel and keep handy

Assembly: Stuff each pita pocket as you like with falafel balls, lettuce, kalamata olives, feta, tomatoes, top with hummous and enjoy.

easy recipe vegetarian falafel Mediterranean meal pita pockets

Labels: , , , ,

Saturday, August 25, 2007

Swiss Chard Masiyal

easy recipe indian vegetarian keerai masiyal mashed swiss chards spinach

Keerai (aka greens) masiyal was not a big favorite when I was little as it was mushy, thick, bland and usually served with some pickle or pappadam.

Over the years, I have fallen in love with this and have added a few variations to make it more appealing to me. So, this recipe is not quite traditional in that sense. This chard masiyal recipe is very simple, quick to whip up on a weeknight and quite nutritious.

My mom usually makes it with spinach, but I use a combination of spinach and chard here. We had a bunch of chard in our garden and I decided to use it up.


Ingredients:
1 bag frozen chopped spinach (or fresh)
1 bunch swiss chard
3-4 green chilies, chopped
1 Tbsp grated ginger
2-3 Tbsp Madras Curry powder
salt to taste
¼ cup finely chopped fresh coconut for garnish (optional)
Tempering: 1 tsp canola oil, 1 tsp mustard seeds, ½ tsp cumin seeds, 1 Tbsp chana dal, 1 tsp urad dal

Preparation

Chop and wash the chard and spinach (if using fresh) well. Drain. Steam in the microwave till wilted and tender, using very little water. Squeeze out excess water. Allow to cool a little.

Combine the steamed greens, chilies and ginger and grind to a fine smooth paste, adding very little water, preferably none.

gently simmer this greens paste, adding a Tbsp of water at a time as needed, add the curry powder, adjust salt to taste

Tempering: In a small pan heat the oil, when it shimmers, add the chana dal, when it turns golden brown add the urad dal, lower the heat, and when urad dal turns golden brown add the mustard seeds and when they pop, add the cumin seeds, and turn off the heat. Throw in the chopped coconut ,if using.

Garnish with the tempering. Serve warm with warm rice, papapdam, vegetable curry, or even rasam and indian pickle.

p.s: thanks to Ashaji's comment, I am now aware of the Green Blog Project event (GBP) and this will be an entry for my Summer 2007 GBP event hosted by Deepz.

A few plant facts: The chard in our garden were from a local nursery, we just transplanted the seedlings in  early summer. This is Zone 5, with an average of 200+ days of growing season.
Cut off the outer leaves 1 1/2 inches above the ground when they are young and tender (about 8-12 inches long). Be careful not to damage the terminal bud, at the center of the bottom of the growing rosette of foliage. Maintain sufficient soil moisture to keep plants growing well.

Nutritional facts
Chard packs a huge amount of vitamin A and it is naturally high in sodium. One cup chopped chards contains Vitamin C 32 mg, Folate 15 mcg, Calories 35
Protein 3 grams, Carbohydrates 7 grams, Calcium 102 mg, Iron 4 mg among other goodies

Labels: , , , , , ,

Sunday, August 19, 2007

Lychee

lychee recipes AFAM blog event lychee sauce flaming lychee daiquiri lychee ice cream

My earliest memory of Lychee is when I was about 6 or 7 years old: It was summer holidays  in Calcutta when I got my first taste of this fruit.

Lychee was a strange fruit for me as the flavor was very strong, but the flesh was sort of like the fruit of the palm tree (nungu), and unlike nungu, it had a pit...

And over the last several years, I had not touched Lychee, not so much as thought about it and didn't really miss it much... Until, that is, I saw Sig's announcement that this edition of AFAM, A Fruit A Month, features the exotic Lychee!

We managed to find some fresh lychees as well as canned ones. While shelling/peeling the fresh ones is a pain, I found that pitting it was manageable with a cherry pitter. Of course the juice kind of flows out and the lychee-pits are more intimately bonded to the lychee-flesh compared to cherries, but, hey, it worked!

I decided to go all the way and satisfy my long-dormant Lychee craving thanks to this AFAM event:

lychee recipes AFAM blog event lychee sauce flaming lychee daiquiri lychee ice cream

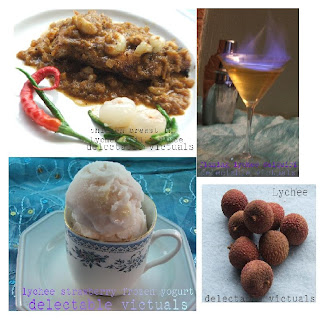
1. Chicken Breast in Lychee Chilli Sauce: The sweetness of the lychee and the fire of the chillies made this sauce quite delicious, if I may say so :-)

2. Lychee Strawberry Frozen Yogurt: Now, having become a fan of the Cuisinart® Ice Cream and Frozen Yogurt Maker, I had to make a lychee dessert, naturally...

3. Flaming Lychee Daiquirí : This is entirely D's idea, he enjoys this drink more than me and is a fairly good mixer of drinks!


Chicken Breast in Lychee Chilli Sauce

lychee recipes AFAM blog event lychee sauce flaming lychee daiquiri lychee ice cream


D likes chicken and fish, especially when served with some interesting sauce. Nothing special about the chicken breast: I used a couple of frozen boneless skinless chicken breasts, thawed, brined for 30 minutes and then rubbed with a spice rub made of ground pancha phoron; pan-seared it on both sides in a stainless steel pan and finished off cooking in a 375°F oven till the thickest part registered about 165°F, so that it is fully cooked, yet juicy (about 10-12 minutes).
Non-stick pan does not develop the fond that is great for making such a reduction pan sauce

The sauce, now that was the interesting part for me. After pan-searing the chicken, I made the sauce in the same pan so as not to lose any of the fond at the bottom.

Lychee Chilli Sauce:
2 shallots, diced finely (or red onion, if shallots are not handy)
8-10 canned lychee, drained and minced finely
2-3 fresh lychee, if available, or canned is fine, chopped finely
2 cloves of garlic, finely minced
2 Tbsp fresh grated ginger
1 Tbsp red miso paste
1 Tbsp sambal oelek
6-8 fresh green chilies, chopped
2 Tbsp white vinegar
1 tsp brown sugar (optional)
¼ cup chicken or vegetable stock
4 Tbsp lychee syrup from the canned lychee
1 Tbsp butter
1 tbsp canola oil
I used some green and red kung pao chilies from my garden :-)

In a blender or food processor, combine the lychees (reserving some), miso, sambal oelek, white vinegar and green chilies and grind to a fine smooth paste

Add the oil to the pan in which the chicken breast was pan-seared, then the shallots, grated ginger and garlic, and let the shallots cook a bit; then add the chicken stock to deglaze and then the ground lychee paste from above and let it simmer gently

Add the reserved chopped lychee, brown sugar (if using), stir the butter in and simmer till the sauce is reduced

Adjust salt to taste - miso is salty enough that I didn't need to add any more...

Smother the chicken breast in the lychee chilli sauce and serve warm.

(Am sure this sauce would be good with fish as well...)


Lychee Strawberry Frozen Yogurt

lychee recipes AFAM blog event lychee sauce flaming lychee daiquiri lychee ice cream

Lychee Strawberry Frozen Yogurt recipe is pretty much the same as my Mango-Strawberry Frozen Yogurt recipe, just substitute lychee and lychee syrup in place of mango ;-)


Flaming Lychee Daiquirí

lychee recipes AFAM blog event lychee sauce flaming lychee daiquiri lychee ice cream lychee recipes AFAM blog event lychee sauce flaming lychee daiquiri lychee ice cream

1½ shots Bacardi 151 Rum
1 shot lychee syrup
¼ tsp superfine sugar (optional)

Mix in a shaker filled with ice, strain and pour into a martini glass. Then carefully set it on fire :-)

Blow out the fire after about 15-20 seconds, and enjoy!

(overproof rum is best to get it flaming...)

Labels: , , , , , ,

Dalma: Oriya Cuisine

blog event RCI Regional Cuisine of India Oriya Cuisine recipe vegetarain dalma easy recipe
The only Oriyan dish I learnt to make (and that too am not sure is very authentic) is this Dalma. What attracted me to this dish was its simplicity, nutritive value, but most of all the combination of spices.

The spices here are standard in most Indian kitchen, but, the combination was new to me - I had never combined cumin and fennel until I saw it in this dish.

And, after making this a few times over the years, I started dry roasting the Pancha Phoron spices (Cumin, Mustard, Fennel, Fenugreek, Nigella sativa) in larger batches and grinding them to fine powder and using them to spice many dals and curries and even use as rub on chicken and turkey.

Also, instead of just regular cumin seeds, I use a mix of cumin and black cumin (kala jeera/ shahi jeera) seeds which is a good carminative, and complements the dals well - as dals do tend to cause gas if one is not used to it:-)

The recommended ratio of pancha phoron as tempering and garnish is 4:4:2:2:1. But to make the spice powder, I use equal measures of cumin (jeera), black cumin (kala jeera), mustard (brown or black) and fennel(saunf), half a measure of nigella (kalonji) seeds, quarter measure of fenugreek (methi) seeds, and leave out the chilli seeds as I can add chilli powder and adjust to taste as desired when cooking...

Ingredients
1 cup each of diced green plantain, pumpkin or squash, potatoes
1 cup toor dal
½ cup chana dal
2 Tbsp grated ginger
1 Tbsp minced garlic
1 Tbsp brown sugar (optional)
½ tsp turmeric powder
1 tsp dry roasted and ground ground cumin seeds (i use a combination of black cumin + regular cumin seeds)
Tempering: 1 Tbsp canola oil (or ghee), 2 Tbsp Pancha Phoron spices

Preparation

Cook the dal in a saucepan; meanwhile, also cook the vegetables in another saucepan with a pinch of salt

When the dal and vegetables are mostly cooked, combine them and add the spices - turmeric, ginger, garlic, brown sugar and adjust salt to taste and let it simmer gently

Tempering: In a small pan, heat the oil and add the Pancha Phoron spices, allow the mustard seeds to pop and the rest of the ingredients to crackle and brown, but not burn

Add the tempering to the dal, sprinkle the dry roasted cumin powder and serve warm with hot rice and ghee. (It is probably wonderful with hot rotis as well...)

And this is my post for the RCI: Regional Cuisine of India event started by Lakshmi at Veggie Cuisine, with RCI:Orissa hosted this month by Swapna at Swad

Labels: , , ,

Saturday, August 18, 2007

sautéed garden eggplant

easy recipe home grown garden ichiban eggplant sauté indian vegetarian

Anytime I feel a little under the weather, my favorite comfort food is rasam and rice with some vegetable curry on the side. I had a bit of a stomach flu last week and didn't cook anything much as I couldn't stomach anything much, and a simple pepper-cumin-garlic rasam was all I could stand.

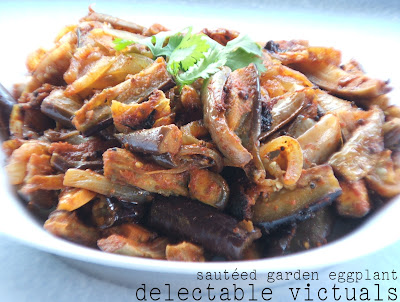
Finally, when I felt strong enough to have some solids, I wanted to have rasam+rice with some vegetable curry. The dozen Ichiban and Neon eggplants we harvested from our garden last week came in handy to make this sautéed eggplant side dish...

Nothing could be simpler, really - this eggplant curry is easy to make, yet tasty.

easy recipe home grown garden ichiban eggplant sauté indian vegetarian

Ingredients:
6 Ichiban eggplants, chopped (or any other favorite variety, adjust quantity as needed)
1 medium yellow onion, sliced thin
salt to taste
1-2 Tbsp cayenne pepper powder or red chili powder (lesser if preferred)
2 Tbsp canola oil
Tempering: 1 tsp mustard seeds, ½ tsp cumin seeds, 5-6 curry leaves (optional)

Preparation

Heat the oil in a pan, when it shimmers add the mustard seeds, when they pop, add the cumin seeds and curry leaves, then the onions; sauté till onions turn translucent; then, add the eggplant, salt, chili powder, toss around a bit, leave on medium high and stir every once in a while till eggplant is cooked and gets a little crispy on the skin.

Serve with hot rice and pepper rasam.


p.s: thanks to Ashaji's comment in another post, I am now aware of the Green Blog Project event (GBP) and this will be an entry for my Summer 2007 GBP event hosted by Deepz.

A few plant facts: The eggplant varieties in the picture are Ichiban and Neon, long fruits - about 6-7 inches long and about 1½ inches wide. This is Zone 5, in Portland Wilamette Valley, with an average of 200+ days of growing season.

We planted it early Summer/late Spring after the frost was gone. We still had some chilly nights, but warmer days, so these survived. It takes about 70 days to harvest, but this seems an early variety so we started getting a few fruits within 8 weeks of planting. Here is some information that helped us decide on when to plant these in our garden.
Eggplant is a cold-sensitive vegetable that requires a long warm season for best yields. The culture of eggplant is similar to that of bell pepper, with transplants being set in the garden after all danger of frost is past. Eggplants are slightly larger plants than peppers and are spaced slightly farther apart. Eggplant requires careful attention for a good harvest. Small-fruited, exotic-colored and ornamental varieties can be grown in containers and used for decorations.

Labels: , , , , ,

Wednesday, August 08, 2007

cooking précisions

Being a food enthusiast, how can I let this pass by unmentioned?

Hervé This (pronounced Tees/Tiss) formulated the delectable chocolat chantilly over a dozen years ago.

Following his Grandes Écoles diploma in physical chemistry, he apparently was intrigued by what he calls "cooking précisions" when
One night, he invited friends to dinner and made a cheese soufflé from a recipe that said to add the egg yolks two at a time. "Because I was a rational man," he says, "I decided to put in all of the yolks together. It was a failure."
He then started testing these "cooking precisions" — rules he gleaned from disparate sources like 19th- century cookbooks, old wives' tales, and the tricks of modern chefs — to see which ones held up (the skin on a suckling pig really does crackle more if you chop off its head right after roasting) and which didn't (a menstruating cook won't ruin mayonnaise).
The standard way to hard-boil eggs in Europe and America—10 minutes in boiling water—is not ideal, says Hervé This. The trouble, he notes clinically, is that 212 degrees Fahrenheit is far higher than the temperature at which the egg whites and the yolks coagulate. Egg whites are made up of protein and water (yolks contain fat as well). As eggs cook, their balled-up proteins uncoil into strands, and the strands bind together to form an intricate mesh that traps water. In essence, the proteins form a gel, a liquid dispersed in a solid. Boiling causes too many egg proteins to bind and form dense meshes, "so there is less sensation of water in the mouth," says This. Voilà: rubbery egg whites and sandy, grayish yolks.

Molecular Gastronomy as a field of study, pioneered by Hervé This, has been around for a while. Especially with my baking fiascos, I started getting very curious about it. I haven't begun to even scratch the surface and already I find it quite fascinating. While my experiments in the kitchen are not so scientific, at least it is helping me pay attention to some "old-wives tales" passed on by my mom :-)

Enough of the rambling... today I just have a very simple yet wholesome recipe I enjoyed making, especially because it is the garden bounty:

Roasted Grape and Cherry Tomatoes


Recipe is very simple. Toss the tomatoes with some olive oil, sliced garlic, some chopped herbs (rosemary, marjoram, basil), some salt and roast it in a 400°F oven for about 8-10 minutes till skin blisters and the aroma is irresistible :-)

Our garden has started fruiting tomatoes in bunches and there was only so much of fresh, sweet, raw cherry and grape tomatoes we can share (and consume), so, I decided to roast some for an afternoon snack. The sample red chili in the picture is a paprika, the long green ones are kung pao chilies, and the light green one is some kind of large wax pepper, plus the yellow pear tomatoes...

Labels: , ,

Tuesday, August 07, 2007

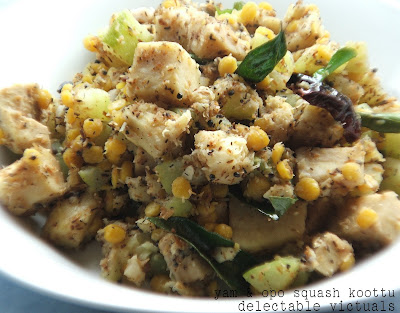
Chaenai Elavan Koottu

easy recipe Yam koottu indian vegetarian
One of my favorite sides when I was little was this Chaenai-Elavan koottu.

Chaenai ('ch' as in chair), aka Elephant foot yam, is a yam that seemed ubiquitous in India, which is not quite the same as the yam sold here. This Chaenai (Suran) has thick dark brown muddy skin, with slightly hard yellowish flesh and is a bugger to clean up and chop. So naturally my mom did not make it often.

Elavan is ash gourd or white pumpkin with spongy/watery white flesh, light green rind and lots of seeds inside. It is about the size of a water melon and is sold in wedges. It is fairly bland and cooks up fast.

I hadn't had this yummy chaenai-elavan koottu in many years until my mom managed to make it last year when I visited India. Imagine my thrill when the other adult came home one day from Indian store with this frozen cleaned-and-par-cooked chaenai!

I *had* to cook up my favorite koottu and share the recipe here - except, I didn't have elavan handy, so, substituted opo squash instead.

easy recipe Yam koottu indian vegetarian

Now, one pot meals like red beans and rice make the best quick and simple meals on weeknights, especially if all the ingredients are handy and all you have to do is come home from work, start it on the pot, go play with the baby as you missed her all day, and in about 20-30 minutes yummy dinner is served!

What feels even better is presenting a typical homely comfort meal with a couple of dishes that complement each other and be able to cook and serve them in about 20-30 minutes.

A few short-cuts that I try to remember for Indian recipes:
  • cook larger batch of toor dal/moong dal/chana dal and store 2 or 3 cup portions (for a family of 2 adults) in the freezer; so, when ready to cook, just thaw the small 3-cup-frozen-batch and cook it up as desired
  • when making paruppusili, soak and steam a largish batch of toor dal balls, freeze the unused portion, again in small batches; thaw the frozen steamed lentil balls in the microwave for a quick approach, or leave it in the fridge overnight, and cook it up with favorite vegetable
  • when making ground masala at home, make a larger batch and store the extra - like for arachu vitta sambar, I make a larger batch of the ground paste and freeze it; or, if it is powdered spices, even better, simply store it in air tight container

Why am going on and on about this? Well, I came across Mallugirl's Summer Express Cooking Event and thought I must dedicate a post for it since Quick and Easy yet Delectable Victuals are what this blog is all about (at least most of the time).

The menu is yam koottu served with pepper-garlic rasam and plain hot rice.

Ingredients:

1 packet frozen yam (chaenai/suran)
½ medium opo squash
2/3 cup chana dal
For rasam spices: 1 Tbsp whole black pepper, 1 tsp cumin seeds, 6-8 garlic cloves
1 tsp tamarind paste
4 Tbsp brown sugar (some for rasam, some for the koottu)
½ cup grated coconut
salt to taste
a few tsp canola oil
2 Tbsp coconut oil (optional)
For tempering: 1 tsp oil (canola or coconut), 1 tsp mustard seeds, curry leaves

And this simple menu can be cooked and served in under 30 minutes with a little bit of multi-tasking: (Ready? Set the timer to 30 minutes and Go!)
  • Start the rice in a rice cooker.

  • Set the microwave timer and thaw the frozen chaenai/suran a.k.a yam in the microwave.

  • Add ½ to 2/3rd cup of chana dal to about 2 cups of water in a pan and allow the dal to cook in the back burner.

  • Meanwhile, in a mortar and pestle, add a tsp of cumin seeds, a tablespoon of whole black pepper and 6-8 cloves of garlic and pound it to a nice powdery paste.

  • Chop up a few tomatoes for the rasam.

  • Heat 1 tsp of oil in a pot in the back burner, add the pounded paste and the tomatoes, 4-5 cups of water, some salt, tamarind paste, 1 Tbsp brown sugar and leave it on medium-low to come to a boil and simmer gently.

  • Chop up elavan a.k.a white pumpkin/ash gourd or opo squash.

  • Heat 1 tsp oil in a pan, add the opo squash, some salt and water and start cooking; part-way through, add the thawed yam pieces and 3 Tbsp brown sugar - these frozen yam pieces are par cooked so they don't need to cook for long to be done - and allow them to cook through.

  • (By now, the timer should be close to 18-20 minutes if you work at a fairly normal-to-brisk pace)

  • The chana dal should be cooked through but not mushy by now; drain it and add it to the yam and opo squash cooking in the pan. Stir well and adjust salt to taste. leave it on low heat.

  • Right about now, rasam should be done as well - the rawness should be gone, and it should have reduced a bit - taste and adjust salt. Off heat.

  • Tempering: In a small pan heat 1 Tbsp oil, when it shimmers, add the mustard seeds and when they begin to pop add the curry leaves (if handy), remove from heat and garnish the rasam and koottu with the tempering.

  • Then, in the same small pan, add the coconut oil and the grated coconut, toast the coconut till it is golden brown and aromatic, don't let it burn; off heat.

  • Garnish the koottu with this toasted coconut.

By now the rice should be done and the timer close to going "beep" - just in time to serve the yummy wholesome meal!

Enjoy!

Labels: , , ,

Monday, August 06, 2007

Eggplant and Summer Squash

easy recipe home grown garden eggplant and summer squash asian

Ichiban and Neon eggplants in the garden are fruiting about half-a-dozen or so every few days and am frantically trying to use them up. If the sun decides to blaze down this weekend, I would like to slice and dry some of them and make what are called "vatthal" in Tamil - sun dried anything is a vatthal,I believe - and eggplant vatthal would make a wonderful vatthal kuzhambu, I am sure... we'll see... it has been quite cloudy and mild here for the last several days.

Meanwhile, I decided to use the current yield and make a favorite: Eggplant in Miso Sauce. This recipe is pretty much the same as my older recipe, but, I used home grown summer squash in addition to eggplant. Also, this time I made a little more sauce so it doesn't just coat the vegetables lightly, but, sort of lets the vegetables float in it :-)

Eggplant recipes happen to dominate my recipe index... possibly because I have a variety of eggplant handy in my backyard, I suppose...

Labels: , , , ,

Sunday, August 05, 2007

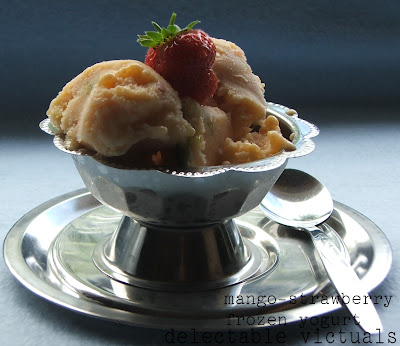
mango-strawberrry frozen yogurt

easy recipe home-made healthy low-fat frozen yogurt mango strawberry
The Cuisinart® Ice Cream and Frozen Yogurt maker is quite a handy apparatus. Especially now that warmer days are here, I try to make small batches of wholesome "healthy" stuff with it. That's how this mango-strawberry frozen yogurt happened.

I had 2 ripe juicy mangoes to be used up. (I was sick, else mangoes would not have had a chance to sit for long and wait to be used up). We had some non-fat strawberry yogurt handy. It takes about 20 minutes to get it ready using the super-duper Cuisinart® frozen yogurt maker. The basic recipe came with the book, I just improvised a bit.

easy recipe home-made healthy low-fat frozen yogurt mango strawberryIngredients:
½ cup 2% milk
¼ cup sugar
2 cups strawberry yogurt
2 ripe mangoes, pulp only

Throw them all together in the machine and let it go for 20 minutes and voila! yummy guilt-free health-friendly frozen yogurt is ready. This makes about eight ½ cup servings (but who has ½ cup servings at a time, right?)

Ordinarily, I wouldn't dream of pairing two strong flavors like strawberry and mango, but, this time, I wanted to make mango flavored dessert, and the recipe called for yogurt but we only had strawberry yogurt... and what a wonderful stroke of serendipity that was!

Plus, our little strawberry patch in the backyard is yielding alright, and I managed to throw in a few fresh strawberries as well, and, save one for garnish for the picture!
strawberries


Fortunately Ana doesn't know the difference between full fat rich ice cream and this leaner version of frozen yogurt. She loved this mango strawberry frozen yogurt and I had to ration it to make sure she doesn't overindulge.

The mango was the stronger of the flavors we could taste right away, and it didn't clash with the pleasant strawberry at all. All in all a good experimental flavor that I would certainly repeat, hopefully soon...

Labels: ,

Friday, August 03, 2007

zucchini eggplant parmesan

eggplant parmesan-1

This is the "diet" version of my Eggplant Parmesan recipe. I like it because it is easy to throw together on a weeknight and is filling, yet not heavy.

Ingredients
¼ cup fresh grated Parmesan
2 cups bread crumbs with herbs and any other flavoring of choice
2 eggs well-beaten, handy in a shallow dish
few Tbsp canola oil as needed
1 medium globe eggplant
1 large zucchini
salt to taste
1 cup grated part-skim, low-fat mozzarella
store-bought or home-made tomato sauce
some grated Parmesan for garnish

Preparation

Slice the eggplant and zucchini, salt them and let them sit for about 5-8 minutes, then drain and pat dry really well.

Combine the grated Parmesan cheese and bread crumbs and keep handy in a shallow dish; keep the beaten eggs handy in another shallow dish

Heat a non-stick griddle or skillet to medium heat; heat oven to 350°F; lightly grease a casserole or oven-safe dish and keep handy

Dip the eggplant/zucchini slices in egg first and then in bread crumbs; press to coat well and place on the hot pan, in batches; cook both sides till golden brown and the vegetables are cooked through, add a few teaspoon of oil at a time as needed

When all eggplant and zucchini are pan-fried as above, in the prepared oven-safe dish assemble the layers: eggplant/zucchini slices, tomato sauce, cheese; bake in the 350°F oven for about 10-15 minutes till cheese melts, the sauce bubbles and the dish comes together

Serve warm with extra tomato sauce and garnish with grated Parmesan cheese if desired.

eggplant-parmesan-2

Labels: , ,

Newer›  ‹Older